Showing posts with label secret. Show all posts
Showing posts with label secret. Show all posts
Sunday, April 9, 2017
The Windows Secret And Hidden Send To Menu Items
The Windows Secret And Hidden Send To Menu Items

Using windows operating system equipped PCs and Laptops is something we are all familiar with it and apparently we all seem relaxed and happy with the clicks we make whenever we are editing a file, clicking on a link, or pinning an icon to the task bar. But it will be more interesting and easier if we knew all the tips and tricks to do all of those tasks in a simpler ways i.e. using shortcuts and hotkeys.
And today we will go deep on the windows built in functions specially the handy ones and weÕll explore something odd and interesting about the Òsend toÓ function. Hopefully we are all familiar about the concept and how it works but what I am going to show you is how to access the secret Òsend toÓ menu items.
Well this may be little bit confusing because you already knew that the Òsend toÓ function is handy whenever you right-click on a folder, file, or icon on the desktop but what are the secret menu items I am talking about. Just follow the below steps and you will get idea instantly.
- Hold down the ÒSHIFTÓ key on your keyboard and right-click on any file or folder on your Desktop.
- Definitely on a moment a menu will popup, which contains a lot of menu items, donÕt get impressed because it may look like the actual menu youve usually seen but itÕs not; you are almost there to explore the hidden and the secret Òsend toÓ menu items just keep holding the ÒSHIFTÓ key and click on the Òsend toÓ menu item.
- Now you will see a plenty of new options which gives you some secret great options like the one in figure 0.1. Some of the secret send to menu items are Mail Recipient, Fax Recipient, Bluetooth Device option if you have installed any. And some other useful menu items which you can directly send to that specific document or folder to any place you want.
 |
| Figure 0.1 |
Hopefully and successfully youve seen a variety of secret and hidden options under the Òsend toÓ menu, but give another glance to the popup menu youÕll see that whenever you right-click on a file or folder while holding down the ÒSHIFTÓ key the menu items will show up are tremendously useful than ever and they are more than enough, so keep in mind with the help of ÒSHIFTÓ key we explored the hidden and the secret send to menu items and some other useful things as well. And that is the beauty of using the hot-keys and sticky-keys.
Final note: if youve already knew the trick I have just demonstrated, 95% of the regular windows users donÔt aware of it, so participate spreading the word and share it with your friends and loved ones.
Go to link Download

Tuesday, January 31, 2017
How to Protect Your Secret Files From Others
How to Protect Your Secret Files From Others

How are you? Hope you are very well. Everyone have some privacy, have some secret files or important files or documents. We donÕt want to share them with anyone. So we need to protect that files/documents. For this reason we search a powerful software which can protect our secret files.
Today I am going to show you how to protect your documents by protecting your hard drive, without any third-party software. For this procedure you must install windows 7/8 or 8.1.
Anyway if you want to protect your files by protecting your hard drive, please follow my bellow procedures.
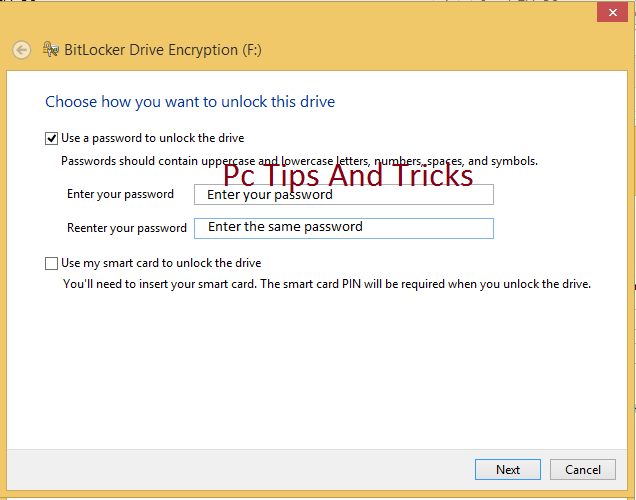
Double click on my computer--> Right click on any drive (Which one you want to protect) --> Click Turn on BitLocker --> Now will open a new window which name is BitLocker Drive Encryption. Check on Use a password to unlock the drive--> now enter your password in the Enter your password box and conform your password in the Reenter your passwordbox. Now this window give you three options.
- Save to your Microsoft account.
- Save to a file.
- Print the recovery key.
Personally I chose Save to a file. Click Save to a file and save this file where you want to save. In feature this file will help you if you forget your BitLocker password. Click Save and click Yes. Click Next and Next. Now click Start Encrypting. Now will start BitLocker Drive Encryption. This process take some times, wait until it finished. After finishing this process your job is done.
Now enjoy yourself ÉÉÉÉÉ
Video Of This Tutorial:
Video Of This Tutorial:
If you like this article and if you think this tricks is helpful, please share this with your friends or share any social media.
Thanks to all of my friends,
Md. Manjurul Islam (Rubel)
You may like also....
How To Install Microsoft .NET Framework On Windows 7
How To Enable .Net Framework On Windows 8/8.1
You may like also....
How To Install Microsoft .NET Framework On Windows 7
How To Enable .Net Framework On Windows 8/8.1
How To Create Password On Windows 8.1
How to backup/Import Microsoft Outlook Mail
Go to link Download
Saturday, November 5, 2016
Secret Disk 3 06
Secret Disk 3 06
Secret Disk creeaz? un disc separat pe PC, pentru fi?ierele private, care pot fi blocate ?i deblocate cu o parol? ”n decurs de o secund?. Mai mult dec‰t at‰t, atunci c‰nd acesta este blocat devine invizibil ”n sistemul Windows. ëntre timp, acest disc poate fi utilizat ca orice disc de obicei.

Trebuie doar s? instala?i Secret Disk ?i alege?i o parol?. Apoi, ”ncepe Secret Disk. Dup? introgucerea parolei la pornire, face?i clic pe butonul de deblocare, marcat ”n chenarul ro?u din imaginea de sus, ve?i vedea un nou disc: Z Disk (va apare ?i ”n My Computer) pe care ”l denumi?i ?i ”l pute?i deschide cu un clic pe ÓOpen diskÓ.


Pagina web
Descarca
Go to link Download
Subscribe to:
Posts (Atom)