Showing posts with label from. Show all posts
Showing posts with label from. Show all posts
Sunday, April 23, 2017
How to Recover Files from Broken Toshiba External Hard Drive
How to Recover Files from Broken Toshiba External Hard Drive
Toshiba hard drive has become broken suddenly without any warning. Unfortunately, precious files on it lost at the same time. So terrible it is. Is there any way effective for Toshiba external hard drive file recovery?
Believe many people would think of backup. Surely restoring from backup is the most effective and safe way to get back Toshiba hard drive lost files. However, this way requires a previous backup for broken Toshiba external hard drive and the backup has to be saved on another location. But not everyone could backup hard drive data and save it safely. Therefore, looking for another way or tool to recover files from Toshiba external hard driveis an urgent thing. Now, Data Genius can give a help.
Recover Files from Broken Toshiba External Hard Drive with Data Recovery Tool
Data Genius is a free data recovery tool, which can solve several data loss issues because of various reasons, such as careless deletion, hard drive format and partition, hard drive virus attacked. When Toshiba external hard drive is broken, we have to make sure the there is a computer accessible; otherwise we canÕt recover lost files from Toshiba external hard drive.
Step 1: Download Data Genius and install it on your computer. Then run it.
When Data Genius can be installed and run on Toshiba computer, it means there would be no problem to Toshiba external hard drive data recovery.
Step 2: Select data recovery type from provided four data recovery options. If you are not sure, select Deleted Recovery.

Step 3: Choose external hard drive and scan. You will see the scan process and until it is finished, lost files will be listed in the window.

Step 3: Choose external hard drive and scan. You will see the scan process and until it is finished, lost files will be listed in the window.
Step 4: Select files to preview and make sure whether recovering them. Or if you think all of them need to be recovered, check them all and click Recover button to choose a folder to save recovered Toshiba files on another external hard drive or compute hard drive.

Tips:
If external hard drive is broken, it is necessary to save recovered data on another hard drive or external hard drive. So before recovering Toshiba hard drive files, please get an external hard drive, such as Toshiba external hard drive.
Step 5: Now believe you have gotten a message "Recovery is finished". Click OK and you can see the lost Toshiba hard drive files.
Related Articles:
Related Articles:
- Recover Data from a Damaged Seagate External Hard Drive
- Western Digital External Hard Drive Lost Data Recovery
- SanDisk USB Flash Drive Data Recovery with Three Tools after Deletion
Go to link Download
Thursday, April 13, 2017
Recover Data from a Damaged Seagate External Hard Drive
Recover Data from a Damaged Seagate External Hard Drive
I just found that data has been lost after transferring data from Seagate external hard drive to computer. And now Seagate external hard drive seems to be damaged. It has become inaccessible.
If you are in such situation and in search to find how to recover data from damaged Seagate external hard drive, it is important to clarify why data lost after transaction.
Technical Errors: Sometimes, lots of data always lose after we accidently delete or copy, but not paste them at right location.
Hard Disk Errors: Seagate external hard drive has been used for a long time. And now it becomes broken, so data lost.
Software Errors: When transferring data from external hard drive to computer, Seagate external hard drive is attacked by virus software on computer.
No matter which reason, Seagate external hard drive damaged is inevitable now. But donÕt panic. There is still chance to recover Seagate external hard drive data, as long as the external hard drive has not been written with new data.
How to recover Seagate external hard drive lost data?
Data Genius is a powerful and free Seagate hard drive data recovery tool, no matter hard drive is formatted, virus-attacked, partition or any other reasons.

Steps for data recovery from Seagate damaged external hard drive:
- Connect damaged Seagate external hard drive to accessible computer.
- Download and install iSunshare Data Genius on this computer.
- Run data recovery tool and choose data recovery option. If you are not sure, choose Deleted Recovery. Click Next.
- Choose external hard drive and click Scan button.
- When hard drive scan process completes, lost data or files can be seen in the left pane of Data Genius new window.
You can select the files and preview them in the right pane to see whether they are the lost data you want to recover from damaged Seagate external hard drive. - Check files you are sure to recover and click Recover button.
- At the following pop-up window, choose a location on computer to save recovered data.
- Until "Recovery is finished" message appears, lost data is recovered successfully from Seagate external hard drive. Click OK and you will turn to the recovered data.
- How to Find Lost File in Windows 7 Laptop
- How to Retrieve Important Data after Deleted or Lost Accidently
- How to Retrieve Music/Movies/Photos Deleted from Mobile SD Card
- Western Digital External Hard Drive Lost Data Recovery
Go to link Download
Wednesday, April 12, 2017
How to Exit Recovery Mode Easily without Data Loss from iPhone iPad iPod
How to Exit Recovery Mode Easily without Data Loss from iPhone iPad iPod
"I clicked Restore button in iTunes carelessly, and my iOS device has been in recovery mode now. But thatÕs not what I want. Apps, connections, or data saved on device will be lost or deleted. How can I do?"
If you have just created a backup before operation error, you can restore device from previous backup after exiting recovery mode. There will not be so much data lost. However, if there is no backup, or the backup has been created a long time ago, how should you do?
Can device exit recovery mode instantly without any data lost when iPhone/iPad/iPad just enters recovery mode? If there is one effective way or tool, that would be perfect.
And now I would tell you such a tool, which can easily get iOS device out of recovery mode instantly. iOSBoot Genius will be introduced in following passage about how to exit recovery mode.
Step 1: Download and install iOSBoot Genius in your computer.
Step 2: Connect device to computer or make sure device connected to computer.
Step 3: Run iOSBoot Genius, and it prompt you that device has been connected, and "Exit Recovery Mode" button is bright.

Step 4: Click "Exit Recovery Mode" button.
You will see USB cable and iTunes logo appearing in device screen. And iOS device will be out of recovery mode soon. During the process of recovery mode existence, you donÕt need to worry about data loss or damage. So if you want device to be out of recovery mode safely without any loss, just need to install and run iOSBoot Genius on computer to help put iPhone/iPad/iPod out of recovery mode.
Tips: It is worth to mention that iOSBoot Genius also can help iPhone/iPad/iPod enter recovery mode. So if there is another reason that leads to failed access recovery mode with device menu or iTunes, iOSBoot Genius can do that successfully.
Related Articles:
- How to Change iTunes Forgotten Backup Password without Data Loss
- How to Factory Reset iPad with or without iTunes
- How to Unlock Locked iPad/iPhone/iPod after Passcode Forgot
- How to Unlock iOS Device If Forgot Passcode
Go to link Download
Friday, April 7, 2017
How To Block A WebSite From TP Link Router
How To Block A WebSite From TP Link Router

How To Block A Web Site From TP Link Router
Hello friend!
How are you? Hope you are very well. Every company has some employee whom browse some websites out of companies work and that companies top management donÕt want that types of employee. If you are in a renewed biggest companies, IT officer you need to block that website which sites are not good for your company.
Today I am going to show you how to block a specific website from your TP Link router. If you donÕt know how to do this, please follow my bellow procedures.
At first open your browser then type in the address bar Òtplinklogin.netÓ then press Enter.
Now browser ask you for the user name and password.
Please enter the user name and password. The default user name and password is ÒadminÓ.
From the left side click on Access Control.
Click on Target.
From the right side click on Add New
From the ModeOption select Domain.
In the Target Description box write something about that website which one you want to block [Example: YouTube].
In the Domain Name Box write domain name [Example: www.youtube.com].
Now click Save.
From the left side click DHCP.
Copy IP Address from the Start IP Address and End IP Address.
Now click again on Access Control -> Host.
Click on Add New.
Make sure Modeoption selected is IP Address.
In the Host Description write description about blocking site [Example: YouTube].
There are two box in the LAN IP Address, first box for Start IP Address and second box for End IP Address. Now past your copied IP address and Save.
From the left side click on Rule.
Click on Add New.
Enter the rule name [Example: YouTube]
From the Hostand Targetselect YouTube.
Click Saveand check mark on Enable Internet Access Control and Save again.
Your job done. From now you canÕt access YouTube from your network.
Thanks to all of my friends,
Md. Manjurul Islam (Rubel)
Video Of This Tutorial:
You May Like Also.....
How To Enable Save Mode On Windows 10
Windows 10 Run Command
Create A System Restore Point In XP
(Offline) How To Install .Net Framework 3.5 On Windows 8/8.1/10
Go to link Download
Sunday, April 2, 2017
Solved How To Find A Computer Hard Disk Serial Number From Windows
Solved How To Find A Computer Hard Disk Serial Number From Windows
How To Find A Computer Hard Disk Serial Number From Windows?
 How To Find A Computer Hard Disk Serial Number From Windows?") Hello! How are you? Hope you are very well. It is very difficult to see your laptop or desktop hard drive serial number. Because of if you want to see the HDD serial number you need to open your laptop or desktop back cover.
Hello! How are you? Hope you are very well. It is very difficult to see your laptop or desktop hard drive serial number. Because of if you want to see the HDD serial number you need to open your laptop or desktop back cover. What do you think if you get your hard disk serial number from windows without opening the back cover. Yes, today I am going to show you how to see your HDD serial number from your running windows. Please follow my bellow proceduresÉ.
- At first you need to open the Command Prompt (CMD)
- Now write in the Òwmic diskdrive get serialnumberÓ
- Press Enter
- After pressing Enter you will see your computerÕs HDD serial number.
- Job done
Thanks to all of my friends. If you like this please share with your friends.
Md. Manjurul Islam (Rubel)
Video Of This Tricks.
Go to link Download
Tuesday, March 21, 2017
H Data Recovery Master Get Back Deleted Photos SMS Music Videos App from LG phone
H Data Recovery Master Get Back Deleted Photos SMS Music Videos App from LG phone

Data loss from LG Phone for acidental formatting of LG smart phone card when is connected to computer? Unintentional deletion of picture files from your LG smartphone? If you delete the data by accident. In this moment, you need LG Data Recovery to help recover your LG deleted Photos/SMS/Music/Videos, etc.
H-Data Recovery Master can restore photos from LG phone only in a couple of mouse clicks. It is a powerful recovery program to recover deleted pictures, videos and audio files from LG cell phones. So, if you had accidentally deleted picture files from your LG Android phone or lost them due to some unknown reason, do not be worried! Just make use of LG picture recovery software and within few clicks recover pictures from LG phone. (View H-Data Recovery Master)
This recovery is designed to get pictures off LG phones. Including picture files this tool even recovers all your lost / deleted audio, applications (.apk), video clips, texts and many other files. Apart from retrieving pictures from LG phone, it even helps the user to recover data from other popular Android manufacturer brands such as Samsung, Sony, Acer,HTC, Micromax, Dell, Motorola etc.
You can download this LG Recovery tool on to your computer and then follow the steps given below to recover the lost files on to your LG G2/G3/G4.
(Windows 8.1, Windows 8, Windows 7, Windows Vista, Windows XP, Windows 2000 supported)

Step by Step to retrieve deleted Photos/SMS/Music/Videos/App from LG phone
1.STEP 1: Connect your LG G Flex 2 with your Windows computer. All the recovery steps are basically on performing to use your LG G Flex 2 as a USB drive. Then launch the software and click the proper module in the primary window as follow. Run this data recovery for SD card.
STEP 2: Highlight the drive which your deleted files originally located and then click Next button, now the program will start to scan the partition for the deleted files and folders. After the scanning, there would be a list of partitions. Then there will be a lot of found files shown on the panel.

STEP 3: Preview the found files. Then click the button Recover to get them fully recovered.

view LG Android File Recovery on Softonic.
View more posts:
Back Up and Restore Deleted Data from LG G Flex 2 Android Smartphone
How to Find and Recover Deleted Photo, Video Files from LG G4
Free Download - Samsung Galaxy S6 Data Backup and Recovery Solutiton
How to Get Back Deleted Text Messages from Samsung Galaxy A7
Simple Steps to Recover Deleted Lost Formatted Data on HTC One M9
Go to link Download
Monday, March 20, 2017
How to upgrade to windows 7 or windows 8 from windows XP
How to upgrade to windows 7 or windows 8 from windows XP
Hello everybody !
Today, I am very happy to tell to everybody an important problem about windows xp - the most popular operating system in the world. But that is changing to windows 7 and windows 8. So upgrading to windows 7 and windows 8 is very important.
I will give you the instruction to do this step by step: Firstly, upgrade to windows 7.

Step 1 : Make sure that your programs and devices will work with Windows 7

Download and install Windows 7 Upgrade Advisor
Follow the steps below to download the Windows 7 Upgrade Advisor.
1. Go to My project to download Windows 7 Upgrade Advisor
2. Click Download the Windows 7 Upgrade Advisor which is compatible with your computer (32bit or 64bit).
3. Click Download, and then save the installation file to your PC.
4. Double-click the installation file saved to your PC.
If youre asked to install .NET 2.0
Windows 7 Upgrade Advisor requires .NET Framework 2.0. If your computer doesnt have it installed, follow these steps. If youre not asked to install .NET 2.0, you can skip this and proceed to step 5.
1. Click Yes.
2. Click Next.
3. If you agree to the license terms, click Install.
4. Click Finish.
5. If you agree to the license terms, click Install.
6. Click Close.
If you see a pre-selected check box, clicking Close will run Windows 7 Upgrade Advisor.
Run Windows 7 Upgrade Advisor
1. If Windows 7 Upgrade Advisor isnt already running, double-click the Windows 7 Upgrade
Advisor shortcut on your PCs desktop.
2. In the security warning dialog box, click Yes.
3. Click Start check. The Windows 7 Upgrade Advisor will scan your PCs hardware, devices, and installed software. This might take a few minutes. When finished, it will provide you with a compatibility report that you can print or save for your reference.
4. Read the report carefully, and make note of any issues that the Upgrade Advisor finds and what the recommended steps are to fix these issues.
5. If you want to save the report and print or refer to it later, click Save Report, type a name in the File Name box, and then click Save.
6. Click Close.
You can scan your PC more than once. We recommend running the Windows 7 Upgrade Advisor again after taking any of the recommended steps or making any changes to your PCs hardware, devices, or installed software before upgrading to Windows 7. Be sure to save your updated report.
Step 2: Moving files and settings, and gatheringyour program discs
I think you should use Windows Easy Transfer, a free download, to help you move your files and settings to another location before you install Windows 7. Then, you can use Windows Easy Transfer again to move your files and settings back to your PC after Windows installation is completed.
If you dont use Windows Easy Transfer, youll need to copy your files manually to an external location, such as CDs, DVDs, an external hard disk, or a USB flash drive before installing Windows 7, and then move them back after Windows installation is completed.
Download and install Windows Easy Transfer
1. Download Windows Easy Transfer from the My project. If youre running a 32-bit version of Windows XP, under For Windows XP, click Download 32-bit. If youre running a 64-bit version of Windows XP, click Download 64-bit.
2. On the Microsoft Download Center webpage, click Download, and then click Run.
3. In the Security Warning dialog box, click Run.
4. In the Software Update Installation Wizard, click Next.
5. If you agree to the license terms, select I Agree, and then click Next.
6. After installation is complete, click Finish.
Open and run Windows Easy Transfer to save your files and settings
1. Make sure your external hard disk or other storage device is connected to your computer.
2. Click Start, click All Programs, and then click Windows Easy Transfer for Windows 7.
3. Click Next.
4. Select An external hard disk or USB flash drive.
5. Click This is my old computer, and then wait while Windows Easy Transfer scans the computer.
6. Clear the check boxes next to any user accounts that you dont want to transfer data from, and then click Next.
7. Enter and retype a password, and then write it down and keep it in a safe place; or leave the boxes blank, and then click Save.
8. Browse to the external hard disk or other storage device where you want to save your Easy
Transfer file, and then click Save.
Step 3: Install Windows 7 directly on windows xp partition (C partition) with Custom option.
You can see Step 1, 2, 3 with instruction video below:
Step 4: Moving your files and settings back to your computer using windows easy transfer.
Click the Start button and type to search windows easy transfer and click transfer.
You can see video below:
You can see video below:
Go to link Download
Read more »
Sunday, February 26, 2017
What Errors Lead to Access Data Import from Excel or Export Failure
What Errors Lead to Access Data Import from Excel or Export Failure
 Even though data transfer between Access and Excel is usual now, errors are still occurring during data import or export. If you have tried to import data into Access from Excel or export data from Access database, believe you can understand it.
Now the following are some errors probably you would encounter during Access data import or export. Hope the solutions can give you a hand when you really meet Access import or export errors.
Error 1: Excel XLS cell data is over maximum limits
- Import Error: The wizard is unable to access information in the file <filename>. Please check that the file exists and is in correct format.
- Export Error: External table is not in the expected format.
This is an error during Access import/export to Excel XLS. Actually, the reason is that the Excel XLS file has cells containing more than 8224 bytes of data.
So, how to correct errors if you still want to import data from excel xls to Access or export data from Access to excel xls?
1. Use the *.xlsx format instead of *.xls.
2. Restrict any memo/long text fields to a length less than 8224 bytes.
3. When exporting, delete the existing .xls file before performing the export using the same file name.
4. Open the .xls file in Excel before performing the import/export from Access.
Error 2: Imported Excel file field is out of range
When I try to import data into a table of Access database, I am getting "Field "F42" Doesnt Exist in Destination Table" error. I have a "client lists" table, and I am trying to add additional records to it.
If you see this error, it is because your excel file field is out of range and the extra fields cannot be imported into Access database table.
Now you would have to give up something, so you can import Excel data into Access successfully. Here are some suggestions for you.
Solution 1: Go to Excel file and hit Ctrl + End to see whether it is much further than you expect. If it is, delete all extra rows and columns, save, and try again.
Solution 2: Name the range in Excel that you wish to import into Access. Then, as you are importing the file into Access, you can elect to import that named range instead of the whole sheet. That should ensure that you are only going to import what you want.
Solution 3: Delete all the extra columns and a lone variable in a distant cell. Then you can import data into Access.
Error 3: Too much rows are in Excel spreadsheet
When you are using Access data import wizard to import data from Excel spreadsheet, you receive this prompting message:
Not all of your data was successfully imported into Access. Errors descriptions with associated row numbers of bad records can be found in the Microsoft Access table <>.
Actually, this is far from unique. When you open ImportErrors table, you would find it is Type Conversion Failure. When Access scans the data in spreadsheet, row value in spreadsheet cannot be confirmed.
Whether we can make row value verified correctly? The answer is surely yes.
Because the value is stored in registry, so it can be easily changed. Then it can be confirmed when import spreadsheet into Access.
Now see how to change the registry key?
1. In Windows desktop computer or laptop, click Start and type regedit in search or Run box. Press Enter to display Registry Editor.
2. In the registry tree, select HKEY_LOCAL_MACHINE - Software - Microsoft - Office - 15.0* - Access Connectivity Engine - Engines.
Or if your Access is not the latest version, you would not navigate to HKEY_LOCAL_MACHINE - Software - Microsoft - Office - 15.0*, it would probably be Office - 14.

3. Double-click the Excel node.
4. In the right panel, double-click the TypeGuessRowsentry.
5. Change the value data to be 0.
6. Click OK.
7. Select File -Exit to exit the Registry Editor window.
After setting the registry key to 0, Access will now scan the entire spreadsheet. This registry change works effectively especially when you frequently import huge spreadsheets into Access databases. But not all of spreadsheet row value should be changed. You can obviously set this value to whatever number of rows makes sense for you.
Tips:
When importing data into an MS Access database, sometimes there are errors in the formatting of the data source. When this happens, MS Access will put the offending row into a separate table. In Access 2010, the file is called <name of import file>_ImportErrors. For example, importing try.txt, it would give try_ImportErrors.
Related Articles:
- How to Import Existing Access or SQL Database into Access
- How to Import External Data into Access 2013 App or Desktop Database
- 3 Ways to Create Access 2007-2013 Database
- How to Backup Access Database and Restore Data or Objects
Go to link Download
Saturday, February 18, 2017
Tips help recovering deleted files from Windows hard drive
Tips help recovering deleted files from Windows hard drive
If youÕve accidentally deleted a file on PC and need to get it back, belows are 2 golden tips
1. You Should Stop Use the Hard Drive Immediately after Data Loss
The file deleted is recoverable. When you delete files the data itself isnt deleted, just the index entry that tells the system where the data for those files is located. The area containing the deleted data is also now marked as free space so it is available for any new files to be written there instead. If and when that happens, then it is too late to recover your deleted files. So it is very, very important to not save any new files or data to the device concerned.
2. Perform Deleted File Fecovery As Soon As Possible
As Windows continues to write files to your hard drive, the chances of it overwriting the deleted files increases. If you deleted a file on year ago, you may lost the chance to retrieve the deleted things. But if you just deleted files an hour ago, even you "shift+delete" the file, you still have high chance to get back them with Windows hard drive data recovery . If you want to be sure you can recover most of lost files, you should perform a recovery immediately.
How-to: Deleted file recoverying from a Crashed Hard Drive in 3 Steps
1. Connect the Drive to Another Computer
If the hard drive crash, you will need to remove it from the current machine and connect it to another machine as a secondary drive. You can connect the drive to another desktop computer internally as a secondary drive. If you do, make sure that the machine detects the drive in the BIOS or you wonÕt be able to access it.
Try to Copy the Data to Another Drive
Recovering deleted data via copying the data to another drive. The reason is you can copy data off that you would like to recover for there is a chance that only the operating system is corrupt and the user data is still fine. After you connect the hard drive to another computer either internally or with the USB adapter, you can check to make sure if you can browse the contents stored on the drive.
Download Deleted File Recovery Software
If you canÕt manually copy the user data off then you can try to recover it using data recovery software. Whatever you do, do not install the recovery software on to the drive that you are trying to recover data from. Doing so could actually overwrite files that you want to restore.
The best way for recovering deleted files from a hard drive is powering the computer down immediately after the file is deleted, inserting the hard drive into another computer, and using an operating system running on another hard drive to recover it. If you try to recover a file by installing a file-recovery program on the same hard drive, the installation process and normal use of the hard drive can overwrite the file.
view guide: How to recover deleted files from hard drive with full recovery
Vist more posts:
Recover data from Windows 8 Laptop HDD-rescue files from failed/dead hard drive
Recover Invisible Pictures From Seagate 500GB External Hard Drive
Quick or complete format recovery on Windows hard drive partition
100% Data Recovery to get Erased/deleted files from Windows 8.1 hard drive
Go to link Download
Sunday, February 12, 2017
Video Streaming from PC to Android Phone
Video Streaming from PC to Android Phone
Steps to Stream Videos From Computer to Android
Step 1: Make sure both your computer and droid is connected to the same Wi-Fi network and thendownload and install Emit App on your Android and the Emit server on your computer. The Emit app is available for Windows, Mac and Linux.Step 2: Run the Emit server on your computer and check Server Running option to start Emit. Click on the Add Dir button to add the folders that contain your video you want to stream on your Android. If you want to share your iTunes Library, check the corresponding option.
Step 3: Take a note of the local Wi-Fi IP address you are connected to. The easiest way to know your computerÕs local IP address is using the ipconfig command on the command prompt.
Step 4: Now launch the Emit app on your Android device. If you are lucky, the app will be able to add your computer as a server automatically but if that doesnÕt happen, press your phoneÕs setting soft key and select Add Server to do the task manually. Further select Local Server and enter your computerÕs Wi-Fi address. The name of the computer can be any alias that will help you remember which computer you are connecting to. This helps when you have servers running on more than one computer.
Step 5: Once you are connected to your computer, the app will list all the folders that are shared by the server. Now just navigate to your video and touch it to play.
The videos will play like itÕs playing from your SD card but when you try to forward or rewind the video you may encounter some delay(for buffering). If you are using the ad-supported version, you can see some ads in the menu and on videos but if you like the app you may go for the pro version and enjoy your videos ads-free.
Emit application Download
Emit server : Download
Go to link Download
Tuesday, January 31, 2017
How to Protect Your Secret Files From Others
How to Protect Your Secret Files From Others

How are you? Hope you are very well. Everyone have some privacy, have some secret files or important files or documents. We donÕt want to share them with anyone. So we need to protect that files/documents. For this reason we search a powerful software which can protect our secret files.
Today I am going to show you how to protect your documents by protecting your hard drive, without any third-party software. For this procedure you must install windows 7/8 or 8.1.
Anyway if you want to protect your files by protecting your hard drive, please follow my bellow procedures.
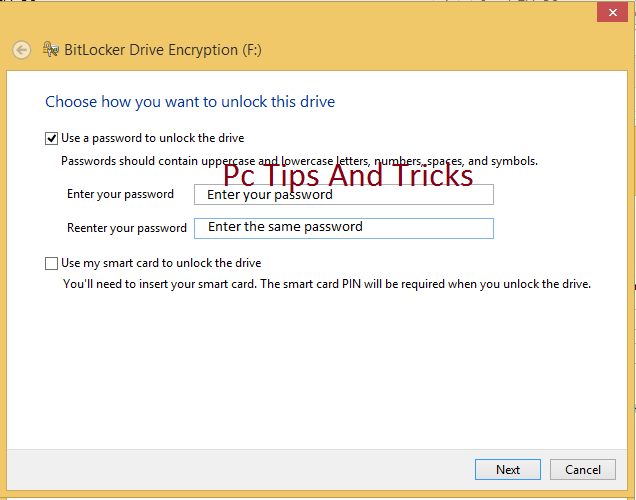
Double click on my computer--> Right click on any drive (Which one you want to protect) --> Click Turn on BitLocker --> Now will open a new window which name is BitLocker Drive Encryption. Check on Use a password to unlock the drive--> now enter your password in the Enter your password box and conform your password in the Reenter your passwordbox. Now this window give you three options.
- Save to your Microsoft account.
- Save to a file.
- Print the recovery key.
Personally I chose Save to a file. Click Save to a file and save this file where you want to save. In feature this file will help you if you forget your BitLocker password. Click Save and click Yes. Click Next and Next. Now click Start Encrypting. Now will start BitLocker Drive Encryption. This process take some times, wait until it finished. After finishing this process your job is done.
Now enjoy yourself ÉÉÉÉÉ
Video Of This Tutorial:
Video Of This Tutorial:
If you like this article and if you think this tricks is helpful, please share this with your friends or share any social media.
Thanks to all of my friends,
Md. Manjurul Islam (Rubel)
You may like also....
How To Install Microsoft .NET Framework On Windows 7
How To Enable .Net Framework On Windows 8/8.1
You may like also....
How To Install Microsoft .NET Framework On Windows 7
How To Enable .Net Framework On Windows 8/8.1
How To Create Password On Windows 8.1
How to backup/Import Microsoft Outlook Mail
Go to link Download
Friday, January 13, 2017
PayPal Duplicate Your Money Leaked From Blackhat
PayPal Duplicate Your Money Leaked From Blackhat
So I have always theorized a way to duplicate PayPal money, im not sure if this has been shared, but I figured Id share how you can do it it for the hey hell why not of it.
Requirements three paypals (Make sure theyre not going to get limited the second they receive some money -.-)
A good VPN
A legit paypal with Money to duplicate.
Step 1. Make 2 PayPals under a VPN (Or just one if you have a friend you want to experiment with. YOUR FRIEND MUST HAVE A DIFFERENT IP).
Lets pretend you have a friend who has a PayPal, instead of making two paypals.
Step 2. After making the VPN PayPal, take the money from your real (NON VPN) account and send it over to the VPN PayPal, like youre buying something like a product.
Step 3. Go onto the VPN account and send over the funds to your Friends paypal.
Step 4. If all of that is successful, wait about a day or two, and open up a case on your main account (You need to wait so that it at least looks legit) against the VPN account, like youve been "Scammed", write up some bullshit story on how you got scammed.
Step 5. Go onto your VPN account, and accept the chargeback.
Step 6. Now, the VPN account will have a negative balance, but both you, and your friends paypal (Or your second paypal, that you also made under a VPN) will have the same amount of money.
Thus your money has been duplicated, please dont abuse this, if youre going to do this, hide your ass to avoid all risk.
Go to link Download
Monday, January 9, 2017
Recover Photos Videos Contacts from Sony Xperia Z4 Smartphone
Recover Photos Videos Contacts from Sony Xperia Z4 Smartphone
How to recover photos, videos, contacts from Sony Xperia Z4 Android Smartphone?

Dont worry! We can take advantage of specialized data recovery tool to recover lost data from Sony Xperia Z4 afterwards:Sony Xperia Data Recovery Software is just a professionally-designed one that enables you to recover pictures, text messages, contacts and more from Sony series including Sony Xperia Z3, Sony Xperia Z2 and Sony Xperia Z Ultra.
Whats more, Sony Xperia Z4 is also simple to use that you can successfully restore lost Sony Xperia Z4 data within 3 easy steps. To begin with, get yourself ready with Sony Xperia Data Recovery Software and launch it after installation.
Steps to restore photos image files from Sony Xperia z4/z3/z2/z1
Generally speaking, if the photos are stored on the memory card, there is a chance that you can restore the lost photos. But, if you keep taking photos and videos with your phone, and save them to the memory card, the deleted photos may not be recovered for the new data may overwrite the deleted photos there. So, stopping using your phone may determine the success of the deleted photo recovery.
Step 1. Connect Sony Xperia Z4 to PC via a USB cable and follow the softwares prompts on the primary interface to turn on USB storage and enable USB debugging respectively.
Step 2. Run Sony Xperia Android file recovery, and then select "USB Disk/Card Recovery", and then press "Next" to start scan the android phone memory card for lost photos and video files.
Sony Xperia Recovery Software
Step 3. You will see deleted files be shown one by one. Select those files you want to recover, and click "Recover" to recover them.
Xperia Recovery
Read more: Backup Sony Xperia Z4 Data to rescue lost file
We always back up our Android phone Data with Gmail account for contacts, calendar data, etc. Google+ can is good to use to unload gallery photos to its cloud alums. For text messages, we can copy them to SIM card for backup. For Sony Xperia phone, we can back up with PC Companion on computer and the official backup and restoration in the phone.
Success to retrieve data from sony xperia z4
Thats all you need to recover Sony Xperia Z4 data. Rest assured to download it as its fully compatible with Windows 10/8.1/8/7/Vista/XP.
Note: Do REMEMBER to back up your phone before rooting, factory reset or Android OS update, which can help to prevent unnecessary data loss from Sony Xperia Z4.
View more posts
Recover Sony Xperia Z4 Deleted Photo Files with Data Recovery
Galaxy Note 4 Data Recovery Review - Detect and Recover your lost data
Manually Backup and Restore Android Galaxy S6 Important Data
Personally Recover Deleted Photo, Video Files from Samsung Galaxy A7/A5/A3
Simple guide to retrieve deleted lost picture file on HTC One M9
Go to link Download
Subscribe to:
Posts (Atom)