Showing posts with label files. Show all posts
Showing posts with label files. Show all posts
Saturday, May 13, 2017
How to Highly Compress Files Software Free Download By Masti Computer
How to Highly Compress Files Software Free Download By Masti Computer

Learn a high degree of file compression software with pressure.Convert ZIP / RAR files for ultra compressed files.You can reduce or significantly reduced for small files.High pressure download software for free. Want always reduce the size of large files Small files to free more space and more in our hard drive.But sometimes we do not have the space for large files, but it is the Precious to us, so we are not able to be stored.
Most people use Win RAR or WinZip to compress filesOr folders, and this is probably the best and most used programsBut they are not able to compress files too. But today, I Go to share programs with which you can 5GB file compression For 5MB. KGB company says that their software can pressure the5GB files 5MB .So today you will learn how to compress your files high.
Step to Use High Compression Sofware.
- First Of All Download the KGB Archiver Software From Link Below.
Click Here To Download Software
- After Installation of both,Open KGB Archiver.
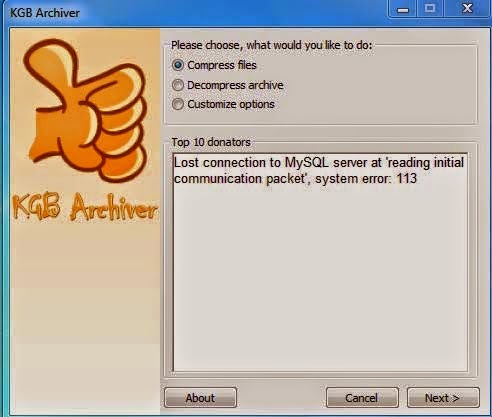
- Select Compress File and Press Next.
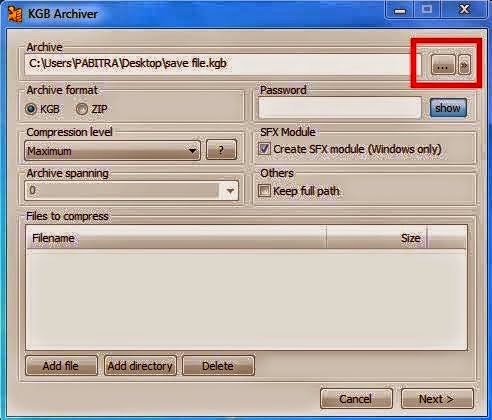
- Give Archive name in box below Archive and Select Archive Format as KGB and Compress level Maximum.
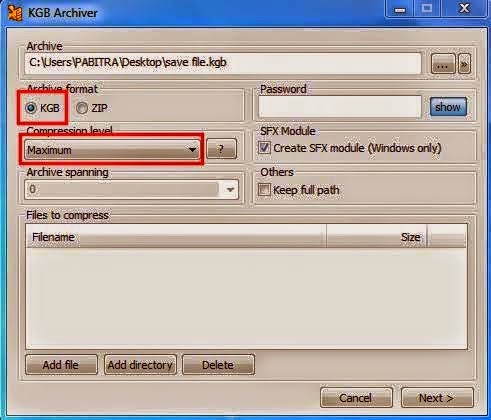
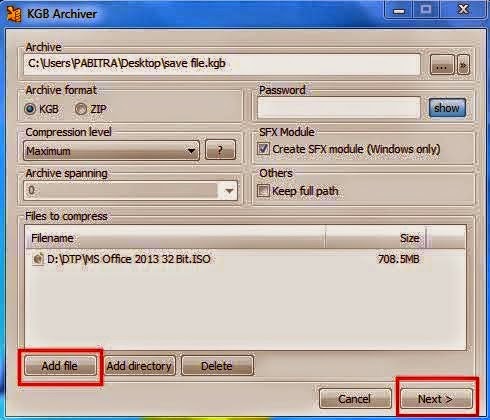
- Then Add file which you want to highly Compress by Clicking Add File button and Click Next.By Clicking Next it Will Start Compressing ,Close All other apps to protect Your System From hanging Up.
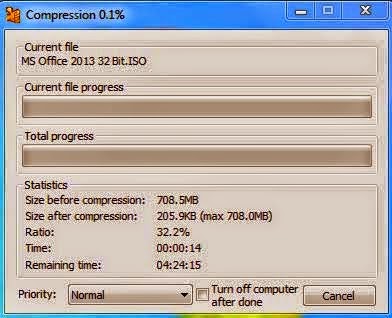
- You have Successfully Compressed Your File.If You have any query of feeling any problem buring Compression,fell Free to Comment on Facebook Page on This Post.You Can also contact us on Facebook.Stay Blessed.
Go to link Download
Sunday, April 23, 2017
How to Recover Files from Broken Toshiba External Hard Drive
How to Recover Files from Broken Toshiba External Hard Drive
Toshiba hard drive has become broken suddenly without any warning. Unfortunately, precious files on it lost at the same time. So terrible it is. Is there any way effective for Toshiba external hard drive file recovery?
Believe many people would think of backup. Surely restoring from backup is the most effective and safe way to get back Toshiba hard drive lost files. However, this way requires a previous backup for broken Toshiba external hard drive and the backup has to be saved on another location. But not everyone could backup hard drive data and save it safely. Therefore, looking for another way or tool to recover files from Toshiba external hard driveis an urgent thing. Now, Data Genius can give a help.
Recover Files from Broken Toshiba External Hard Drive with Data Recovery Tool
Data Genius is a free data recovery tool, which can solve several data loss issues because of various reasons, such as careless deletion, hard drive format and partition, hard drive virus attacked. When Toshiba external hard drive is broken, we have to make sure the there is a computer accessible; otherwise we canÕt recover lost files from Toshiba external hard drive.
Step 1: Download Data Genius and install it on your computer. Then run it.
When Data Genius can be installed and run on Toshiba computer, it means there would be no problem to Toshiba external hard drive data recovery.
Step 2: Select data recovery type from provided four data recovery options. If you are not sure, select Deleted Recovery.

Step 3: Choose external hard drive and scan. You will see the scan process and until it is finished, lost files will be listed in the window.

Step 3: Choose external hard drive and scan. You will see the scan process and until it is finished, lost files will be listed in the window.
Step 4: Select files to preview and make sure whether recovering them. Or if you think all of them need to be recovered, check them all and click Recover button to choose a folder to save recovered Toshiba files on another external hard drive or compute hard drive.

Tips:
If external hard drive is broken, it is necessary to save recovered data on another hard drive or external hard drive. So before recovering Toshiba hard drive files, please get an external hard drive, such as Toshiba external hard drive.
Step 5: Now believe you have gotten a message "Recovery is finished". Click OK and you can see the lost Toshiba hard drive files.
Related Articles:
Related Articles:
- Recover Data from a Damaged Seagate External Hard Drive
- Western Digital External Hard Drive Lost Data Recovery
- SanDisk USB Flash Drive Data Recovery with Three Tools after Deletion
Go to link Download
Saturday, March 4, 2017
How to Recover iPad Deleted Files iPad File Recovery
How to Recover iPad Deleted Files iPad File Recovery
If your iPad files are deleted or lost because of iPad damage, iPad factory reset, iPad iOS upgrade etc, how can you effectively recover iPad deleted files?
I think this article could help you a lot if there are no other methods for you. Two powerful ways below would tell you how to retrieve iPad lost files from iTunes backup or your iPad.
- Way 1: Restore iPad Deleted Files from iTunes Backup
- Way 2: Recover Deleted Files from iPad with iOS Data Genius
Way 1: Restore iPad Deleted Files from iTunes Backup
With iTunes backup in hand, you could not only restore iPhone/iPad/iPod data directly from backup, but also only extract the data you want from iTunes backup with iOS Data Genius. When you have decided to recover iPad files from iTunes backup, please choose to directly make full use of iTunes backup or take iOS Data Genius with more efficiency.
Choice 1: Directly restore iPad deleted files from backup with iTunes
Step 1: Connect your iPad to computer and run iTunes.
Step 2: Click iPad on iTunes top right side to open iPad main window.
Step 3: In Backups part, click Restore Backup and choose a backup in pop-up dialog. Then click Restore to restore iPad from backup.

After backup data restored to your connected iPad, would know what have been recovered when you open your iPad to see. So selecting a right iTunes backup for iPad file recovery becomes important for you.
Choice 2: Recover iPad deleted files from iTunes backup with iOS Data Genius
Step 1: Install and run iSunshare iOS Data Genius on Windows computer.
Step 2: Choose Recover from iTunes Backup File recovery mode and tap Start Scan button.

Step 3: Preview iPad files from iTunes backup in new screen.

Step 4: Select the iPad files on the left side and click Recover button.
Then browse a folder on computer to save iPad deleted files. Until a message prompts you iPad files recovery successfully, tap OK to exit iOS Data Genius and see iPad deleted files on computer.
Compared to the first choice, believe you have realized that you could choose iTunes backup file and recover iPad data more appropriately. At the same time, you could exit iPad file recovery process and does no influence on your iPad.
Way 2: Recover Deleted Files from iPad with iOS Data Genius
iOS Data Genius will not only recover iPhone/iPad/iPod lost deleted data from iTunes backup, but also recover iOS data from iPhone/iPad/iPod. Surely, you can run iOS Data Genius to recover iPad deleted files without iTunes backup.
Step 1: Run iOS Data Genius on your computer and connect iPad to computer.
Step 2: Check "I have backed up my device with iTunes" and tap Start Scan to look through your iPad.

Step 3: Preview data after scanning iPad, and choose data on the left pane to recover.

Step 4: Save iPad data on computer and get Recover successfully message.

Undoubtedly, this way gives iPhone/iPad/iPod users hope to recover lost or deleted data, especially when they are worried or anxious about iOS data recovery.
Related Articles:
Related Articles:
- How to Restore iPad Mini Videos without Apple ID
- How to Retrieve Deleted Text Messages iPhone after Factory Reset
- How to Undelete iPod Lost Music with Four Methods
- How to Sync iPhone to iTunes after Passcode Forgot
- How to Restore Locked iPhone Lost Data without Passcode
Go to link Download
Saturday, February 18, 2017
Tips help recovering deleted files from Windows hard drive
Tips help recovering deleted files from Windows hard drive
If youÕve accidentally deleted a file on PC and need to get it back, belows are 2 golden tips
1. You Should Stop Use the Hard Drive Immediately after Data Loss
The file deleted is recoverable. When you delete files the data itself isnt deleted, just the index entry that tells the system where the data for those files is located. The area containing the deleted data is also now marked as free space so it is available for any new files to be written there instead. If and when that happens, then it is too late to recover your deleted files. So it is very, very important to not save any new files or data to the device concerned.
2. Perform Deleted File Fecovery As Soon As Possible
As Windows continues to write files to your hard drive, the chances of it overwriting the deleted files increases. If you deleted a file on year ago, you may lost the chance to retrieve the deleted things. But if you just deleted files an hour ago, even you "shift+delete" the file, you still have high chance to get back them with Windows hard drive data recovery . If you want to be sure you can recover most of lost files, you should perform a recovery immediately.
How-to: Deleted file recoverying from a Crashed Hard Drive in 3 Steps
1. Connect the Drive to Another Computer
If the hard drive crash, you will need to remove it from the current machine and connect it to another machine as a secondary drive. You can connect the drive to another desktop computer internally as a secondary drive. If you do, make sure that the machine detects the drive in the BIOS or you wonÕt be able to access it.
Try to Copy the Data to Another Drive
Recovering deleted data via copying the data to another drive. The reason is you can copy data off that you would like to recover for there is a chance that only the operating system is corrupt and the user data is still fine. After you connect the hard drive to another computer either internally or with the USB adapter, you can check to make sure if you can browse the contents stored on the drive.
Download Deleted File Recovery Software
If you canÕt manually copy the user data off then you can try to recover it using data recovery software. Whatever you do, do not install the recovery software on to the drive that you are trying to recover data from. Doing so could actually overwrite files that you want to restore.
The best way for recovering deleted files from a hard drive is powering the computer down immediately after the file is deleted, inserting the hard drive into another computer, and using an operating system running on another hard drive to recover it. If you try to recover a file by installing a file-recovery program on the same hard drive, the installation process and normal use of the hard drive can overwrite the file.
view guide: How to recover deleted files from hard drive with full recovery
Vist more posts:
Recover data from Windows 8 Laptop HDD-rescue files from failed/dead hard drive
Recover Invisible Pictures From Seagate 500GB External Hard Drive
Quick or complete format recovery on Windows hard drive partition
100% Data Recovery to get Erased/deleted files from Windows 8.1 hard drive
Go to link Download
Wednesday, February 15, 2017
Windows 8 File Recovery How to Recover Deleted Files in Windows 8
Windows 8 File Recovery How to Recover Deleted Files in Windows 8
How can you do to recover Windows 8 files when Windows 8 data lost or deleted?
As is known, while Windows 8 is refreshed, reset, formatted, or attacked by virus etc, there is a great possibility that, Windows 8 data would be lost or deleted. It also seems that lost Windows 8 data could not be recovered longer.
But is it real? I donÕt think so. Data recovery tool I have used to recover my Windows 7 computer has ever easily restore Windows 7 deleted data back. I think this tool would also apply to Windows 8 file recovery. Now letÕs see how does it recover Windows 8 deleted files?
Step 1: Download and install data recovery tool Data Genius on computer.
Step 2: Run it and choose Window 8 data recovery mode.

Deleted Recovery mode is the default data recovery mode that is intended to deleted files from computer, removable data storage, such as USB device or CD/DVD-ROM. If you think it is OK for you, just need to click ÒNextÓ button to go on.
If you want to make data recovery address in more detail, you can choose another data recovery mode, such as Format Recovery, Raw File Recovery and Partition Recovery.
Step 3: Select the driver where Windows 8 lost data, such as C:/ and click Scan button to browse Windows driver.

About few seconds or minutes later, Windows 8 deleted data are found and shown in new screen.
Step 4: Preview Windows 8 deleted data one by one folder and check the Windows 8 lost data you want to recover.

Step 5: Click Recover button to restore and save Windows 8 deleted data on computer.
When you have checked all of lost Windows 8 data you want to recover, just click "Recover" button and choose a folder in pop-up dialog to save the data that will be recovered. Instantly, Data Genius will prompt you that "Recovery is finished". Now click "OK" and finish Windows 8 file recovery.
Related Articles:
- How to Restore Lost Data from Windows 10 Hard Drive
- How to Undelete Files in Windows 7
- How to Reset Admin Password in Windows 8.1 Tablet
- Forgot Windows 8 Password No Reset Disk
Go to link Download
Tuesday, January 31, 2017
How to Protect Your Secret Files From Others
How to Protect Your Secret Files From Others

How are you? Hope you are very well. Everyone have some privacy, have some secret files or important files or documents. We donÕt want to share them with anyone. So we need to protect that files/documents. For this reason we search a powerful software which can protect our secret files.
Today I am going to show you how to protect your documents by protecting your hard drive, without any third-party software. For this procedure you must install windows 7/8 or 8.1.
Anyway if you want to protect your files by protecting your hard drive, please follow my bellow procedures.
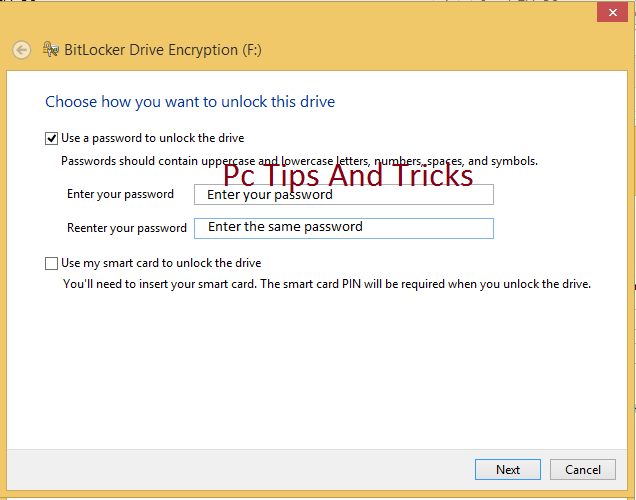
Double click on my computer--> Right click on any drive (Which one you want to protect) --> Click Turn on BitLocker --> Now will open a new window which name is BitLocker Drive Encryption. Check on Use a password to unlock the drive--> now enter your password in the Enter your password box and conform your password in the Reenter your passwordbox. Now this window give you three options.
- Save to your Microsoft account.
- Save to a file.
- Print the recovery key.
Personally I chose Save to a file. Click Save to a file and save this file where you want to save. In feature this file will help you if you forget your BitLocker password. Click Save and click Yes. Click Next and Next. Now click Start Encrypting. Now will start BitLocker Drive Encryption. This process take some times, wait until it finished. After finishing this process your job is done.
Now enjoy yourself ÉÉÉÉÉ
Video Of This Tutorial:
Video Of This Tutorial:
If you like this article and if you think this tricks is helpful, please share this with your friends or share any social media.
Thanks to all of my friends,
Md. Manjurul Islam (Rubel)
You may like also....
How To Install Microsoft .NET Framework On Windows 7
How To Enable .Net Framework On Windows 8/8.1
You may like also....
How To Install Microsoft .NET Framework On Windows 7
How To Enable .Net Framework On Windows 8/8.1
How To Create Password On Windows 8.1
How to backup/Import Microsoft Outlook Mail
Go to link Download
Thursday, January 19, 2017
Use Filezilla Ftp Client 4 Upload Files On Server In Urdu
Use Filezilla Ftp Client 4 Upload Files On Server In Urdu
 |
| Use Filezilla Ftp Client 4 Upload Files On Server In Urdu |
- Easy to use
- Supports FTP,and SSH File Transfer Protocol(SFTP)
- IPv6 Support
- Available in many languages
- Supports resume and transfer of large file greater than 4GB
- Bookmarks
- Drag&Drop Support
- Filename Filters
- Network configuration wizard
- Remote file editing

Downlaod and Install FileZilla Cllient:
First of all Download FileZilla Cllient and install your Computer . Downlaod File Zilla to Click the Downlaod Button Below. FileZilla Cillent is a fast and reliable cross-plat from FTP.FTPS and SFTP Client with lots of useful features.

Watch Video and Share With Your Friends!
Use Filezilla Ftp Client 4 Upload Files On Server In Urdu from Masti Computer on Vimeo.
Use Filezilla Ftp Client 4 Upload Files On Server In Urdu from Masti Computer on Vimeo.
Go to link Download
Friday, November 11, 2016
How to Create a New PDF Document with Word Excel PowerPoint or Other Files
How to Create a New PDF Document with Word Excel PowerPoint or Other Files
As a popular document read mode, PDF format is used usually on computer, mobile phone and other digital devices. So many other files types are converted to PDF document for reading more conveniently. Now letÕs see how can we create a new PDF document from other files?
- Method 1: Create PDF Document by "Save As" Option.
- Method 2: Create PDF Document with Adobe Acrobat Menu.
- Method 3: Combine a PDF Document from Several Kinds of Files.
Method 1: Save Word/Excel/PowerPoint as PDF format document
Step 1: Open Word, Excel, or PowerPoint 2007 or newer versions, and click File Ð Save As.

Step 2: In the pop-up Save As window, set a name. Browse Save as type, and choose PDF. Click Save.

Method 2: Create PDF with Word/Excel/PowerPoint by Adobe Acrobat Menu
After you install Adobe Acrobat, there will be a new menu "Acrobat" in Word/Excel/PowerPoint menu. Several options are provided in Acrobat, such as "Create PDF".
Step 1: Open Word, Excel, or PowerPoint 2007 or newer versions file.
Step 2: Click Acrobat menu and choose Create PDF option under it.

Method 3: Create PDF with any files by combining files in Acrobat
After you install Adobe Acrobat XI Pro, one new option "Combine files in Acrobat" is added to right-click menu. No matter which kind of file you want to create as a PDF file, just combine them and save it is OK. Then a new PDF file will be created, which includes all of the content of files you add.
Step 1: Right click one file you want to add to the new PDF. And choose ÒCombine files in AcrobatÓ in right-click menu.

Step 2: In Combine Files window, you can see the file you just clicked. Now click Add Files Ð Add Files button.

Or you can open a PDF file first, and then click File Ð Create Ð Combine Files into a Single PDF.

Then "Combine Files" window also appears.

Then "Combine Files" window also appears.
Step 3: Select the files you want to add to the new PDF, and click Open.

If there are still files you want to add, repeat above two steps.
Step 4: When all of files have been added, arrange the files and make them listed as you like.

Step 5: Confirm and click Combine Files.

Step 6: After they are added into new PDF file and open, press Ctrl + S to save it.

Related Articles:
Related Articles:
- How to Secure and Edit a Secured PDF Document
Go to link Download
Subscribe to:
Posts (Atom)