Showing posts with label not. Show all posts
Showing posts with label not. Show all posts
Tuesday, May 16, 2017
Cara Mengatasi this windows not genuine Windows7
Cara Mengatasi this windows not genuine Windows7
Cara Mengatasi this windows not genuine Windows7, cara untuk membuat windows7 menjadi Genuine. Layar menjadi hitam, gelap pada windows7 dengan tulisan this windows not genuine. Merubah windows7 menjadi Genuine atau asli. Jika kita menggunakan windows7 yang tidak asli, suatu saat akan muncul hal seperti ini. Trik, cara membuat Windows7 menjadi Genuine atau asli.
Mengapa kita perlu membuat windows 7 menjadi Genuine atau asli, karena jika kita menginstall windows not genuine, maka suatu saat nanti, windows akan berubah menjadi layer hitam dengan tulisan this windows not genuine di kanan bawah layar komputer anda. Berikut cara membuat Windows7 menjadi Genuine atau asli.
Download windows loader terbaru
https://ba156027-a-62cb3a1a-s-sites.googlegroups.com/site/yanatrie/Windows%20Loader%202.2.1.rar
Catatan: Yang perlu anda perhatikan adalah, untuk kasus windows7 yang tiba-tiba menjadi not genuine/layer hitam, maka pada windows loader silakan pilih uninstall terlebih dahulu.
Jika anda baru saja melakukan install ulang windows 7, maka untuk membuat menjadi genuine, pada windows loader anda, langsung pilih install.
Berikut langkah yang akan anda jalankan.
Setelah download silakan ekstrak file terlebih dahulu. Jika anda pengguna win 7 dan saat menyalakan laptop entah kenapa muncul tulisan this windows not genuine atau layar hitam, maka langkah pertama yang anda lakukan adalah Uninstall menggunakan windows loader.
Cara Uninstall adalah: buka windows loader, lalu pilih Uninstall. Ingat proses ini terkadang berjalan secara background (tidak kelihatan) dan berlangsung beberapa menit, jadi biarkan dulu (jangan dimatikan) dan biarkan hingga komputer melakukan restart.

Setelah komputer terbuka kembali, jalankan lagi windows loader dan klik di tab Advanced Options. Centang pada kotak ÒIgnore the existing SLICÓ dan ÒLegacy mode on MemoryÓ. Kemudian klik tab installation lalu klik Install dan setelah selesai lalu restart PC lagi. Hasilnya akan menjadi Status: Licensed.

Untuk windows yang baru/hasil install ulang (tanpa product key), pada windows loader langsung pilih Install lalu tunggu hingga ada perintah restart computer, lalu silakan restart. Jika anda perhatikan saat windows loader dibuka, maka pada status (tulisan hijau) yang ada di jendela windows loader, disana masih tertulis Trial.
Setelah anda selesai menjalankan windows loader dan restart computer, maka jika anda cek dengan membuka kembali windows loader, maka windows sudah menjadi Licensed atau bisa juga cek di system (klik kanan computer > properties) maka disana tertulis windows is activated dengan logo genuine.
Pada kasus tertentu ternyata cara diatas tidak berhasil maka anda perlu cara lainnya seperti berikut. gunakan MBR Regenerator, silakan download dibawah.
Download MBR Regenerator
ATAU http://www.softpedia.com/get/System/Back-Up-and-Recovery/MBR-Regenerator.shtml
Ekstrak filenya, lalu jalankan MBR Regenerator, centang pada kotak ÒRegenerate all activation systemÓ. Kemudian klik Start Regeneration System. Prosesnya lumayan lama silakan tunggu hingga selesai. Jangan menghentikan ditengah jalan meski layer terlihat diam, biarkan sampai tampilan OK muncul, lalu OK
Setelah proses selesai, silakan jalankan lagi windows Loader anda. Pilih Uninstall terlebih dahulu, tunggu hingga selesai dan restart computer.
Setelah itu jalankan lagi windows Loader , pilih Install, tunggu hingga proses selesai dan restart komputer. Jika anda lihat lagi pada tampilan windows Loader tersebut telah menjadi Licensed.
Untuk langkah terakhir agar lebih aman lagi anda bisa lakukan validasi online windows 7 yang sudah menjadi genuine tadi, dengan mengunjungi link berikut ini
http://www.softpedia.com/get/System/Back-Up-and-Recovery/MBR-Regenerator.shtml
Sukses untuk anda dan terima kasih telah hadir disini, sekian informasi Cara Membuat Windows7 Menjadi Genuine Atau Asli.
Go to link Download

Thursday, March 16, 2017
How to Start Windows 10 in Safe Mode When Computer Locked or Not
How to Start Windows 10 in Safe Mode When Computer Locked or Not
Windows 10 safe mode is undoubtedly good pattern to boot Windows 10, especially when we encounter some problems about Windows systems. Now please learn how to start Windows 10 computer in safe mode when computer is available or locked.
How to start Windows 10 in safe mode when computer is available
1. When your Windows 10 computer is accessible, click Start and Power icon, then press and hold on Shift key, and click Restartat the same time.
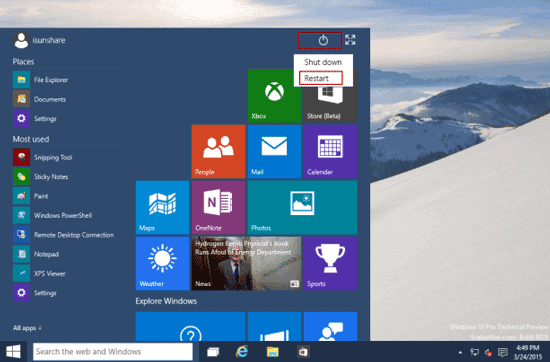
2. As a new window screen appears, choose Troubleshoot, and then select Advanced options.
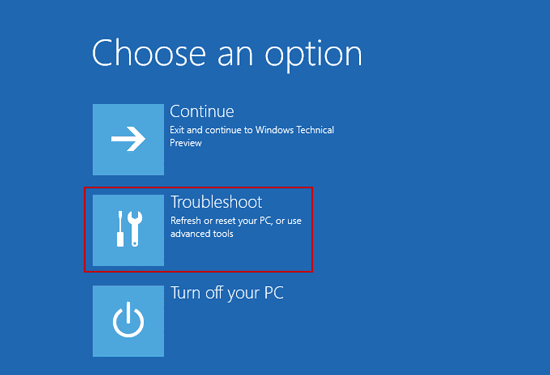
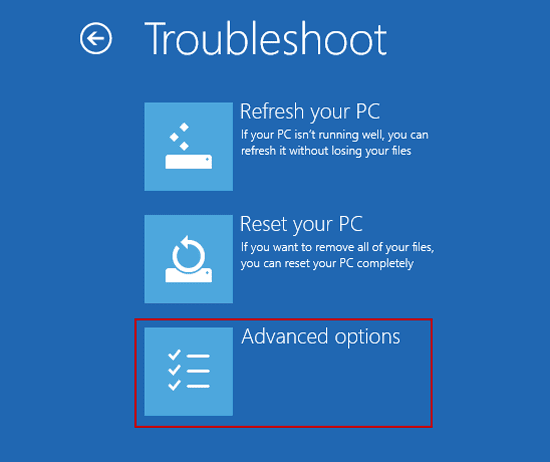
3. Choose Startup Settings under "Advanced options".
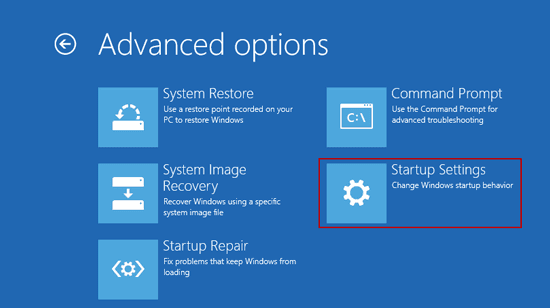
4. In Startup Settings, you can see there are several options for you to change Windows startup settings when you reboot Windows 10 computer again. So now click Restart.
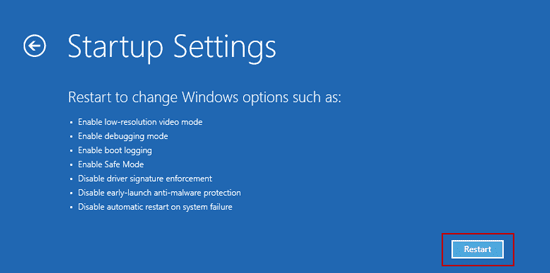
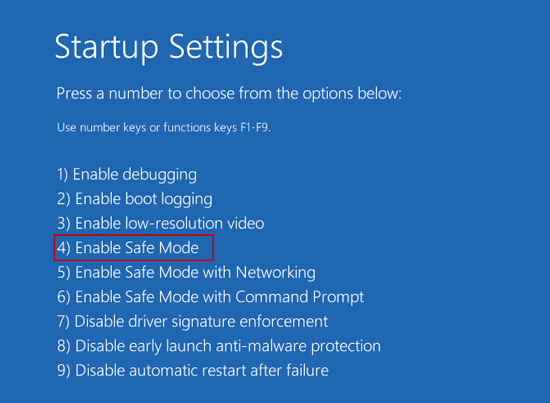
5. Once you decide to restart Windows 10 with which option enabled or disabled, press corresponding number key to make it done. Now we are going to boot Windows 10 in safe mode. So press F4and wait for Windows 10 starting in safe mode.
Tips: When Windows 10 reboots and before entering Windows 10 in safe mode, logon screen still asks you to type password.

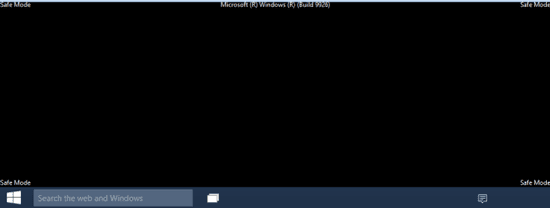
Because computer is available, so just choose the available user and type password to login Windows 10 in safe mode. The following image shows Windows 10 safe mode.
How to start Windows 10 in safe mode when computer is locked
When Windows 10 password forgot and you are locked out of Windows 10, how can you boot Windows 10 in safe mode, in order to make full use of default administrator to reset Windows 10 forgotten password?
Actually, on Windows 10 logon screen, you can see Power button at the right bottom side, click it and select "Restart" button, at the same time, press and hold on Shift key.
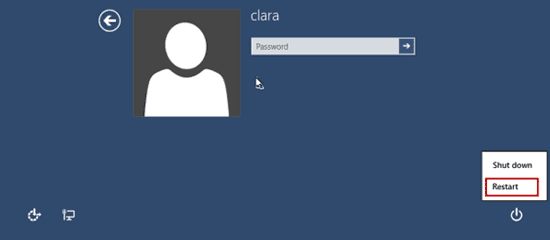
Then Windows 10 will enter a new window, where you can choose "Troubleshoot - Advanced options". Following steps will be the same as starting Windows 10 in safe mode when computer is available.
Then Windows 10 will enter a new window, where you can choose "Troubleshoot - Advanced options". Following steps will be the same as starting Windows 10 in safe mode when computer is available.
The difference is that there is no available user for logon now when Windows 10 restarts and is going to safe mode. But, if now default administrator is enabled, you can see it in user list and login Windows 10 with it.
Refer to: How to enable or disable Windows 10 default administrator
If the methods in above referred passage are not effective for you to enable Windows 10 default administrator, please get Windows Password Genius Advanced to create a password reset disk, and then use it to boot locked windows 10 computer. You would see default administrator and could reset Windows 10 default administrator password. But only when default administrator is enabled in accessible Windows 10, can it login Windows 10 with new password. So at this moment, it might have been wiser to reset other user password or create new administrator for Windows 10 logon. Then you could enable Windows 10 default administrator or start Windows 10 in safe mode.
Related Articles:
Related Articles:
- How to Boot Windows Server 2012 in Safe Mode
- How to Enable Safe Mode on Windows 8 Computer
Go to link Download
Wednesday, March 15, 2017
Password Is Not Recognized in Windows 8 How to Fix It
Password Is Not Recognized in Windows 8 How to Fix It
Question: Password is not recognize in Windows 8, how to fix it?
ÒHelp! Windows 8 is not recognized my password. When I login to my live.com account on Windows 8 it tells me that my password is not correct. I have used the account.live.com/password/reset as directed by the login screen error many times and every time it does not accept the new password. Can you please offer me any assistance in resolving this issue? Or point me in the direction of a resolution? Are there issues with the password that my PC is checking against not updating properly?
Most of the "answers" I have seen indicate you cant help with password issues, but, obviously I am not having any issue typing in the correct password as I am logged into my account on another computer to type this, nor am I having any trouble changing the password as I have done this multiple items this morning. Sorry, but I am a little stressed that I am unable to login to my main PC since I went to bed last night. So does anyone know what to do when the password is not recognized in Windows 8? Thank you for your assistance in this matter!Ó
Answer 1:
Hi everyone -- not really an answer or solution here, but I had exactly the same problem as stated above. Microsoft clearly doesnt have any solution to this (or even a desire to help). What I had to do was the following:
1. Restore the PC from a last known good configuration: hold down "shift" while selecting "Restart" -- this brings up some start up config settings.
2. In this start up config, find the menu item "Restore" (or something similar) and perform a restore from a last known configuration. In my case, the last available restore was just a few days prior to my password problem. This took approx. 20 minutes (for me), but after it completed, I was able to log in to my administrator account with my OLD password (not my most recent Microsoft Live password).
3. Go into Setup > PC Settings > Users and deselect password for the administrator account. You will have to enter the password one last time (again, the OLD password) but when prompted for a new password, leave all the fields blank.
After doing this, I now have a local administrator profile that does not require a password. I also deselected passwords for all of the other user profiles.
Answer 2:
Hi Everyone, I Also experienced the password problem with both local account and MS ID. The problem is that Win8 changes your keyboard so if your password contains characters other than letters and number, you are most likely entering incorrect characters without knowing. Best thing to do is enter your password in the username field so you can see the characters. Then at the bottom right, change your keyboard and test again.
Go to link Download
Thursday, February 16, 2017
Solved Wifi Problem After Updating Windows 10 Limited Access or Not Connecting
Solved Wifi Problem After Updating Windows 10 Limited Access or Not Connecting
![[Solved] Wifi Problem After Updating Windows 10, Limited Access or Not Connecting](https://blogger.googleusercontent.com/img/b/R29vZ2xl/AVvXsEg56qupAcjSZyzI6lzTXaCyE12W9hhdqG4PdW7Ob04aho9sNgLr_T9P-RN4MmVx-uvrjGtr4nEinqT9oMNR1k8iZEKFkZYTbNiLtRpW_y5uJGeytF6VdZVJH-FW65tpygua9LPgOeM6aQvP/s1600/Wifi+Problem.png "[Solved] Wifi Problem After Updating Windows 10, Limited Access or Not Connecting")
[Solved] Wifi Problem After Updating Windows 10, Limited Access or Not Connecting.
Hello friend!
How are you? Hope you are very well. Today I am going to show you after updating windows 10 how to solve wifi problem (Limited Access)?
There are two methods to solve this problem. If first method is failure, then we can try 2nd method. I hope one of them will work for you.
Method-1:
1) Write in the search box CMD.
2) Right click on Command Prompt.
3) Click Run As Administrator.
4) Click Yes.
5) Now will open Command Prompt.
6) Enter the following command in the command prompt Ònetsh int ip resetÓ and press Enter.
7) Now restart your computer for finishing the first method.
If first one is failure to fix your wifi problem, please follow the second methodÉÉ
Method-2:
1) Write in the search box CMD.
2) Right click on Command Prompt.
3) Click Run As Administrator.
4) Click Yes.
5) Now will open Command Prompt.
6) Enter the following command in the command prompt Ònetsh int tcp set heuristics disabledÓ and press Enter.
7) Write another New command Ònetsh int tcp set global autotuninglevel=disabledÓ press Enter.
8) Write another New command Ònetsh int tcp set global rss=enabledÓ press Enter.
9) Write another New command Ònetsh int tcp show globalÓ press Enter.
10) After enter the above four command, close the command prompt and restart your computer.
Hope your problem is solved.
Video Of This Article:
Video Of This Article:
Thanks to all of my friendsÉÉ
Md. Manjurul Islam (Rubel)
You May Like Also......
How To Create A Video From Your MS PowerPoint
How To Install A Display Language On Windows 8.1
(Solved) How To Solve HP Pavilion 14-ab012TU WIFI Driver Problem
After Updating Windows 10, How To Delete Windows.old (Previous Windows)
Go to link Download
Wednesday, February 15, 2017
Mac Recovery HD A spare wheel not really convenient
Mac Recovery HD A spare wheel not really convenient
Recovery HD A spare wheel not really convenient.
 To overcome the lack OS X DVD or installation key that allowed particularly easily reinstall the OS X on your Mac, APPLE offers from LION a new tool that allows system recovery. This "Recovery HD" tool is unfortunately far from having the flexibility and simplicity that can have the DVD or the installation key. It is also necessary to be online to use certain features of "Recovery HD". Better to provide alternative solutions in case something happens and avoid resorting to this not necessarily convenient tool.
Introducing "Recovery HD"
Up to 10.6 SNOW LEOPARD, reinstall Mac OS X on her in case of necessity, it was enough to bring the DVD bootable OS X installation, start holding the "C" key to have started on the DVD, which allowed to launch "Disk Utility" to initialize (or partition) hard disk and proceed in the wake of the re-installation OS X.
With the arrival of Lion, the situation has changed. OS X is no longer sold on DVD bootable installation or as bootable USB drive, but by default via download from the Mac App Store. Therefore, to reinstall OS X if necessary, it is possible to us as in the past...
To face this new, APPLE has decided to propose a different system from LION for reinstalling OS X on your Mac if necessary. This tool is called "Recovery HD".
This is actually a small partition that is automatically created on your hard drive, just when you install YOSEMITE on this hard drive. You do not require same account, and may not know you now that you have such a partition! This is unfortunately not surprising, because this partition is very well hidden and nobody will tell you that it exists on your Mac!
NB: In some cases, this partition "Recovery HD" will however not be installed on your Mac during installation YOSEMITE: When the hard drive on which you install YOSEMITE is partitioned, in the case of a RAID volume, or if the disk has a partition configuration Boot Camp nonstandard, in which partitioning was performed after the execution of the Assistant Boot Camp or the configuration created by the Boot Camp Assistant has been manually changed.
This partition "Recovery HD" just lodge next to your OS X YOSEMITE system. So if you have YOSEMITE installed on your Mac, you have de facto of this small hidden partition.

To access the partition, you must start the Mac is holding the "R" key pressed (in this case you will automatically start on that partition "Recovery HD") or holding down the "alt" key (in this case, Then select the partition "Recovery 10.10" that will appear on the screen).
If you have enabled "FileVault", access to the "Recovery HD" cannot be done by holding down the "alt" key when booting the Mac. It must indeed start the Mac by holding the "cmd" and "R" keys down.
What is this partition "Recovery HD"?
Once you have started on this partition "Recovery HD", you go (like the good old days of the DVD) to a certain tools.
At the top of the screen, in the menu bar, the "Utilities" menu include access to "Terminal" in the "Network Utility" and "Password Utility Firmware". You probably will not need these utilities, if perhaps not to reset the administrator password:
Reset the administrator password
á Start the "Terminal."
á Enter this command: resetpassword
á A new window appears allowing you to change the administrator password.
á When you restart the Mac, you can use the new password.
Now look at the main window that appears when you start up your Mac in "Recovery HD":

"Recovery HD" allows you to run a restore from backup "Time Machine" to launch "Safari" to surf and have particular online help, launch "Disk Utility" to repair minor injuries your OS X system and also boot / partition hard drives connected to the Mac, and perform a re-installation of OS X if necessary.
So finally, you will tell me if your Mac YOSEMITE faces some problems, well instead of starting as in the past on the installation DVD, youll be able to boot to that partition to start small basic repairs via "Disk Utility". Certainly it is possible, but since you have a clone having many more powerful maintenance tools, Im sure you already Demarrias more on the DVD to perform this type of basic maintenance operation ... then you will not start on that partition "Recovery HD", right?
And to re-install the system in case of need? In the past, yes, actually the best way to conduct a clean install of your OS X system was started on the installation DVD and do so to the re-installation of OS X. But now I urge you to do not go through "Recovery HD" to re-install OS X on your Mac.
Indeed, although it is of course possible to re-install OS X via the "Re-install OS X" function offered by "Recovery HD" This solution is not, in my opinion, not the best nor the most practical. If you have a clone, then preferably use the clone to make an OS X re-installation.
By default this partition "Recovery HD" is installed on the same hard drive where you installed OS X YOSEMITE. But what happens there if unfortunately your hard drive were to let go? Without clone bootable USB drive without installation YOSEMITE (crafted by you), it will NOT POSSIBLE not boot from this partition "Recovery HDÓ!!! So what?
Apple offers to download HERE a "Disk Recovery Wizard". This wizard letÕs just clone the partition "Recovery HD" to another hard disk (external drive) or even a USB drive. But be careful, in this case, this key will IN NO EVENT key USB bootable installation YOSEMITE, but it will just be a clone of the partition "Recovery HD" you already have on your hard drive. You can use this partition clone "Recovery HD" if you cannot use the partition "Recovery HD" located on your hard drive.
Its a little spare tire of the spare wheel.
NB: It is necessary to make the partition clone "Recovery HD" before the partition "Recovery HD" is no longer operational, of course.
Important note about the Mac market after the release of LION 10.7
Macs sold since the release of LION and therefore come with LION MOUNTAIN LION, MAVERICKS or YOSEMITE now installed on the machine, also have a function "OS X Internet Recovery" that allows you, in case of failure your hard drive and / or hard disk change, start your Mac directly from APPLE servers to process resettlement OS X. This feature is not available for Macs before the release of LION and therefore that had been purchased with a previous version of the system (or SNOW LEOPARD LEOPARD).
"OS X Internet Recovery" checks your machine, including its serial number (to verify that your Mac is allowed), and then automatically downloads and launches an image of the hard drive recovery.
To do this, you must have an Internet connection because you will have to download more than 5 GB of data necessary for the relocation YOSEMITE!!
More on "Internet Recovery OS X" HERE.
Why make it simple when you can make it complicated? Some will no doubt think that this system is practical and modern because it avoids having to annoy to re-install OS X, but I honestly think that APPLE would be much better to continue to offer the sale of bootable USB keys OS X and especially to slide one in every Mac sold in cartons YOSEMITE, rather than forcing new buyers to go through this function "OS X Internet Recovery" really not practical. Everyone does not necessarily have a high speed Internet connection, and how to re-install OS X and its MacBook Air or MacBook Pro when you are in a place without an Internet connection?
Indeed, the new Mac buyers have no choice but to go through Apples servers to re-install OS X if something goes wrong with their hard drive, they have neither USB Bootable of installation or installer (downloaded from the Mac App Store) they could use from a clone.
In short, after reading the above, it is better to take all possible precautions to deal with any difficult situation. I do know strongly advise you to urgently provided a clone of your YOSEMITE installer and / or you make a bootable USB installation YOSEMITE key.
Indeed, the new Mac buyers have no choice but to go through Apples servers to re-install OS X, if something goes wrong with their hard drive, they have neither Bootable USB key to installation or installer (downloaded from the Mac App Store) they could use from a clone.
Go to link Download
Sunday, November 13, 2016
Why must you not to hear a huge collection of songs or music regularly
Why must you not to hear a huge collection of songs or music regularly
Crazy music people collect a lot of songs and hear the songs regularly in normal or shuffled mode. What is the most important reason to stop doing this anymore?
Just let get a thought about the memorization process of your memory. oh, sorry its not a SD. I talk about your brain above. You hear, listen or know something at very first. Could you memorize it and remember it after few days. I hope that, it is not possible all the time. ThatÕs why the students study or read subjects again and again. HavenÕt you? Are you with me? If yes,
Let come to the discussing topic above. You listen to a song or music which may duration up to 5 to 10 minutes. If you are gotten crazy in it, it is not possible to hear at once only. You may hear more than 5 times. Most of brains could memorize a full song if it is listened as little as 3 times. So, what do you think about the crazy people? I mentioned you above. The song will be thoroughly memorized in future.
If you have collected 500 songs or music and consisted in your device, what is its total duration? 3,500mins (assumed 7 min music). It is equal to 210,000s. Let guess one think, how many sec is taken to say a word? I thought, 2.1s (an average for to simplify the calculation too.) What a huge thing? This means, you have memorized 100,000 words as in the music list or songs. And also all the words are ordered according to the every music or song for individually.
Now, could you understand what the problem is? You are now losing your memory space and may be affected by amnesia in future. You may collect a 10 most favorite songs or music and then hear it again and again or memorize if you want? LOLÉ
What is the solution for this? I know, how hard to be without music or song if you are crazy in it as a music crazy dude? Update your music list every week or any scheduled order regularly. DonÕt forget to erase the old songs and then add new songs. I have a grateful idea for this. You could set to a favorite music station or FM which plays songs as new as daily. They update their list according to the trend. And also, you could to be relaxed in the remains times other than music such as sponsor ads and RJ word within the mean time.