Showing posts with label a. Show all posts
Showing posts with label a. Show all posts
Sunday, May 14, 2017
Create A System Restore Point In XP
Create A System Restore Point In XP

Create A System Restore Point In XP
Introduction:
Windows backup and restore is a system that can save your machine to a specific time and load this backup to restore your computer in exactly the same state as when you saved it.
You can use a restore point when, for example, you have been infected by a destructive virus and can no longer serve you properly on your computer. The restore point, if you did, you will regain a healthy computer and working. Well, the theory generally just practice. The time has come for you to create a restore point (Windows XP).
You should know that Windows includes a restoration software that works perfectly well. It is this software that we will use in this tutorial
Create a restore point:
To begin, start Windows Restore: Button Start => All Programs => Accessories => System Tools => System Restore You should see a window offering you to restore your system or create a restore point. Select Create a restore point. and click nextyou must enter a description that will allow you to easily identify yours restore point.
Using a restore point:
Now that you have created you restore point, you need to know how to load.
If you clicked on the button Start, returned here on the main window of the assistant. Select Restore my computer to an earlier time. You now find yourself facing a schedule. This calendar is special; it lists all yours restore points. Thus, you should see youÕre in the right frame by clicking on the day you created.
Cancel restore:
Your system restores gone wrong? No problem, there is a simple and effective solution?
Start the Recovery Tool. You fall back on the main window (again!?). Select Undo my last restoration. Click Next. Once again, it summarizes the information you: what will change if you cancel the restoration, what restoration will be canceled ... Click Next to start the cancellation of a previous restoration. Click Cancel to cancel and exit the System Restore tool (theres still time to turn around!). Windows restarts and like magic your computer has resumed its old settings!
You May Like Also.......
(Offline) How To Install .Net Framework 3.5 On Windows 8/8.1/10
What Is The Difference Between FAT32, exFAT, and NTFS?
How To Show or Hide File Name Extensions in Windows 10/8.1/8/7/Xp
[Solved] Wifi Problem After Updating Windows 10, Limited Access or Not Connecting
Go to link Download
Friday, April 28, 2017
How to Make a Boot Disk for Windows 7
How to Make a Boot Disk for Windows 7
I want to reinstall Windows 7 but no installation disk. How do I get or make Windows 7 boot disk free by myself?
For Windows 7, you could create Windows USB installation disk and Windows CD/DVD disk with Finalbooster. Finalbooster is powerful install tool, which could create Windows installation disk with ISO image file. And then you could boot computer from it and install Windows operational system on computer, such as Windows 8/7/Vista and Windows server 2012/2008.
So now create Windows 7 boot disk with Finalbooster in two ways, bootable USB drive and CD/DVD-ROM.
- Create Windows 7 Boot Disk with Bootable USB Drive
- Make a Boot Disk for Windows 7 with CD/DVD-ROM
Step 1: Get Finalbooster and install it on accessible computer.
Step 2: Run it after installation, you would see following in screen.
Step 2: Run it after installation, you would see following in screen.
- Select an ISO image file
- Burn ISO image file to CD/DVD disc
- Burn ISO image file to USB flash drive

Step 3: Click ÒBrowseÓ button to import Windows 7 ISO image file.
And then prepare bootable USB flash drive or CD/DVD-ROM and insert it into computer.
Step 4: Burn Windows 7 ISO image file into USB flash drive or CD/DVD-ROM.

1. Create Windows 7 boot disk with USB drive
1. Create Windows 7 boot disk with USB drive
After insert USB flash drive into computer, choose it from drop-down box of ÒBurn ISO image file to USB flash driveÓ. And then click ÒBurn to USBÓ.
2. Make a boot disk for Windows 7 with CD/DVD-ROM
After insert CD/DVD device into computer, select it from drop-down box of ÒBurn ISO image file to CD/DVD discÓ. And then click ÒBurn to CD/DVDÓ.
Step 5: When the Progressbar becomes full, it means ISO image file has been successfully burned into USB drive or CD/DVD-ROM.

The method of making Windows installation disk or boot disk above applies to Windows 7/8/Vista/2008/2012. And the most important is that you could burn Windows boot disk with Finalbooster free and easily. So donÕt worry about no Windows installation or boot disk.
Related Articles:
- Ways to Boot and Use HP Laptop Successfully if Lost Windows 7 Password
- How to Boot Dell Windows 7 Computer Successfully Forgot Password
- How to Get a Windows 7 Reset Disk without Access Ð Windows 7 Administrator Password Reset
- How to Reset Windows 7 Password with or without USB Disk
- How to Reset Windows Vista Password without CD or Reset Disk
- How to Change Admin Account with Windows 8 Disk
- Password Reset Disk Creation on Windows 8 or 8.1 PC
- Forgot Windows 8 Password No Reset Disk
- How to Reboot Computer If We Forgot Password in Windows 8
- What Matters Needed Attention if Reinstall Windows 7 after Forgot Password
Go to link Download
Thursday, April 13, 2017
Recover Data from a Damaged Seagate External Hard Drive
Recover Data from a Damaged Seagate External Hard Drive
I just found that data has been lost after transferring data from Seagate external hard drive to computer. And now Seagate external hard drive seems to be damaged. It has become inaccessible.
If you are in such situation and in search to find how to recover data from damaged Seagate external hard drive, it is important to clarify why data lost after transaction.
Technical Errors: Sometimes, lots of data always lose after we accidently delete or copy, but not paste them at right location.
Hard Disk Errors: Seagate external hard drive has been used for a long time. And now it becomes broken, so data lost.
Software Errors: When transferring data from external hard drive to computer, Seagate external hard drive is attacked by virus software on computer.
No matter which reason, Seagate external hard drive damaged is inevitable now. But donÕt panic. There is still chance to recover Seagate external hard drive data, as long as the external hard drive has not been written with new data.
How to recover Seagate external hard drive lost data?
Data Genius is a powerful and free Seagate hard drive data recovery tool, no matter hard drive is formatted, virus-attacked, partition or any other reasons.

Steps for data recovery from Seagate damaged external hard drive:
- Connect damaged Seagate external hard drive to accessible computer.
- Download and install iSunshare Data Genius on this computer.
- Run data recovery tool and choose data recovery option. If you are not sure, choose Deleted Recovery. Click Next.
- Choose external hard drive and click Scan button.
- When hard drive scan process completes, lost data or files can be seen in the left pane of Data Genius new window.
You can select the files and preview them in the right pane to see whether they are the lost data you want to recover from damaged Seagate external hard drive. - Check files you are sure to recover and click Recover button.
- At the following pop-up window, choose a location on computer to save recovered data.
- Until "Recovery is finished" message appears, lost data is recovered successfully from Seagate external hard drive. Click OK and you will turn to the recovered data.
- How to Find Lost File in Windows 7 Laptop
- How to Retrieve Important Data after Deleted or Lost Accidently
- How to Retrieve Music/Movies/Photos Deleted from Mobile SD Card
- Western Digital External Hard Drive Lost Data Recovery
Go to link Download
Friday, April 7, 2017
How To Block A WebSite From TP Link Router
How To Block A WebSite From TP Link Router

How To Block A Web Site From TP Link Router
Hello friend!
How are you? Hope you are very well. Every company has some employee whom browse some websites out of companies work and that companies top management donÕt want that types of employee. If you are in a renewed biggest companies, IT officer you need to block that website which sites are not good for your company.
Today I am going to show you how to block a specific website from your TP Link router. If you donÕt know how to do this, please follow my bellow procedures.
At first open your browser then type in the address bar Òtplinklogin.netÓ then press Enter.
Now browser ask you for the user name and password.
Please enter the user name and password. The default user name and password is ÒadminÓ.
From the left side click on Access Control.
Click on Target.
From the right side click on Add New
From the ModeOption select Domain.
In the Target Description box write something about that website which one you want to block [Example: YouTube].
In the Domain Name Box write domain name [Example: www.youtube.com].
Now click Save.
From the left side click DHCP.
Copy IP Address from the Start IP Address and End IP Address.
Now click again on Access Control -> Host.
Click on Add New.
Make sure Modeoption selected is IP Address.
In the Host Description write description about blocking site [Example: YouTube].
There are two box in the LAN IP Address, first box for Start IP Address and second box for End IP Address. Now past your copied IP address and Save.
From the left side click on Rule.
Click on Add New.
Enter the rule name [Example: YouTube]
From the Hostand Targetselect YouTube.
Click Saveand check mark on Enable Internet Access Control and Save again.
Your job done. From now you canÕt access YouTube from your network.
Thanks to all of my friends,
Md. Manjurul Islam (Rubel)
Video Of This Tutorial:
You May Like Also.....
How To Enable Save Mode On Windows 10
Windows 10 Run Command
Create A System Restore Point In XP
(Offline) How To Install .Net Framework 3.5 On Windows 8/8.1/10
Go to link Download
Sunday, April 2, 2017
Solved How To Find A Computer Hard Disk Serial Number From Windows
Solved How To Find A Computer Hard Disk Serial Number From Windows
How To Find A Computer Hard Disk Serial Number From Windows?
 How To Find A Computer Hard Disk Serial Number From Windows?") Hello! How are you? Hope you are very well. It is very difficult to see your laptop or desktop hard drive serial number. Because of if you want to see the HDD serial number you need to open your laptop or desktop back cover.
Hello! How are you? Hope you are very well. It is very difficult to see your laptop or desktop hard drive serial number. Because of if you want to see the HDD serial number you need to open your laptop or desktop back cover. What do you think if you get your hard disk serial number from windows without opening the back cover. Yes, today I am going to show you how to see your HDD serial number from your running windows. Please follow my bellow proceduresÉ.
- At first you need to open the Command Prompt (CMD)
- Now write in the Òwmic diskdrive get serialnumberÓ
- Press Enter
- After pressing Enter you will see your computerÕs HDD serial number.
- Job done
Thanks to all of my friends. If you like this please share with your friends.
Md. Manjurul Islam (Rubel)
Video Of This Tricks.
Go to link Download
Monday, March 20, 2017
Where to Get a Password Reset Disk for Windows 7 8
Where to Get a Password Reset Disk for Windows 7 8
When we have typed incorrect password to try to login in to Windows 8/7 computer, a prompt usually suggests us to reset Windows password by click ÒReset PasswordÓ button under password box. But if we have no password reset disk available, where to get one for Windows 8/7?
Generally, you could get Windows 8/7 password reset disk from two ways.
One is created when the computer is available. Turn to Control Panel Ð User Account. On the left side of window, click ÒCreate a password reset diskÓ and insert bootable USB to burn password reset disk. The other is to use password recovery tool, Windows Password Genius.
- Get Windows 7/8 Password Reset Disk in Control Panel
- Burn Password Reset Disk with Windows Password Recovery Tool
1. Get Windows 7/8 Password Reset Disk in Control Panel
For Windows 7:
Open Control Panel from Start menu, and turn to User Accounts and Family Safety - User Accounts screen. Insert bootable USB drive and click "Create a password reset disk". Follow "Forgotten Password Wizard".

For Windows 8:
Windows 8 Control Panel is different from Windows 7. Control Panel has to be viewed by "Small icons" or "Large icons". And then User Accounts could be found.

Windows 8 Control Panel is different from Windows 7. Control Panel has to be viewed by "Small icons" or "Large icons". And then User Accounts could be found.

2. Burn Password Reset Disk with Windows Password Recovery Tool
Step 1: Install and run Windows Password Genius on another accessible computer.
Step 2: Prepare bootable USB or CD/DVD-ROM to burn password reset disk.
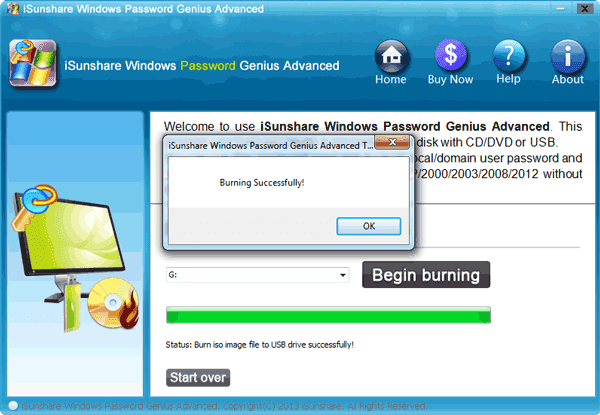
When you see "Burning Successfully" message, Windows 8/7 password reset disk has been created. Besides, such password reset disk also works for Windows Vista/XP and Windows server 2012/2008/2003/2000.
Related Articles:
- No Reset Disk- How to Reset Windows 8 Password
- How to Reset Windows Vista Password without CD or Reset Disk
- How to Change Admin Account with Windows 8 Disk
- How to Reset Windows 7 Password with or without USB Disk
- How to Make a Boot Disk for Windows 7
Go to link Download
Friday, March 17, 2017
How to Secure and Edit a Secured PDF Document
How to Secure and Edit a Secured PDF Document
Why we should have to secure PDF file?
- PDF (Portable document format) is popular document sharing format over the Internet. PDF file are usually used in formal or informal occasions.
- Because of various advantages offered by the portable document format, lots of confidential documents are transferred by people via Internet, e-mail etc.
- If PDF file is not protected with password or permissions, any persons can open even change PDF document contents, which will lead to PDF crack and receivers cannot get the right one.
- Part 1: How to Secure a PDF File
- Part 2: How to Edit a Secured PDF Document
Part 1: How to Secure a PDF File
If you are the creator and owner of PDF file, you can protect PDF file with password and permissions by yourself now.
The following article in this part will mainly talk about how to secure PDF files with password and permissions.
Step 1: When PDF file is prepared and open, navigate to Protection Ð Encrypt Ð Encrypt with Password in Tool pane at the right side of PDF file window. Or in tool bar, click Encrypt button and select "Encrypt with Password".

Step 2: In pop-up Password Security Settings window, document open password and permissions can be set.

- Check Require a password to open the document, and type a secure password in Document Open Password box.
- Check box under Permissions, and type a different complex password in Change Permissions Password box. Click OK.
Step 3: Then password confirmation dialog pops up. Type document open and permissions password again in dialogs and click OK.


Step 4: The last step is to save changes on this PDF file, otherwise, PDF file will not be secured really with password and permissions.
Part 2: How to Edit a Secured PDF Document
When PDF document is secured with open password and edit permissions, open password should be known to open secured PDF document, then remove permissions, PDF document can be edited.
Step 1: Open secured PDF document.
If you have PDF open password, open PDF document instantly, otherwise, PDF document open password should be found first. For example, take effective PDF Password Genius to find PDF open password.
1. Get, install and run PDF Password Genius on your computer.
2. Import protected PDF document by clicking Open button in tool bar of PDF Password Genius.
3. Choose password recovery typeand make settings for it in order to find PDF password with as short time as possible.
4. Begin to recover PDF document password after Start button clicked.

5. Copy password in window appearing following and open secured PDF document with it.

Step 2: Remove PDF Edit Permissions.


2. Enter permissions password you have in pop up password box. Click OK. Then you can see the Restrict Editing button become available, that means PDF security password has been removed.

Step 3: Edit PDF document without any restrictions.
Above steps are intended to remove secured PDF document security, so if you want to protect PDF after editing, you should set document open password and permissions again.
Related Articles:
Related Articles:
- Conversion between Microsoft Word 2013 and PowerPoint, PDF
- PDF Owner and User Password - Keep PDF Safe
Go to link Download
Monday, March 13, 2017
How to Encrypt a File or Folder with Easy Ways
How to Encrypt a File or Folder with Easy Ways
Maybe you could find several different kinds of encrypted methods for files, but whether they are helpful for you or easy to use, you donÕt know that. And it is hard to promise that. Actually, too many encryption methods are not necessary for us. What we need is easy-to-use and effective encryption ways. Now the following will show some easy ways with or without encryption software, which apply to both computer expert and newcomers.
Choice 1: Some Simple Ways to Encrypt Files without Software
Method 1: Keep You File or Folder Hidden
Right-click parameters of file or folder, and set its parameter as Hidden. And then navigate to Control Panel, open Folder Option and click View button to choose donÕt show hidden file or folder. As a result, you could not see this file or folder again until you cancel these settings.
Method 2: Name Suffix Encryption
Change the extension name of the file or folder after they are compressed. But you have to remember what kind of the file is. This method can be used when you use method 1.
Method 3: Compress File or Folder as *.winrar Encrypted Compressed Folder
Right-click the file or folder you prepare to compress, and then Add to compressed file. Choose Advanced Ð Set Password Ð Enter Password, and then make sure it. Keep other options default settings.
Method 4: Lock File with Notepad
1. Make sure which file you want to lock, for example, D:pics. Now create new notepad and type following text:
ren pics pics.{21EC2020-3AEA-1069-A2DD-08002B30309D}
pics is the name of your file, and save it as loc.bat in the same directory like file.
2. And then open another new notepad and type similar text like the following:
ren pics.{21EC2020-3AEA-1069-A2DD-08002B30309D} pics
Save it as key.bat in the same directory too.
Tips: Actually, the notepad could be named optionally. But the suffix should be .bat.
How to lock and unlock file?
1. Click loc.bat, file will be locked.
2. Click key.bat, the file will be unlocked and you can handle it.
Choice 2: Encrypt File with Software
Software 1: WinZip
WinZip is the most popular compression and decompression software, providing simple encryption function at the same time.
- First, create new compressed file without any content.
- Add file you want to compress to it.
- Choose Password command in Option, and password setting window will pop up.
- Type password you need to set in text box. When you type password, if you hope password not be seen, please select ÒMask PasswordÓ.
Software 2: WinRAR
Maybe WinRAR is more popular than WinZip. So it is necessary to learn how to use WinRAR to compress and encrypted file or folder. Encryption of WinRAR can go on with graphical interfaces and command. Click Ctrl + P or choose Password command in Option menu. A dialog Type Default Password pops up, so just type your password now to encrypt file.
Tips:
- If the "Show Password" option is forbidden, you have to type password twice to make sure the accuracy of password.
- If you have set "Encrypt File Name Option", WinRAR will not only encrypt data, but also encrypt all the sensitive area of the package including file name, size, parameters, annotation and other data. Therefore, it provides us higher safety level. Both password and file list could not be seen in the package encrypted with command. And this option is more significant when it compresses file as *rar file. If you decrypt file with default password or compress file into *.zip file, it will be ignored.
Related Article:
- How to Encrypt Archives in Computer and Some Tips
- How to ZIP a File with a Password
- How to Encrypt Files or Folders in Windows 10 Computer
Go to link Download
Sunday, March 12, 2017
Lock Your Computer Screen By Creating A Shortcut
Lock Your Computer Screen By Creating A Shortcut
 Hello friend!
How are you? Hope you are very well. For locking the computer screen we use two options (logoff and sleep). Today I am going to show you an easy way how to lock your computer, creating by a shortcut.
Anyway if you want to know this tricks, please follow my proceduresÉÉ
Right click on your desktop --> From the New --> Click Shortcut. Now will open a new window like the bellow image.
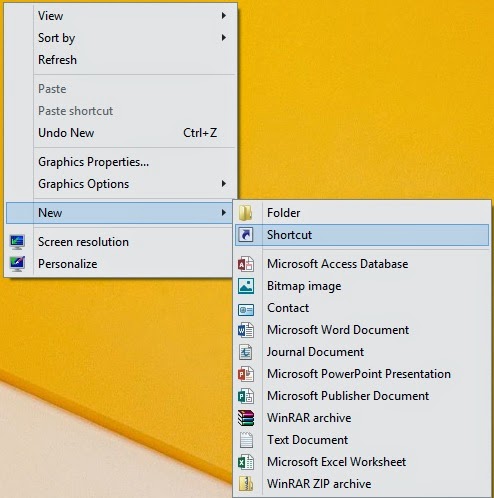
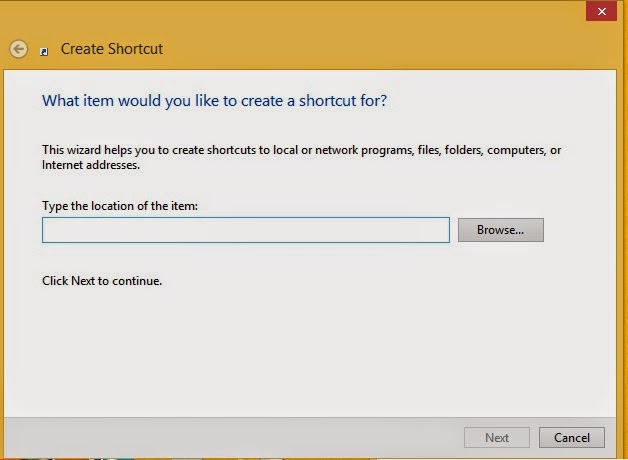
Now type this code in the Òrundll32 user32.dll,LockWorkStationÓ then click next. Type the name of this shortcut (ItÕs not necessary, you can use default name) then click finish.
Your work is finished. Now double click on your created file and look your computer screen is locked.
Video Of This Tutorial:
If you think this article is helpful for you please share with your friends.
Thanks to all of my friends,
Md. Manjurul Islam (Rubel)
You may like also.....
How to Protect Your Secret Files From Others
How To Create Password On Windows 8.1
How to backup/Import Microsoft Outlook Mail
Go to link Download
Monday, March 6, 2017
World Top 15 Best Websites that can make you a Web Designer
World Top 15 Best Websites that can make you a Web Designer
http://m14hackersworld.blogspot.com
World Top 15 Best Websites that can make you a Web Designer

It is very easy to say that i want to make my own website but Friends its a very difficult job if you dont know about programming and such famous languages HTML,JavaScript,Css are the basic building of a webpage.ÊIf you want a real and good web designer and also want a ful Grip on web designing so have a good knowledge of this languages which names is mentioned above. This article is for those who wants to learn how to make a website, all the websites listed below have very accurate information and you can easily learn web designing step by step.
Read more È
Go to link Download
Sunday, March 5, 2017
How To Make a Single Name Facebook
How To Make a Single Name Facebook

How To Make a Single Name Facebook
How To Make a Single Name Facebook by MastiComputer
Go to link Download
Friday, March 3, 2017
How to Create and Use a Windows 7 Password Reset USB
How to Create and Use a Windows 7 Password Reset USB
Suppose if you forgot Windows 7 password, you would try to find solutions to recover or reset it through the internet. Soon you would find one solutionÑusing Windows 7 password reset USB disk, which is most mentioned by people. So here in this article, I will show you the exact ways to create a Windows 7 password reset disk.
Theoretically, a password reset disk Windows 7 can be made with a CD/DVD or USB flash drive. Since USB flash drive is more convenient to carry and safer to preserve, here I highly recommend creating a Windows 7 reset password with USB to prevent your computer from being locked. Below are guides on how to create a Win 7 password recovery USB.
Scenario 1: If you havenÕt forgotten your Windows 7 password yet.
At this situation, you can easily make such a password reset USB disc for free to prevent your computer from being locked. Now please follow the below steps:
Step1: Insert the prepared USB flash drive into your computer.
Step2: Type ÒresetÓ in the Windows search box and select ÒCreate a password reset diskÓ.
Step3: When the ÒForgotten Password WizardÓ appears, click ÒNextÓ.
Step4: Select your USB flash drive and click ÒNextÓ.
Step5: Once the wizard finishes creating the reset disk, click ÒNextÓ then ÒFinishÓ.
Scenario 2: If you have already forgotten your Windows 7 password.
Many computer users actually didnÕt take any precautions against Windows 7 password forgotten problem before they find theyÕve lost or forgotten the password. So if you donÕt have such a password reset disk when you forget or lose your Windows 7 password, you need to seek for other ways to make one and then use that to reset Windows 7 password, say a professional Windows password recovery toolÑWindows Password Recovery Enhance.
HereÕs how to create a reset password Windows 7 USB with Windows Password Recovery Enhance.
Step1: Download, install and launch Windows Password Recovery Enhance on an accessible computer.
Step2: Insert the early prepared USB flash drive to the accessible PC.
Step3: Choose ÒUSB Flash DriveÓ button to select your USB, next click ÒBurnÓ button to initiate the burning process. (Burn the image file of Windows Password Recovery Enhance to USB.)
Step4: Soon you will receive a message box showing ÒBurning successfully completedÓ. Until now it means you have successfully created a Windows 7 password recovery USB. Next, just click ÒOkÓ to end to process and then take out the USB from PC.
ThatÕs all about how to create password reset USB disk for Win 7. If you are interested in how to use a reset Windows 7 password USB for lost Win 7 password recovery, you then can refer to:
http://www.windowspasswordrecovery.net/support/enhanceuserguid.html
http://www.windowspasswordrecovery.net/support/enhanceuserguid.html
Source: http://www.windowspasswordrecovery.net/article/reset-win-7-password-with-usb.html
Go to link Download
Wednesday, February 15, 2017
Mac Recovery HD A spare wheel not really convenient
Mac Recovery HD A spare wheel not really convenient
Recovery HD A spare wheel not really convenient.
 To overcome the lack OS X DVD or installation key that allowed particularly easily reinstall the OS X on your Mac, APPLE offers from LION a new tool that allows system recovery. This "Recovery HD" tool is unfortunately far from having the flexibility and simplicity that can have the DVD or the installation key. It is also necessary to be online to use certain features of "Recovery HD". Better to provide alternative solutions in case something happens and avoid resorting to this not necessarily convenient tool.
Introducing "Recovery HD"
Up to 10.6 SNOW LEOPARD, reinstall Mac OS X on her in case of necessity, it was enough to bring the DVD bootable OS X installation, start holding the "C" key to have started on the DVD, which allowed to launch "Disk Utility" to initialize (or partition) hard disk and proceed in the wake of the re-installation OS X.
With the arrival of Lion, the situation has changed. OS X is no longer sold on DVD bootable installation or as bootable USB drive, but by default via download from the Mac App Store. Therefore, to reinstall OS X if necessary, it is possible to us as in the past...
To face this new, APPLE has decided to propose a different system from LION for reinstalling OS X on your Mac if necessary. This tool is called "Recovery HD".
This is actually a small partition that is automatically created on your hard drive, just when you install YOSEMITE on this hard drive. You do not require same account, and may not know you now that you have such a partition! This is unfortunately not surprising, because this partition is very well hidden and nobody will tell you that it exists on your Mac!
NB: In some cases, this partition "Recovery HD" will however not be installed on your Mac during installation YOSEMITE: When the hard drive on which you install YOSEMITE is partitioned, in the case of a RAID volume, or if the disk has a partition configuration Boot Camp nonstandard, in which partitioning was performed after the execution of the Assistant Boot Camp or the configuration created by the Boot Camp Assistant has been manually changed.
This partition "Recovery HD" just lodge next to your OS X YOSEMITE system. So if you have YOSEMITE installed on your Mac, you have de facto of this small hidden partition.

To access the partition, you must start the Mac is holding the "R" key pressed (in this case you will automatically start on that partition "Recovery HD") or holding down the "alt" key (in this case, Then select the partition "Recovery 10.10" that will appear on the screen).
If you have enabled "FileVault", access to the "Recovery HD" cannot be done by holding down the "alt" key when booting the Mac. It must indeed start the Mac by holding the "cmd" and "R" keys down.
What is this partition "Recovery HD"?
Once you have started on this partition "Recovery HD", you go (like the good old days of the DVD) to a certain tools.
At the top of the screen, in the menu bar, the "Utilities" menu include access to "Terminal" in the "Network Utility" and "Password Utility Firmware". You probably will not need these utilities, if perhaps not to reset the administrator password:
Reset the administrator password
á Start the "Terminal."
á Enter this command: resetpassword
á A new window appears allowing you to change the administrator password.
á When you restart the Mac, you can use the new password.
Now look at the main window that appears when you start up your Mac in "Recovery HD":

"Recovery HD" allows you to run a restore from backup "Time Machine" to launch "Safari" to surf and have particular online help, launch "Disk Utility" to repair minor injuries your OS X system and also boot / partition hard drives connected to the Mac, and perform a re-installation of OS X if necessary.
So finally, you will tell me if your Mac YOSEMITE faces some problems, well instead of starting as in the past on the installation DVD, youll be able to boot to that partition to start small basic repairs via "Disk Utility". Certainly it is possible, but since you have a clone having many more powerful maintenance tools, Im sure you already Demarrias more on the DVD to perform this type of basic maintenance operation ... then you will not start on that partition "Recovery HD", right?
And to re-install the system in case of need? In the past, yes, actually the best way to conduct a clean install of your OS X system was started on the installation DVD and do so to the re-installation of OS X. But now I urge you to do not go through "Recovery HD" to re-install OS X on your Mac.
Indeed, although it is of course possible to re-install OS X via the "Re-install OS X" function offered by "Recovery HD" This solution is not, in my opinion, not the best nor the most practical. If you have a clone, then preferably use the clone to make an OS X re-installation.
By default this partition "Recovery HD" is installed on the same hard drive where you installed OS X YOSEMITE. But what happens there if unfortunately your hard drive were to let go? Without clone bootable USB drive without installation YOSEMITE (crafted by you), it will NOT POSSIBLE not boot from this partition "Recovery HDÓ!!! So what?
Apple offers to download HERE a "Disk Recovery Wizard". This wizard letÕs just clone the partition "Recovery HD" to another hard disk (external drive) or even a USB drive. But be careful, in this case, this key will IN NO EVENT key USB bootable installation YOSEMITE, but it will just be a clone of the partition "Recovery HD" you already have on your hard drive. You can use this partition clone "Recovery HD" if you cannot use the partition "Recovery HD" located on your hard drive.
Its a little spare tire of the spare wheel.
NB: It is necessary to make the partition clone "Recovery HD" before the partition "Recovery HD" is no longer operational, of course.
Important note about the Mac market after the release of LION 10.7
Macs sold since the release of LION and therefore come with LION MOUNTAIN LION, MAVERICKS or YOSEMITE now installed on the machine, also have a function "OS X Internet Recovery" that allows you, in case of failure your hard drive and / or hard disk change, start your Mac directly from APPLE servers to process resettlement OS X. This feature is not available for Macs before the release of LION and therefore that had been purchased with a previous version of the system (or SNOW LEOPARD LEOPARD).
"OS X Internet Recovery" checks your machine, including its serial number (to verify that your Mac is allowed), and then automatically downloads and launches an image of the hard drive recovery.
To do this, you must have an Internet connection because you will have to download more than 5 GB of data necessary for the relocation YOSEMITE!!
More on "Internet Recovery OS X" HERE.
Why make it simple when you can make it complicated? Some will no doubt think that this system is practical and modern because it avoids having to annoy to re-install OS X, but I honestly think that APPLE would be much better to continue to offer the sale of bootable USB keys OS X and especially to slide one in every Mac sold in cartons YOSEMITE, rather than forcing new buyers to go through this function "OS X Internet Recovery" really not practical. Everyone does not necessarily have a high speed Internet connection, and how to re-install OS X and its MacBook Air or MacBook Pro when you are in a place without an Internet connection?
Indeed, the new Mac buyers have no choice but to go through Apples servers to re-install OS X if something goes wrong with their hard drive, they have neither USB Bootable of installation or installer (downloaded from the Mac App Store) they could use from a clone.
In short, after reading the above, it is better to take all possible precautions to deal with any difficult situation. I do know strongly advise you to urgently provided a clone of your YOSEMITE installer and / or you make a bootable USB installation YOSEMITE key.
Indeed, the new Mac buyers have no choice but to go through Apples servers to re-install OS X, if something goes wrong with their hard drive, they have neither Bootable USB key to installation or installer (downloaded from the Mac App Store) they could use from a clone.
Go to link Download
Subscribe to:
Posts (Atom)