Showing posts with label or. Show all posts
Showing posts with label or. Show all posts
Monday, May 15, 2017
Tips or Tricks for Windows Server 2012 Usage
Tips or Tricks for Windows Server 2012 Usage
Windows Server 2012 is new Windows server operational system, which is designed based on Windows 8. So it is different from previous server operating system. If you operate Windows server 2012 like before, that would be difficult. Therefore, now this passage gives some tips and tricks to use Windows server 2012 effectively.
Tip 1: How to find Windows Server 2012 traditional ÒStartÓ Menu
Windows server 2012 also removes ÒStartÓ menu from taskbar. Maybe there are so many server computer users unhappy about it, but this is truth. Now letÕs see how we can find traditional ÒStartÓ menu.
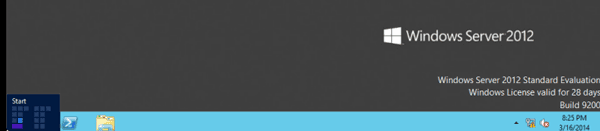
Actually, ÒStartÓ menu has not disappeared. It is just removed to the left bottom side of traditional desktop. But users couldnÕt see it only if move mouse there. Click it, and experience new functions setting in Start menu, including Server Manager, Task Management, Computer etc common applications. Double-click the application picture, and it opens. If click it, we can delete or remove it. If we want to turn back to desktop, just click ÒDesktopÓ.
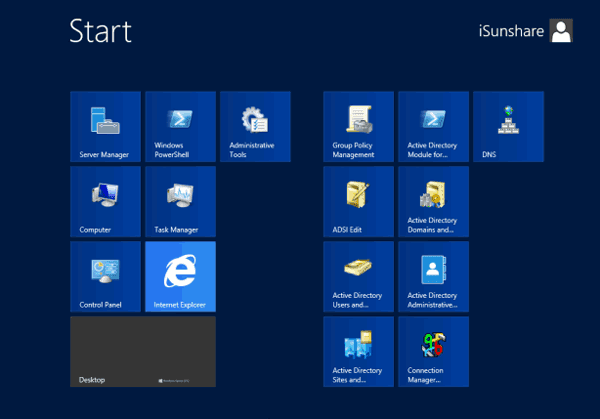
Or move the mouse to the right bottom side of window, and you would see ÒStartÓ menu like in Windows 8, click it and Start screen appears.
Tip 2: How to find software or tools in Windows server 2012
In Windows server 2012 start screen, what we can see is not what we think of. There are so many tools and software that we donÕt know where they are. In fact, it is simple. We just need to right click in the blank section of Windows start screen. And then there would be a option ÒAll AppsÓ pop up in the bottom side. Click it and we could see the tools page.
In the tools page, we can see effective tools in Windows server 2012. If we use one application usually, we can right click it and add it to desktop, taskbar or login with administrator etc.
Tip 3: How to shut down Windows server 2012 computer fast
Windows server 2012 shutdown problem also troubles computer users because of no ÒStartÓ menu on traditional desktop. So sometimes we could only shut down server computer with Task Manager. It is helpless. Now this passage summarizes four ways to shut down Windows server 2012.
1. Press Windows + I or move mouse to the right bottom side of desktop, Menu and Toolbars. Click ÒPowerÓ and "Shut down" Windows server 2012.
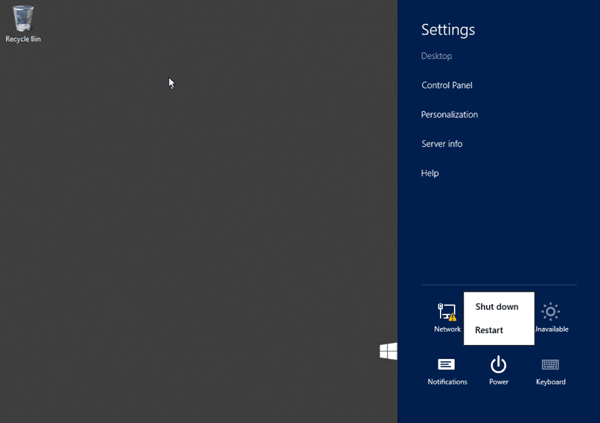
2. Press Alt + F4 on traditional desktop to open application close window. In traditional desktop, Alt + F4 is used to close Metro applications.
3. Press ÒCtrl + Alt + DelÓ, Windows shutdown options would appear in the right bottom corner of desktop.
4. Press Windows + R to run command Òshutdown.exe -s -t 00Ó.
Run command prompt with administrator, type in Òpowercfg/H onÓ. ÒPowerÓ option is open. Click ÒMust type password when wake upÓ in the left side, and tick the ÒFast BootÓ. And you could start and shut down Windows server computer fast.
Refer to: How to enable fast boot and shut down Windows server 2012
Refer to: How to enable fast boot and shut down Windows server 2012
Tip 4: How to adjust performance to optimize programs
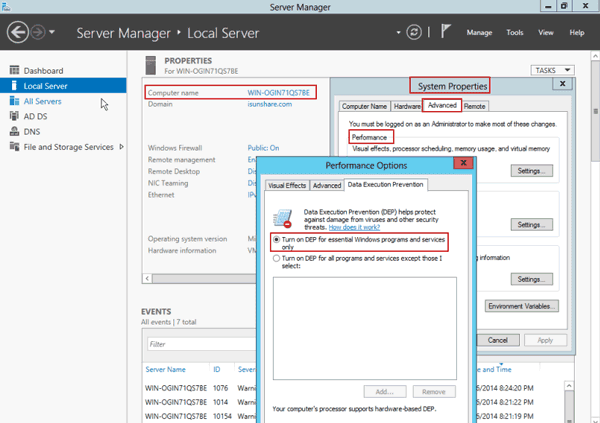
Open Server Manager Ð Local Server, click computer name and System Properties window pops up. Select Advanced Ð Performance, and choose ÒTurn on DEP for essential Windows programs and services onlyÓ in Data Execution Prevention. Select ÒAdjust to optimize performanceÓ Ð ÒProgramsÓ. And then click ÒChange ButtonÓ in virtual memory, donÕt tick ÒAutomatic management of all drives paging file sizeÓ. Choose system drive, select ÒNo page fileÓ and click ÒSettingsÓ button so as to delete virtual memory files in system volume.
Tip 5: How to disable Enhanced IE security settings
Open Server Manager Ð Local Server Ð Enhanced IE security settings, and then change ÒEnabledÓ to ÒDisabledÓ.
Tip 6: How to not boot Server Manager when Windows logon
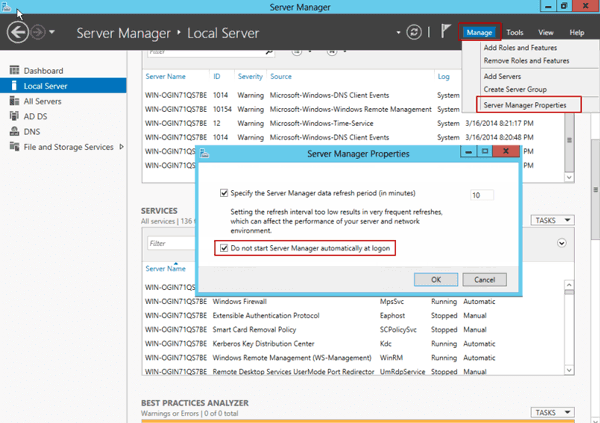
Open Server Manager, and click ManageÐ Server Management Properties, and choose ÒDont automatically start server manager when logonÓ.
Tip 7: How to set input method switch shortcut
If you are Chinese people, please pay attention to that English and Chinese input method switch shortcut is not the same as previous Windows operational system. Now open Control Panel Ð Language Ð Change Language Hotkey, set their switch shortcut as ÒCtrl +ShiftÓ.
Related articles:
- Change Windows Server 2012 from Host to Domain Controller
- Upgrade Server 2008 and Migrate Domain Service to Windows Server 2012 R2
- Windows Server 2012 R2 Activation Key Recovery Finder
Go to link Download

How to Reset Windows Vista Password without CD or Reset Disk
How to Reset Windows Vista Password without CD or Reset Disk
When you forgot Windows Vista password and no installation CD image and password reset disk are available, how should you do to reset forgotten Windows password?
From the beginning of Windows password recovery, password reset disk and convenient installation CD are computer usersÕ favorite tools to recover forgotten or lost Windows login or admin password. But now, you donÕt have them longer. As soon as you are complaining about this, you have to thank for this chance, which makes you find another more effective ways to reset Windows Vista password Ð Windows password recovery tool.
Now, in this passage, we mainly talk about two tools for Windows Vista password recovery.
1. Offline NT Password Registry Editor - Old and Freeware Program
2. Windows Password Genius - Easy and Effective Program
1. Offline NT Password Registry Editor - Old and Freeware Program
2. Windows Password Genius - Easy and Effective Program
1. Offline NT Password and Registry Editor Ð Old and Freeware Program
Offline NT Password and Registry is a utility to reset password of any user that has a valid local account on Windows system from NT3.5 to Win7, including Windows Vista. You do not need to know the old password to set a new one. It works offline, that is, you have to shut down your computer and boot off a CD or USB disk to do the password reset.
Step 1: Get Offline NT Password and Registry Editor.
Just get password reset CD/USB boot disk Ð Offline Windows Password and Registry Editor
Step 2: Insert the CD and convince your BIOS that should boot from it.
Step 2: Insert the CD and convince your BIOS that should boot from it.
You will see Windows Vista computer boots and outputs a lot of kernel messages about your hardware and such.
Tip: How to set computer boot from CD/DVD ROM
Step 3: Select disk where the Windows installation is.
Here we only have one partition, so we just press Enter to select it.

Step 4: Select PATH and registry files.

The registry is usually system32/config under WINDOWS or WINNT directory, depending on the windows version (and it may be changed during installation).
If the correct partition has been selected, the default prompt will be adjusted to match if it can find one of the usual variants.
And the select which part of registry to load, use predefined choices or list the files with space as delimiter.

Choice 1 is for password edit, most used. So now just press Enter to select it.
Step 5: Password or registry edit.
After we choose password reset, chntpw runs and its main interactive menu appears.

Just select 1 to edit user data and passwords. But you can also do other things.
And then that will list user info and passwords. Choose user you want to reset its password and go on.
About details on how Chntpw disk reset Windows password, please turn to:
How to Reset Your Windows password without an install CD
2. Windows Password Genius Ð Easy and Effective Program
Does the first program help you? If not, go to see how this easy and effective program works. Compared to Offline NT Password and Registry, Windows Password Genius with user-friendly interface, becomes easier for Windows Vista user to use, and whose concise function design makes operation effective.
Step 1: Get Windows Password Genius to install on your available computer.
There are four versions of Windows Password Genius for you to choose. Except raid version, other three versions apply to Windows Vista computer. Now download Windows Password Genius Professional.
Step 2: Burn a Windows Password Reset Disk.
Step 2: Burn a Windows Password Reset Disk.
When it runs normally, insert bootable USB drive into available computer. And then choose media type Ð USB. At last, click ÒBegin burningÓ to create password reset disk. Few seconds later, a message ÒSuccessfully burningÓ will tell you password reset disk has been created.
Step 3: Set Windows Vista Computer Boot from USB.
Plug USB reset disk into Vista computer first. How to boot from USB various from computer make to computer make. Some BIOS shows a boot device select menu if you press ESC, F8, F11 or F12 or something like that during the self-test. Some even tell you on the screen what to press.
How to set computer boot from USB
Step 4: Reset Windows Vista Forgotten Password.
If it boots from USB reset disk, you should see this:

Select Windows Vista and user you have forgotten password. Click ÒReset PasswordÓ and ÒYesÓ to make sure remove its password.

The last step is to reboot locked Windows Vista computer, and exit USB drive during start-up. Now you will see you donÕt need to type any password to login Windows Vista.
Which one can help you in short time? Which one could reset Windows password even you have no knowledge about computer? Make a try, and you will know.
Which one can help you in short time? Which one could reset Windows password even you have no knowledge about computer? Make a try, and you will know.
Go to link Download
Friday, May 5, 2017
How to Reinstall Office without Disk or Product Key
How to Reinstall Office without Disk or Product Key
After we buy a new computer, besides Windows installation, there are still other programs having to be installed on new computer, such as common Microsoft Office. Almost all of computer users use it to work or write something, or do with data. But unfortunately, we always encounter some problems when we prepare to install full version of Microsoft Office. How to reinstall Office successfully becomes a new problem for us after we get new computer and Windows system.
We can discuss this problem on three occasions:
- How to reinstall Office without disk
- How to reinstall Office without product key
- How to reinstall Office without disk and product key
1. How to reinstall Office on new computer without disk
Maybe you have purchased Microsoft Office at a store or from the web, or it has come with your PC. You are given a 25-digit Microsoft Office product key. It is very important to keep the product key in safe place or write it down.
But now you lost or misplaced your Microsoft Office Disc even though you have product key. So you are unable to reinstall Office on your new computer.
Actually, at this time, you just need a personal computer and an internet connection, and you can go to Microsoft Office download page to choose the right version of Microsoft Office for you.
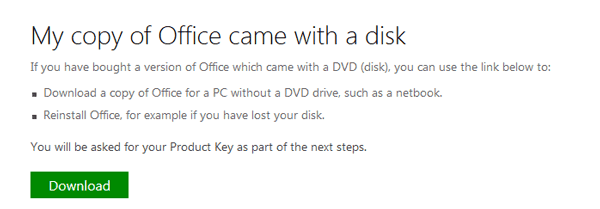
Step 1: Click on the green Download button under the main heading "My copy of Office came with a disk".
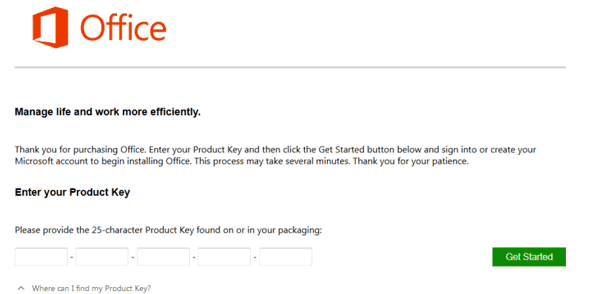
Step 2: Type in product key in the product key box.
2. How to reinstall Office without product key
When you have purchased Microsoft Office, there would be Office product key for you. But now Office product key has been lost and only Microsoft Office disc is saved in computer. How to reinstall Office on another new computer?
At this moment, the main step is to find out Office product key. According to the previous installation of Office in your old computer, you could find its product key with software, iSunshare Product Key Finder.
Step 1: Run Product Key Finder on your old computer. And click ÒStart RecoveryÓ to recover product keys for programs installing on computer now.
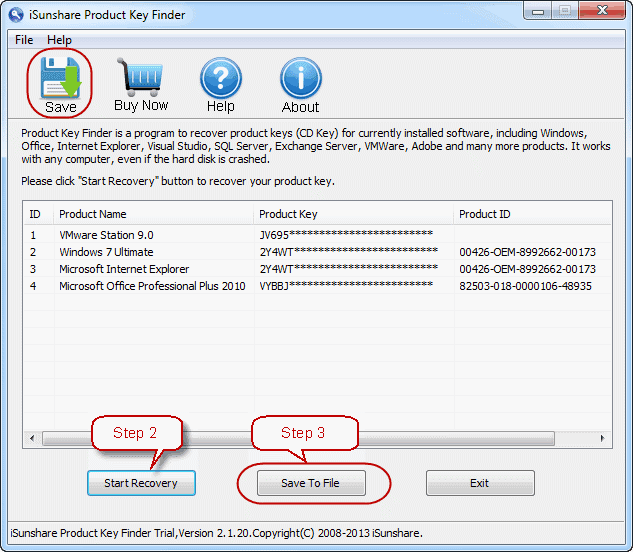
Save Office product key to a text file after all the product keys appear in software window.
Save Office product key to a text file after all the product keys appear in software window.
Step 2: Install Microsoft Office on new computer and type in product key just found to complete Office reinstallation.
Tips: How to Reinstall Microsoft Office without Product Key
Tips: How to Reinstall Microsoft Office without Product Key
3. How to reinstall Office without disc and product key
From the above introductions on two different situations, we can know if you donÕt have Office disk, you can download it from:
http://office.microsoft.com/en-gb/products/download-backup-restore-microsoft-office-products-FX103427465.aspx
If you have lost Office product key, Product Key Finder could help you find it out on your old computer.
After all Office disk and product key has been prepared, begin to reinstall Office on your new computer.Related articles:
- How to activate Office 2013 without product key
- What matters needed attention if reinstall Windows 7 after forgot password
- Find Lost Windows/Office Product Key easily with one click
- How to Find Windows 8.1 Activation Key
Go to link Download
Friday, April 28, 2017
WiFi ‰ÛÏLimited Connection‰Û or ‰ÛÏNo Internet Access‰Û 9 Solutions You Need to Know
WiFi ‰ÛÏLimited Connection‰Û or ‰ÛÏNo Internet Access‰Û 9 Solutions You Need to Know
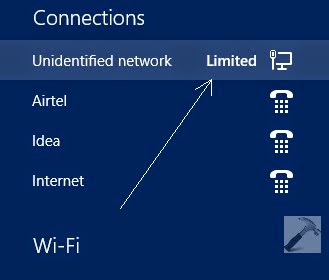
Question 1: I need help because I have tried a lot of tricks but still canÕt connect to WiFi at all. I have been connected to my modem before but now all I see is limited connectivity which doesnÕt allow me to connect to the internet. What can I do?
Question 2: I recently ordered a new Lenovo laptop online. I got the y510p. My problem is when I connect to the WiFi it says limited connection. I have tried many "fixes" online but none have worked. I really need help. Does anyone know how to fix this?
 |
| WiFi Òlimited connectionÓ |
After installing Windows 8 or Windows 8.1, users frequently get into the trouble WiFi Òlimited connectionÓ or Òno Internet accessÓ. There are various reasons for that. According to the most common causes I summarize 10 solutions to cope with the trouble. Hope to help you well:
Solution 1: Examine whether your modem, adapter, router and access points are turned on and connected correctly.
- Make sure the modem, adapter and router are connected correctly and the lights are on.
- Re-seat all the cables and power cords.
- Start the computer and open the Windows Desktop. On the Windows desktop, click the Network Connection icon, then click the name of the network and click connect.
Solution 2: Reset power to router and modem
After working for a long time, your router or modem may crash temporarily. In this case you need to reset power to your router and modem. Please follow the steps below:
- Unplug the power to the wireless router and to the cable or DSL modem and wait at least 30 seconds before continuing.
- Reconnect the power to the modem and allow it to re-establish a connection to the ISP. If the modem has indicator lights, wait until the lights indicate a connection. (If using a separate wireless router, reconnect the power to the router and allow it to re-establish the connections to the modem and other components)
- After the modem and router have finished making connections, check whether your computer can connect to WiFi and have access to the Internet. If not, please refer to the following solutions.
Solution 3: Re-configuring the wireless network
- Get intoÓ Network and Sharing CenterÓ from control panel and then click ÒSet up a new connection or networkÓ.
- In the ÒChoose a connection optionÓ window, select ÒManually connect to a wireless networkÓ, and click ÒNextÓ.
- Type the required wireless network information, and then click ÒNextÓ and ÒcloseÓ.
- From the Windows desktop, click the Network Connection icon in the notification area, and then click the name of the network. Click "Connect". Enter the network password (or security key) for the selected wireless network, and then click ÒNextÓ.
Solution 4: Moving your computer closer to the router and avoid the influence of solid objects and electrical appliances
As is known to us, a wireless network router has a limited broadcast range. The further the computer is from the router, the weaker the broadcast signal. And also Solid objects such as walls, metal furniture, and electrical appliances might interfere with the signal and decrease the usable range. Thus you can move your computer closer to the router and prevent your computer form solid objects and electrical appliances.
Solution 5: Connect the computer directly to the network router with an Ethernet cable
To determine if the connection problem lies with the router settings or with the wireless signal you can follow this way. Detailed steps are as follows:
- Insert an Ethernet cable from one of the available ports on the router to the network port on the computer.
- Wait for one minute, and then check the Network Connection icon in the notification area on the Windows desktop.
- If the icon has an X in the lower corner, the connection is not working. Right-click the icon, and then click Troubleshoot problems. Windows Network Diagnostics checks for problems. If Window Network Diagnostics is not able to fix the issue, the router is not working properly. Refer to Solution 6: Resetting and reconfiguring the router
- If the icon does not have an X in the lower corner, the connection is working. Disconnect the Ethernet cable from the computer, and manually setup a new connection to the wireless network.
Solution 6: Resetting and reconfiguring the router
In case that your router is hacked and the information is changed is changed by others. This way will work. Refer to the instructions below:
- Enter the default IP addresses for the router into the URL address field on the browser. The following list provides default IP addresses for several routers.
3Com: http://192.168.1.1
D-Link: http://192.168.0.1
Linksys: http://192.168.1.1
Netgear: http://192.168.0.1 - After the home page for the router displays, type a password to perform configuration tasks. (See the User Guide for model specific information)
- When you have administrator access to the router, change the routers default name, sometimes it is called an SSID, a name that is different from other routers in your area.
- Set up Wi-Fi protected access (WPA) or wireless encryption (WEP) to prevent other computers from connecting to your home network.
- Enter a network access password, sometimes called a passphrase. Make sure to pick a password that is easy to remember, such as a phone number that you dial often or a phrase that is familiar.
Solution 7: Updating the router firmware
Outdated firmware may prevent the router from accessing the Internet or certain Web pages. Log into the home page for the router and update the routers firmware. Consult the User Guide that come with your manual for information on how to perform a firmware update.
Solution 8: Installing updated wireless LAN driver and Bios
If no network connection icon is displayed within 15 to 30 seconds after enabling the wireless network, or if a Windows Device not Found error message displays, the software driver might be missing or corrupt. To fix this, download and install the latest drivers and BIOS from the Internet. You must know the exact model number or product number for your computer. Be sure to select the correct operating system.
Solution 9: Restoring your Windows 8 system to a previous state
If the computer was able to connect to the wireless network in the past, but now cannot connect, perform a ÒMicrosoft System RestoreÓ. Make your computer return to the previous state.
With the nine solutions most people are supposed to solve their WiFi Òlimited connectionÓ or Òno Internet access problems. If the solutions above donÕt work for you donÕt hesitate to contact the manufacturer for support.
Go to link Download
Friday, April 21, 2017
How to Unlock iPhone without iTunes or Passcode
How to Unlock iPhone without iTunes or Passcode
When you forgot passcode or couldnÕt connect iPhone to computer with iTunes, how to unlock iPhone when it is locked out?
If you want to find effective ways for this problem, I think it has to be discussed in following two parts.
- Part 1: How to Unlock iPhone without iTunes
- Part 2: How to Unlock iPhone without Passcode
So now the passage below will describe the details to unlock locked iPhone without iTunes or passcode.
Part 1: How to Unlock iPhone without iTunes
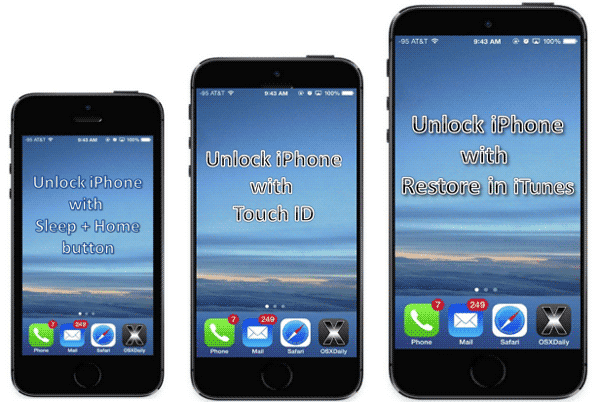
If you couldnÕt useRestore feature in iTunes, iPhone buttons can restore iPhone to factory settings. And then iPhone can be restored from iCloud backup after factory reset.
When iPhone is locked, hold Sleep button and Home button at the same time, iPhone will enter recovery mode. And then you just follow tips to do.
Part 2: How to Unlock iPhone without Passcode
Method 1: Access Locked iPhone with Touch ID
Use Touch ID instead of passcode to access locked iPhone, if it is iPhone 6, 6 plus, 5s or 5c. Touch ID is another way to protect iPhone, which has been created before you want to use it to enter locked iPhone. It is a fingerprint of iPhone user. And it can be used to unlock iPhone when your iPhone is locked because of passcode forgot.
Method 2: Unlock iPhone with iTunes
If iTunes is not available for iPhone, follow part 1.
If iPhone can be connected to computer, and just couldnÕt be checked by iTunes, iOSBoot Genius is another choice for your iPhone. It can easily enter iPhone recovery mode, so you can restore iPhone to factory default to unlock iPhone.
Step 1: Connect iPhone to computer.
Step 2: Install and run iOSBoot Genius.
Step 3: Click "Enter Recovery Mode" in iOSBoot Genius.
When "Exit Recovery Mode" becomes available, iPhone can instantly restore to factory settings with recovery mode.
Every method above has its advantages and disadvantages. We canÕt say which one is better than another one. What we can do is to choose available conditions.
Related Articles:
- How to Unlock iOS Backup after Password Forgot
- How Do I Unlock My iPad Air 2 without iTunes
- How to Unlock iPod Touch Backup If Password Lost
- Locked out of iTunes Backup Ð How to Reset iTunes Backup Password
- How to Exit Recovery Mode Easily without Data Loss from iPhone/iPad/iPod
Go to link Download
Wednesday, April 19, 2017
How to Reset Windows 7 Password with or without USB Disk
How to Reset Windows 7 Password with or without USB Disk
USB flash drive is usually used to create password reset disk, burn Windows installation disc, Windows recovery drive, which could reset Windows 7 password. So USB disk usually appears in Windows password reset. In this passage, we will talk about Windows 7 password reset with or without USB disk.
- Reset Windows 7 Password with USB Disk
- Reset Windows 7 Password without USB Disk
Part 1: How to Reset Windows 7 Password with USB Disk
- When you have USB disk with password reset disk, how to reset Windows 7 password?
- When you have USB disk with installation disc, how to remove Windows 7 password?
Option 1: Reset Windows 7 Password with USB Password Reset Disk
Password reset disk is common boot disk for Windows password reset, applying to Windows 8.1/8/7/Vista/XP and Windows server 2012/2008/2003/2000. And it is created in Control Panel or with Windows password recovery tool, such as Windows Password Genius.
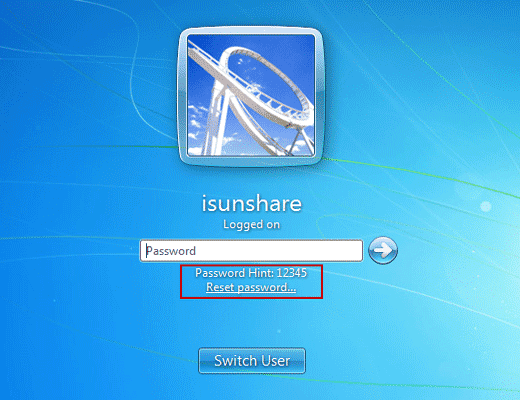
If it is created in Control Panel, just insert USB disk into your locked computer after you login Windows 7 failed. Click ÒReset PasswordÓ on Windows 7 logon screen, and Windows forgotten password reset wizard appears. Follow it and go on to set a new password for current user account.
If it is created with Windows password recovery tool, such as Windows Password Genius, you have to insert USB disk into locked Windows 7 computer. And set computer boot from USB disk. When Windows Password Genius program runs in WinPE environment, select Windows 7 system and user account to ÒReset PasswordÓ. This password recovery tool would remove forgotten Windows 7 user password.
If it is created with Windows password recovery tool, such as Windows Password Genius, you have to insert USB disk into locked Windows 7 computer. And set computer boot from USB disk. When Windows Password Genius program runs in WinPE environment, select Windows 7 system and user account to ÒReset PasswordÓ. This password recovery tool would remove forgotten Windows 7 user password.
Option 2: Reset Windows 7 Password with USB installation disk
Installation disc is used to reinstall Windows 7 or repair Windows 7, in order to remove forgotten Windows 7 password. So make sure important data has been back up previously.

- Boot from Windows 7 DVD or USB Device.
Insert Windows 7 USB installation disk into computer. And hold on pressing Del key. - Wait for Windows 7 Installation Files to Load
- Wait for Windows 7 Setup to Finish Loading
- Choose Language and Other Preferences
- Click the Install Now Button.
- Wait for Windows 7 Setup to Begin
- Accept the Windows 7 License Terms
- Choose the Type of Windows 7 Installation to Complete
- Show the Windows 7 Advanced Drive Options
- Delete the Partition Windows is installed on
- Confirm the Partition Deletion
- Delete Other Operating System Related Partitions
- Confirm Additional Partition Deletions
- Choose a Physical Location to Install Windows 7 On
After it completes successfully, you will get Windows 7 clean install. Previous Windows 7 password has been removed. Now there has been no password for Windows 7 default administrator. So now you could login into Windows 7 computer without password.
Part 2: How to Reset Windows 7 Password without USB Disk
When you donÕt have USB disk, CD disk is also available for Windows 7 password reset. Or create password reset disk with new bootable USB drive to reset Windows 7 password.
Option 1: Reset Windows 7 Password with system repair disc
- Plug the system repair disc in the CD/DVD drive of your locked Windows 7 computer. Restart the computer.
- A few seconds later, the screen displays Press any key to boot from CD or DVD. Press any key to boot the disc. If your PC still boots from the hard drive, you need to change the boot order in BIOS.
- Choose the Use recovery tools that can help fix problems starting Windows option. Click Next.
- On the next screen, youll see various system recovery tools that can used to repair your computer. Click on Command Prompt.
- In the Command Prompt window, type these commands one by one in order to replace the sethc.exe (Sticky Keys application) with the Command Prompt (cmd.exe).
c:
cd windows
cd system32
ren sethc.exe sethc.exe.bak
copy cmd.exe sethc.exe - Close the Command Prompt. Remove the system repair disc and restart your PC.
- Once you get to the Windows 7 login screen, hit the Shift key 5 times and it will open the Command Prompt window instead of the Sticky Keys application.
- Now to reset the password - just type the following command, replacing the username and password with the combination you want:
reset user isunshare 123456 - Close the Command Prompt and you should be able to log into your PC using the new password.
- After getting into Windows 7, remember to rename the sethc.exe.bak back to sethc.exe.
- Thats it Ð you have successfully reset your forgotten Windows 7 password.
Option 2: Create password reset disk with new bootable USB drive
When there is no USB disk to reset Windows password, Windows Password Genius provides you another chance to create password reset disk, which could recover Windows 7 forgotten password and add new user account in locked Windows 7 computer.
- Prepare devices what are needed to create password reset disk with USB drive.
Windows Password Genius, bootable USB flash drive, available computer. - Install Windows Password Genius on available computer and insert bootable USB drive into computer.

- Choose inserted USB drive and click ÒBegin burningÓ to burn password reset disk into USB drive. Exit it after successfully password reset disk creation.
- Plug USB password reset disk into your locked Win 7 computer, and boot computer from USB disk, you could remove Windows 7 password on Windows Password Genius program interface. After that, exit USB drive and reboot Win 7 computer.
Related Articles:
- How to reset Windows 7 password without reset disk
- How to create recovery disc for Windows forgotten admin password reset
- How to reset admin password on PC Windows 7
- How to bypass password for Acer laptop Windows 7 | forgot Windows 7 password
- How to crack administrator password in Windows 7 without CD
Go to link Download
How to Import External Data into Access 2013 App or Desktop Database
How to Import External Data into Access 2013 App or Desktop Database
While you want Access database referring to your important excel file, the introduction about importing external data into Access 2013 App or desktop database in this passage would tell you how to do. So whether you have such a problem, go on to read.
- S1: Import external file into an Access 2013 app
- S2: Import external data into Access 2013 desktop database
S1: Import external file into an Access 2013 app
Available external file type: Excel workbooks, ODBC data sources, text/CSV files, SharePoint lists, and other Access databases.
Preparation: Access 2013 has been installed and opened on your computer and imported files have been prepared on computer or connected storage devices.
Step 1: On the Add Tables page, you can import data from Excel workbooks, ODBC data resources, text/CSV files, SharePoint lists, and other Access databases.
Tips: You can see Add Tables page when creating a new custom app. But if you have already started an app, open it in Access, then click Home - Table.
Step 2: Near the bottom of the Add Tables page, click the type of data source you want to import, and follow the instructions in the Get External Data wizard.
Tips: Imported data is always added to new table with default List and Datasheet views.
S2: Import external data into Access 2013 desktop database
Imported data can be added to existing table. And sometimes, when you couldnÕt import data directly into an app, you might be able to import it into a desktop database first, and then import desktop database table into the app.
For example: import external excel file into Access 2013 desktop database
For example: import external excel file into Access 2013 desktop database
Step 1: Open Access 2013. On the External Data tab, in the Import & Link group, click the file type you want to import.

Step 2: Follow the instructions in the Get External Data Wizard. For example, click "Browse" button next to "File name" box, to specify the source of the definition of the objects. Now we choose to import Excel file.

Step 3: Follow "Import Spreadsheet Wizard" to do.
 |
| 3-1 Choose Show Worksheet you like and click Next |
 |
| 3-2 Check "First Row Contains Column Headings" and click Next |
 |
| 3-3 Set "Field Name" and "Data Type" |
 |
| 3-4 Set datasheet primary key |
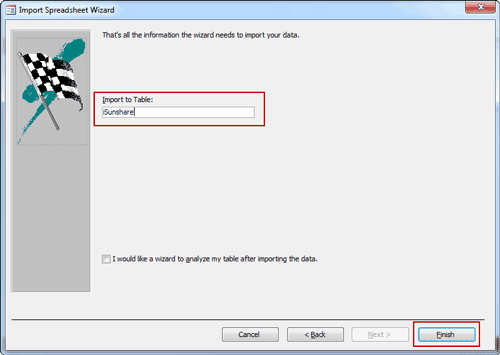 |
| 3-5 Set a name for imported Excel file in Access and click Finish |
 |
| 3-6 Exit "Import Spreadsheet Wizard" |
 |
| or Save Excel import steps |
Step 4: External Excel file has been successfully imported into Access 2013.

Summary:
The beginning of importing different external data into Access is the same. But it would be different after you choose the file type you want to import. For example, if you want to import SQL database into Access database, it would be more complex than importing Excel or access database file into Access.
Related Articles:
Related Articles:
- 3 Ways to Create Access 2007-2013 Database
- How to Encrypt and Decrypt Access Database
- How to Access Locked Access 2013 Database
- Access Database Password Reset
- What Errors Lead to Access DataImport from Excel or Export Failure
Go to link Download
Sunday, April 9, 2017
Hide or Show Search Box on Taskbar using Registry Editor
Hide or Show Search Box on Taskbar using Registry Editor
How do you hide or show search box on taskbar in Windows 10 computer? In this article, youÕll learn how to make it through changing the related value data in Registry Editor.
Step 1: Access Registry Editor.
Sub-step 1: Press Windows+R to launch Run, type regedit and tap OK.

Sub-step 2: Choose Yes in the User Account Control dialog.

Step 2: Open the value named SearchboxTaskbarMode.
In detail, it is located in HKEY_CURRENT_USER/SOFTWARE/Microsoft/Windows/CurrentVersion/Search.

Step 3: Change the value data.
1. To hide search box, input 0 in the value data box and click OK.

2. To display search box, type 2 in the value data box and hit OK.

Step 4: Restart the computer.
Tap the bottom-left Start button on the desktop, click Power and select Restart.

Related Articles:
Related Articles:
- Hide and Show Search Box on Taskbar in Windows 10
- 2 Ways to Disable Delete Confirmation Dialog in Windows 10
- A Brand New Way to Open Settings in Windows 10
Go to link Download
Friday, April 7, 2017
How to Set or Reset Access 2016 ACCDB Database Password
How to Set or Reset Access 2016 ACCDB Database Password
When access 2016 database is not encrypted, you can set a password to protect it for security.
When access 2016 database has been encrypted, but the password is too simple, you also can reset access 2016 database password to protect it again with powerful one.
- How to set Access 2016 ACCDB database password
- How to reset Access 2016 ACCDB database password
No matter you want to set or reset access 2016 database password, you should open access 2016 database with Open Exclusive mode. Otherwise, encryption or decryption will not be available.

Steps to set Access 2016 database password
1. Click File > Open > Browse in Access 2016 to find access 2016 database you want to open.

2. Select right database file and choose "Open Exclusive" mode in Open window.

3. Click File > Info > Encrypt with Password, type and confirm password twice on pop-up dialog and click OK. Your access database has been encrypted with a password.


1. Run Access 2016, and click File > Open > Browse, to search Access 2016 database.
2. Select database and Open Exclusive mode in Open window.

3. Type access 2016 database old password and click OK.

4. Click File > Info > Decrypt with Password, and type password again in Unset Database Password dialog, click OK at last to remove old simple password from access 2016 database.


5. Click File > Info > Encrypt with Password, type password and verify it on Set Database Password dialog.
Related Articles:
- How to Remove Password Protection from Access 2016 ACCDBDatabase
- Best Way to Open Access 2016 ACCDB Database without Password
- Failed to Encrypt or Decrypt Access 2007-2016 Database
Go to link Download
Subscribe to:
Posts (Atom)