Showing posts with label settings. Show all posts
Showing posts with label settings. Show all posts
Tuesday, May 23, 2017
How to Make Windows 7 Security Settings on UAC
How to Make Windows 7 Security Settings on UAC
Most of us probably have confronted with such situation. That is no matter which kind of user account we login Windows with, system administrator or local standard user, UAC prompting message always pops up when we prepare to install software on Windows 7 or change Windows system settings.
Actually, it protects our computer sometimes, but sometimes it disturbs operations on Windows 7 computer. So some impatient computer users may want to close UAC for convenience directly. However, it is really suitable to close UAC at our will?
It is surely not and it is not necessary. Because compared to Windows Vista, the UAC on Windows 7 has made a progress on work principles and level settings. With the active defense function provided by Windows 7 UAC, malicious software can be forbidden running automatically in the Windows system background. And we can make simple settings on Windows 7 UAC to let it work according to our intention, and protect Windows system at the same time.
Now, letÕs see how to make Windows 7 security settings on UAC step by step.
Step 1: Create Windows User Account on UAC
Step 2: Set Password for User Account on UAC
Step 3: Monitor Computer Usage with Parental Controls
Step 1: Create Windows User Account on UAC
Step 2: Set Password for User Account on UAC
Step 3: Monitor Computer Usage with Parental Controls
Step 1: Create Windows User Account on UAC
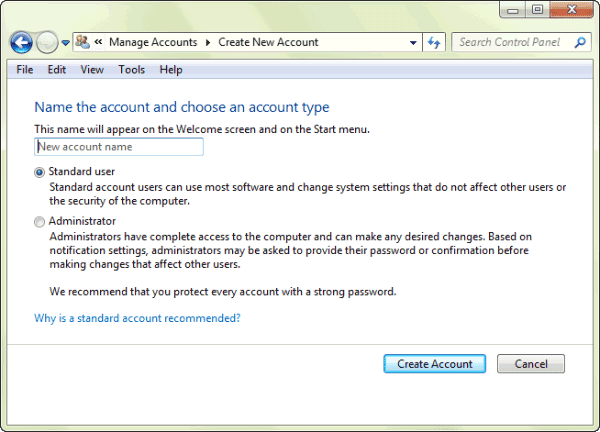
Open Control Panel Ð Add or remove user accounts, and a dialog pops up. Click ÒCreate a new accountÓ. Type a name for user account and choose an account type. At last, click ÒCreate AccountÓ button.
Step 2: Set Password for Windows 7 User Account
Click the Standard User to open User Account control window, and select ÒCreate a passwordÓ. Type new password twice for this user account, and click ÒCreate passwordÓ button.
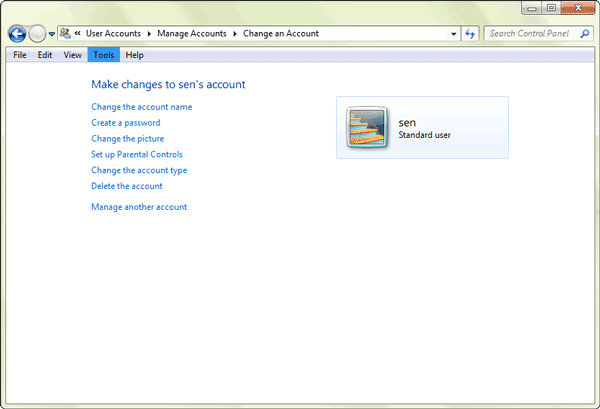
Set password for every account on Windows with this method. And then when we login Windows every time, password would be needed to type in.
Tips: How to Set Windows 7 Password
Tips: How to Set Windows 7 Password
Step 3: Monitor Computer Usage with Parental Controls
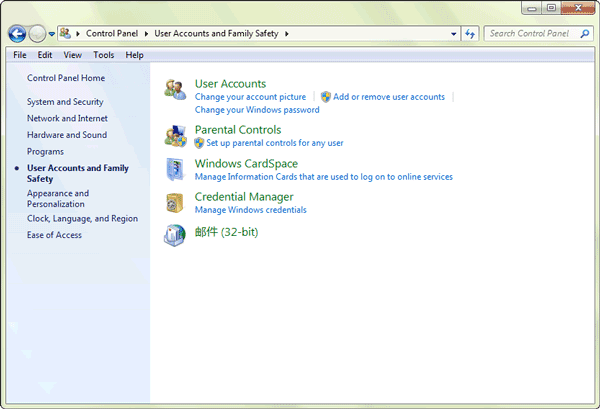
Open Control Panel Ð User Accounts and Family Safety, and click ÒParental ControlsÓ. Select Standard User, and system would prompt you that set password for administrator if you have never set for them. If you have set administrator password, it would directly enter Parental Controls window.
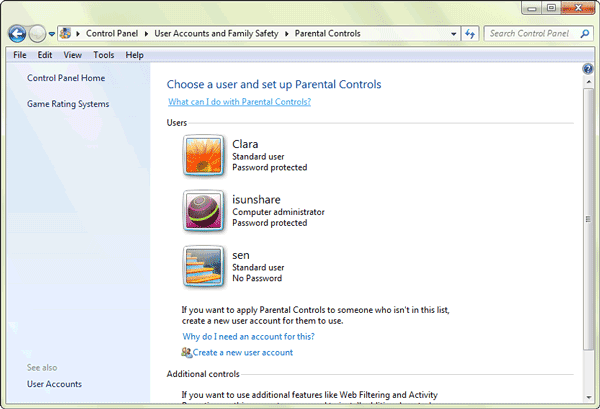
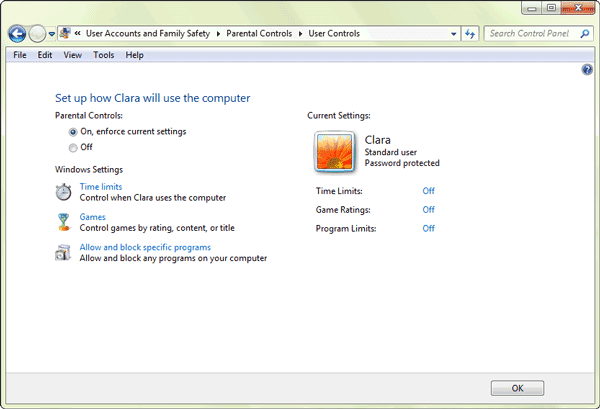
Click ÒTime limitsÓ to open Time Restrictions window, here you could set time when this standard user can or canÕt use computer. At last, click ÒOKÓ to complete user time restrictions settings.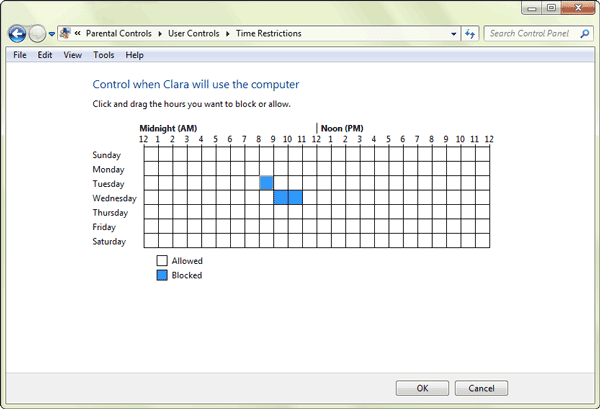
Click ÒAllow and block specific programsÓ, to open Application Restrictions. There are two options for selection. Generally, select Ò* can only use the programs I allowÓ. And tap the programs in the box that you want to set available for this user account. If the programs you want to set available are not listed, click ÒBrowseÓ to add them to this list first and then choose them. At last, click ÒOKÓ to finish setting application restrictions.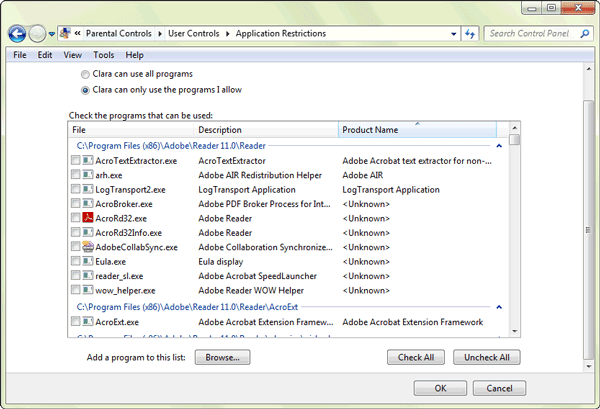
From then on, when this user accesses to Windows 7 and want to run the blocked programs, system will prompt user that ÒParental Controls has forbidden this programÓ. At this time, if this user wants to get privileges to run this program again, please click the button ÒPlease Ask Administrator for PrivilegesÓ and type administrator password to run it.
Tips: How to Lock Apps on PC with Windows 7
From then on, when this user accesses to Windows 7 and want to run the blocked programs, system will prompt user that ÒParental Controls has forbidden this programÓ. At this time, if this user wants to get privileges to run this program again, please click the button ÒPlease Ask Administrator for PrivilegesÓ and type administrator password to run it.
Tips: How to Lock Apps on PC with Windows 7
Besides the usual settings on Windows UAC, there are much more UAC options for Windows 7 security, such as ÒChange User Account SettingsÓ and settings for making UAC filter Windows system file and work for applications only.
1. Change User Account Control Settings:
There are four levels on user account control settings. You can move the slider to one of the levels, in order to choose appropriate control settings.
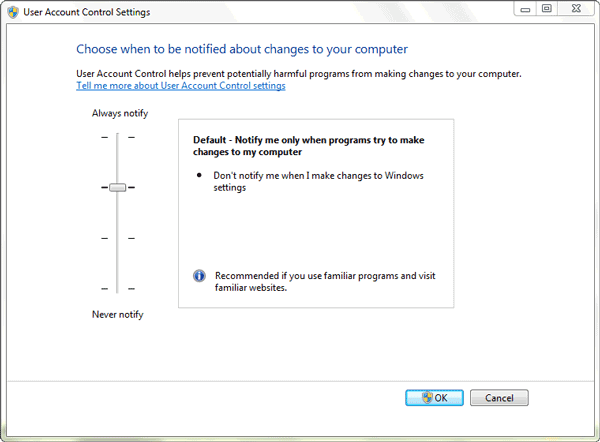
- Always notify me when
- Default Ð Notify me only when programs try to make changes to m computer:
- Notify me only when programs try to make changes to my computer (do not dim my desktop)
- Never notify me when: It is not suggested.
2. Set UAC only work for applications:
Search ÒSecpol.mscÓ in the menu search box in computer, to open Local Security Policy Ð Security Options. Look for ÒUser Account Control: Behavior of the elevation prompt for administrators in Admin Approval ModeÓ in the right side of window.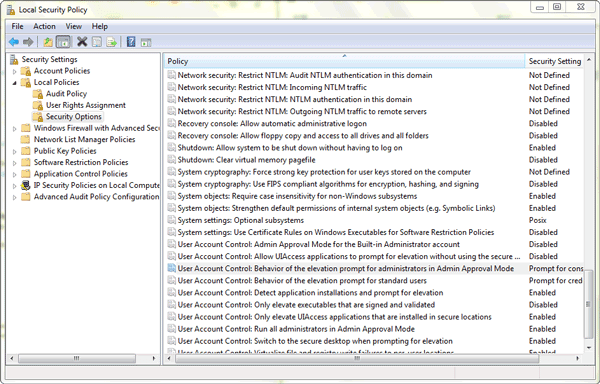
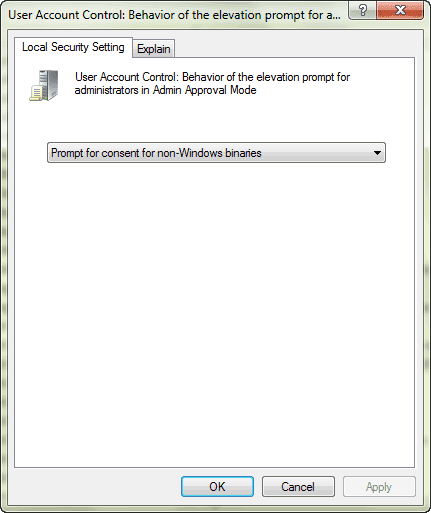 Double click it and six modes are provided. Select one from drop-down box under ÒLocal Security SettingÓ according to your intention. To speak of, the ÒPrompt for consent for non- Windows binariesÓ could filter Windows system file and make UAC only work for applications.
Related Articles:
Related Articles:
- How to Improve Windows 8 Picture Password Security
- Three Major Differences between Windows 8 and Windows 7 Ð Security/Design/Version
- Configure Windows 7 Security Settings and Deployment
Go to link Download

Sunday, April 23, 2017
10 General Secure Settings Options for Windows 8
10 General Secure Settings Options for Windows 8
Even though there are so many advanced secure settings set default in Windows 8 computer, if we want to protect it better, itÕs necessary to do basic and general settings good first for Windows 8. Now the following lists 10 secure setting options we could do.
1. Prevent malicious Ping attack
Navigate to Control Panel Ð System and Safety Ð Administrative Tools Ð Windows Firewall with Advanced Security Ð Import Policy. Choose Custom Ð All Programs option. Set protocol type parameter of this policy as ÒICMPv4Ó. And set all local ports and remote port parameter as ÒAll the portsÓ. Later, set this policy matching any IP address. At last, select Òprevent linkÓ option.
2. Type ÒregeditÓ in start search box to enter regedit list.
Choose HKEY_LOCAL_MACHINE, and find SYSTEMControlSet001ServicesSharedAccessParametersFirewallPolicyFirewallRules. Select Authority. Add account ÒEveryoneÓ, and change Òfull controlÓ permission to ÒrejectedÓ.
3. Type Ògpedit.mscÓ to run Local Group Policy Editor. Choose Computer Configuration Ð Administrative Templates Ð Windows Components Ð Internet Explorer Ð Security Features Ð Restrict File Download. Find Internet Explorer Processes in ÒRestrict File DownloadÓ option. Select ÒEnabledÓ and OK.
4. In Local Group Policy Editor, choose Computer Configuration Ð Windows Settings Ð Security Settings Ð Local Policies Ð User Right Assignment. Look for ÒAccess this computer from networkÓ and delete all the accounts list there.
5. The same in Local Group Policy Editor, choose Computer Configuration Ð Administrative Templates Ð Network Ð Network Connections Ð Windows Firewall Ð Standard Profile. Find the option ÒWindows Firewall: Protect all network connectionsÓ and make it ÒEnabledÓ.
6. In Local Group Policy Editor, select Computer Configuration Ð Administrative Templates Ð Windows Components Ð Windows Logon Options. Choose ÒDisplay information about previous logons during user logonÓ and make it ÒEnabledÓ.
7. Enter user account management interface by Òcontrol user passwords2Ó. Click ÒRequires the user to press Ctrl + Alt + DeleteÓ option and let it work.
8. Remote Setup. The remote desktop only allows computer with network level authority to be connected.
9. Run local group policy editor, choose User Configuration Ð Administrative Templates Ð Network Ð Networks. Select ÒAbility to delete all user remote access connectionsÓ. Make it work for computer.
10. Type Ògpedit.mscÓ in Start box, run Local Group Policy Editor.
Turn to Computer Configuration Ð Windows Settings Ð Security Settings Ð Local Policies Ð Security Options. Find ÒUser Account Control: Run all administrators in Admin Approval ModeÓ and make it ÒDisabledÓ.
Related Articles:
- Windows 8 Security Knowledge Ð What you should know
- Configure Windows 7 Security Settings and Deployment
- 10 New Features in Windows 8.1
- Three Major Differences between Windows 8 and Windows 7 Ð Security/Design/Version
Go to link Download
Sunday, January 1, 2017
How to Reset Your browerser setting into Default settings Urdu
How to Reset Your browerser setting into Default settings Urdu

Watch Video and Share With Your Friends.
How to Reset Your browerser setting into... by MastiComputer
How to Reset Your browerser setting into Default settings Urdu Powered By Masti Computer and More Computer Trips&Tricks,Free Software ,Computer Course Like Our Facebook Page.
Go to link Download
Saturday, November 26, 2016
Restore Device to Factory Settings on Samsung Galaxy Ace
Restore Device to Factory Settings on Samsung Galaxy Ace
When we encounter problems on Samsung Galaxy Ace, reset it back to factory default settings could be helpful. But we should pay attention to that such factory reset would make personal data and settings lost on Samsung Galaxy phone. If you are ready, follow one of the methods below to restore Samsung Galaxy device to factory settings.
- Method 1: Factory Reset Samsung Galaxy in Settings Menu
- Method 2: Hard Reset Samsung Galaxy Phone with Composite Hardware Keys
- Method 3: Restore Samsung Galaxy Phone to Default Settings with Dial Pad
Method 1: Factory Reset Samsung Galaxy in Settings Menu
If you are still could turn on Samsung Galaxy Ace and enter it successfully, follow this method.
- Turn on your Samsung Galaxy phone. Tap ÒMenuÓ from the home screen.
- Tap on ÒSettingsÓ.
- Select ÒBack up and resetÓ.
Samsung Galaxy Ace will automatically backup and restore all your data. If you do not want your personal data backed up and restored following the reset, tap on each corresponding to clear the check box. - Tap on ÒFactory data resetÓ.
- Tap on ÒReset deviceÓ.
If you have the screen lock feature enabled on your device, you will be prompted to enter your password or PIN code before you can continue. - Select ÒDelete allÓ. Samsung phone will then reset by erasing all data and rebooting.
Method 2: Hard Reset Samsung Galaxy Phone with Composite Hardware Keys
When your Galaxy Ace keeps freezing, and youÕve forgotten the security codes or it just doesnÕt work, take it back to factory settings. This will wipe everything on your phone, so if youÕre not locked out of phone, please try backing it up first. This wonÕt wipe your SIM. Follow the steps to do:
- Switch the Samsung phone off. If its frozen, remove and reinstall the battery to turn it off.
- When the phone is still off, press and hold the Home, Volume Up and Power buttons all together until you see the Android developer menu appear.
- Use the Volume Down key to scroll to wipe data/factory reset and then press the Homekey to select it.
- Use the Volume Down key to scroll to Yes - delete all user data and then press the Home key to select it.
- Use Volume Down to highlight reboot system nowand the press the Home key to select it.
Method 3: Restore Samsung Galaxy Phone to Default Settings with Dial Pad
- Open the dial pad on your Samsung Galaxy Ace.
- Enter *2767*3855# and dial. Your Samsung Galaxy phone device will then reset itself and wipe all your personal information and settings.
Related Articles:
- How to Factory Reset Samsung Laptop
- Get Access to Samsung 700t after Windows 8 Password Forgot
- Lock out of Samsung Tablet
Go to link Download
Tuesday, October 11, 2016
A Brand New Way to Open Settings in Windows 10
A Brand New Way to Open Settings in Windows 10
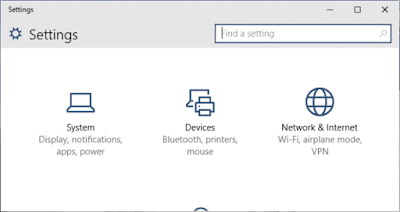
How do you open Settings (referring to the following picture) in Windows 10 computer? In this article, you may learn a brand new method. Just read on.
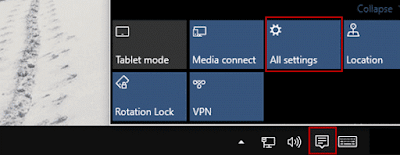
On the desktop, click the Action Center icon on the taskbar, and then select All settings in the panel, as exhibited in the following screen shot.
Related Articles:
On the desktop, click the Action Center icon on the taskbar, and then select All settings in the panel, as exhibited in the following screen shot.
Related Articles:
- 3 Ways to Open PC Settings on Windows 10
- Hide and Show System Icons on Taskbar in Windows 10
- Six Options to Sign in Locked Windows 10 PC/Laptop/Tablet
Go to link Download
Sunday, October 2, 2016
Configure Windows 7 Security Settings and Deployment
Configure Windows 7 Security Settings and Deployment
There are three default secure features provided in Windows 7. Now letÕs see what they are and how to configure and some tips we have to pay attention to deployment.
Windows 7 comes with three security features enabled by default:
- Windows Firewall
- Windows Defender
- User Account Control
One: Windows Firewall
The most important security feature you need to have is a software firewall running on your computer. A firewall is a security feature that blocks unauthorized attempts to send data to your computer. Windows Firewall is turned on by default, but you should check this, just to be safe.

- Click Start.
- Type ÔfirewallÕ and then click Windows Firewall in the search results. The Windows Firewall window appears.
- Check the Windows Firewall State value. If it says "On", youre fine; otherwise, continue to step 4.
- Click Turn Windows Firewall On or Off. The Customize Settings window appears.
- In the Home or Work (Private) Network Location Settings section, activate the Turn On Windows Firewall option.
- In the Public Network Location Settings section, activate the Turn On Windows Firewall option.
- Click OK.
Two: Windows Defender
The worst malware offender is spyware. Spyware is any program that surreptitiously monitors a users computer activities -- particularly the typing of passwords, PINs, and credit card numbers -- or harvests sensitive data on the users computer, and then sends that information to an individual or a company via the users Internet connection without the users consent.
Windows Defender protects your computer from spyware in two ways:
- It scans your system for evidence of installed spyware programs (and removes or disables those programs, if necessary).
- It monitors your system in real time to watch for activities that indicate the presence of spyware.

If the protection feature of Windows Defender is turned off, you will see the Action Centermessage shown below. Click that message to launch Windows Defender and turn on protection. Otherwise, click Start, type ÔdefenderÕ, and then press Enter.
In the Windows Defender Status area, select the following values:
- Scan Schedule: If you see "Do Not Auto Scan," it means that Windows Defender isnt set up to scan your system for spyware automatically.
- Real-Time Protection: If you see "Off" here, it means that Windows Defender is actively guarding against spyware activity.
Follow these steps to ensure that Windows Defender is set up for maximum protection:
- Click Tools.
- Click Options.
- Click Automatic Scanning.
- Enable the Automatically Scan My Computer checkbox.
- Click Real-Time Protection.
- Enable the Use Real-Time Protection checkbox.
- Click OK.

Windows Defender supports three different spyware scan types:
- Quick Scan: This scan checks those areas of your system where it is likely to find evidence of spyware. This scan usually takes just a couple of minutes. This scan is the default, and you can initiate one at any time by clicking the Scan link.
- Full Scan: This scan checks for evidence of spyware in system memory, all running processes, and the system drive (usually drive C:), and it performs a deep scan on all folders. This scan might take 30 minutes or more, depending on your system. To run this scan, select Scan > Full Scan.
- Custom Scan: This scan checks just the drives and folders that you select. The length of the scan depends on the number of locations you select and the number of objects in those locations. To run this scan, go to Scan > Custom Scan, which displays the Select Scan Options page. Click Select, select the checkboxes for the drives you want scanned, and then click OK. Click Scan Now to start the scan.
By default, Windows Defender is set up to perform a quick scan of your system every morning at 2:00 a.m. To change this, select Tools > Options > Automatic Scanning, and then use the controls to specify the scan frequency time and type.
The rest of the Options page offers options for customizing Windows Defender, which are detailed below:
- Default Actions: Sets the action that Windows Defender should take if it finds potential spyware in the Severe, High, Medium, and Low categories: Recommended Action Based on Definitions, Ignore, Quarantine (disables the threat without removing it), Remove, or Allow.
- Real-Time Protection: Besides toggling real-time protection on and off, you can also toggle security agents on and off. Security agents monitor Windows components that are frequent targets of spyware activity.
Note: Windows Defender will warn you that a program might be spyware and ask whether you want to allow the program to operate normally or to block it. If you accidentally allow an unsafe program, click Tools > Allowed Items, then select the program in the Allowed Items list, and then click Remove from List. Similarly, if you accidentally blocked a safe program, click Tools > Quarantined Items, select the program in the Quarantined Items list, and then click Remove. - Excluded Files and Folders: This section allows you to specify files or folders that you dont want Windows Defender to scan.
- Excluded File Type: This section allows you to specify file extensions that you dont want Windows Defender to scan.
- Advanced: These options allow you to enable scanning inside archive files, email messages, and removable drives.
- Administrator: This section has a checkbox that toggles Windows Defender on and off, and another that, when activated, allows you to see Windows Defenders items (such as allowed programs) for all user accounts on the computer.
Three: User Account Control
To enable User Account Control:
- Select Start, type ÔuserÕ, and then click Change User Account Control Settings in the search results. The User Account Control Settings window appears.
- Make sure the slider is set to anything other than Never Notify at the bottom.
- Click OK.
- Restart your computer to put the new setting into effect.

Refer to: How to set Windows 7 secure settings
The above are Windows 7 default security features. And what others you should pay attention to on security deployment?
Similar to Windows Vista/XP, security deployment in Windows 7 should refer to Windows secure process. This general way will guarantee Windows security more.
1. Set a Windows 7 logon password for restricting someone without permission to access computer.
1. Set a Windows 7 logon password for restricting someone without permission to access computer.
2. System Port
If there are some ports for Windows system, hackers would control our computer through these ports, such as 3899 port. So we should know about open port before we close them. Type Ònetstat-anÓ, you could see open port 135 and 139 etc. We should prohibit them by closing them directly or monitoring Windows firewall.
3. User Accounts
Most of the hackersÕ invasion becomes so easy because they get root privileges of our computer. Therefore, security of user accounts becomes so important for us. As we all know, administrator has all privileges, controlling everything in computer. So itÕs necessary to give an unnoticed name for administrator instead of Admin.
Besides, suspend guest account in user account manage, not allowing it to login Windows anytime. And certainly this way applies to computer user oneself. If we meet more user log in or limited user login, we had better set a general password for them, to block the invasion of external network.
Besides, suspend guest account in user account manage, not allowing it to login Windows anytime. And certainly this way applies to computer user oneself. If we meet more user log in or limited user login, we had better set a general password for them, to block the invasion of external network.
4. Share Resource
Type ÒnetshareÓ in CMD to look for shared resource. There are IPC passageway, document and printer for sharing. Of course, Windows system takes hard disk for sharing default too. Forbidden methods are provided here:
netsharec$/delete?delete sharing C: disk, other disks are the same?
netshareipc$/delete?delete sharing IPC?
With the secure settings above for Windows 7, we could say we have made full preparation for Windows 7 security. Also, I hope this passage help you protect your Windows 7 computer better.
Related Articles:
10 General Secure Settings Options for Windows 8
Three Major Differences between Windows 8 and Windows 7 Ð Security/Design/Version
Go to link Download
Subscribe to:
Posts (Atom)