Showing posts with label tips. Show all posts
Showing posts with label tips. Show all posts
Monday, May 15, 2017
Tips or Tricks for Windows Server 2012 Usage
Tips or Tricks for Windows Server 2012 Usage
Windows Server 2012 is new Windows server operational system, which is designed based on Windows 8. So it is different from previous server operating system. If you operate Windows server 2012 like before, that would be difficult. Therefore, now this passage gives some tips and tricks to use Windows server 2012 effectively.
Tip 1: How to find Windows Server 2012 traditional ÒStartÓ Menu
Windows server 2012 also removes ÒStartÓ menu from taskbar. Maybe there are so many server computer users unhappy about it, but this is truth. Now letÕs see how we can find traditional ÒStartÓ menu.

Actually, ÒStartÓ menu has not disappeared. It is just removed to the left bottom side of traditional desktop. But users couldnÕt see it only if move mouse there. Click it, and experience new functions setting in Start menu, including Server Manager, Task Management, Computer etc common applications. Double-click the application picture, and it opens. If click it, we can delete or remove it. If we want to turn back to desktop, just click ÒDesktopÓ.

Or move the mouse to the right bottom side of window, and you would see ÒStartÓ menu like in Windows 8, click it and Start screen appears.
Tip 2: How to find software or tools in Windows server 2012
In Windows server 2012 start screen, what we can see is not what we think of. There are so many tools and software that we donÕt know where they are. In fact, it is simple. We just need to right click in the blank section of Windows start screen. And then there would be a option ÒAll AppsÓ pop up in the bottom side. Click it and we could see the tools page.
In the tools page, we can see effective tools in Windows server 2012. If we use one application usually, we can right click it and add it to desktop, taskbar or login with administrator etc.
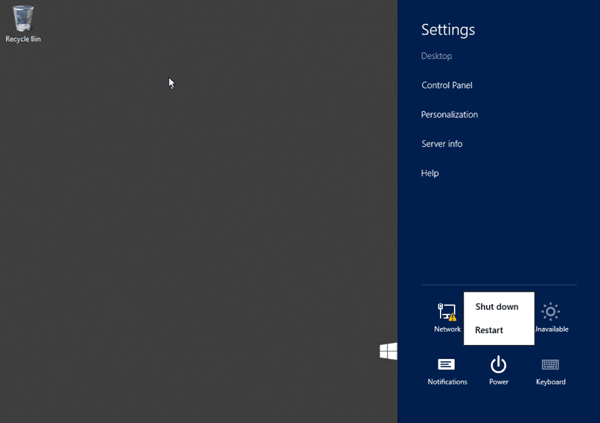
Tip 3: How to shut down Windows server 2012 computer fast
Windows server 2012 shutdown problem also troubles computer users because of no ÒStartÓ menu on traditional desktop. So sometimes we could only shut down server computer with Task Manager. It is helpless. Now this passage summarizes four ways to shut down Windows server 2012.
1. Press Windows + I or move mouse to the right bottom side of desktop, Menu and Toolbars. Click ÒPowerÓ and "Shut down" Windows server 2012.
2. Press Alt + F4 on traditional desktop to open application close window. In traditional desktop, Alt + F4 is used to close Metro applications.
3. Press ÒCtrl + Alt + DelÓ, Windows shutdown options would appear in the right bottom corner of desktop.
4. Press Windows + R to run command Òshutdown.exe -s -t 00Ó.
Run command prompt with administrator, type in Òpowercfg/H onÓ. ÒPowerÓ option is open. Click ÒMust type password when wake upÓ in the left side, and tick the ÒFast BootÓ. And you could start and shut down Windows server computer fast.
Refer to: How to enable fast boot and shut down Windows server 2012
Refer to: How to enable fast boot and shut down Windows server 2012
Tip 4: How to adjust performance to optimize programs
Open Server Manager Ð Local Server, click computer name and System Properties window pops up. Select Advanced Ð Performance, and choose ÒTurn on DEP for essential Windows programs and services onlyÓ in Data Execution Prevention. Select ÒAdjust to optimize performanceÓ Ð ÒProgramsÓ. And then click ÒChange ButtonÓ in virtual memory, donÕt tick ÒAutomatic management of all drives paging file sizeÓ. Choose system drive, select ÒNo page fileÓ and click ÒSettingsÓ button so as to delete virtual memory files in system volume.

Tip 5: How to disable Enhanced IE security settings
Open Server Manager Ð Local Server Ð Enhanced IE security settings, and then change ÒEnabledÓ to ÒDisabledÓ.
Tip 6: How to not boot Server Manager when Windows logon
Open Server Manager, and click ManageÐ Server Management Properties, and choose ÒDont automatically start server manager when logonÓ.

Tip 7: How to set input method switch shortcut
If you are Chinese people, please pay attention to that English and Chinese input method switch shortcut is not the same as previous Windows operational system. Now open Control Panel Ð Language Ð Change Language Hotkey, set their switch shortcut as ÒCtrl +ShiftÓ.
Related articles:
- Change Windows Server 2012 from Host to Domain Controller
- Upgrade Server 2008 and Migrate Domain Service to Windows Server 2012 R2
- Windows Server 2012 R2 Activation Key Recovery Finder
Go to link Download
Wednesday, May 10, 2017
Tips Sukses Main Flappy Bird Langsung Dari Penciptanya
Tips Sukses Main Flappy Bird Langsung Dari Penciptanya

Bahkan menurut yang dilansir laman Telegraph, game Flappy Bird saat ini tercatat telah diunduh hingga 3 juta kali di perangkat berbasis iOS dan Android.
Meski mulai digemari, namun banyak gamer yang mengeluhkan game ini terasa terlalu sulit. Menanggapi hal ini, sang pencipta Flappy Bird Nguyen Ha Dong dilaporkan laman Huffington Post, Kamis (6/2/2014), telah mem-posting-kan sejumlah tips sukses memainkan Flappy Bird melalui akun Twitter miliknya, @doimoidong.
Ha Dong menyebutkan, "caranya adalah jangan terlalu keras dan cepat ketika mengetuk layar ketika mengontrol terbang si burung untuk melewati halang rintang."
Ia pun menjelaskan bahwa sesungguhnya tidak ada situasi yang mustahil untuk dilewati dalam game Flappy Bird. Akan tetapi, sang pencipta Flappy Bird ini pun mengakui kalau game buatannya itu memang cukup sulit. Bahkan Ha Dong pun mengaku sejauh ini dirinya hanya mampu meraih skor dengan hadiah medali platinum.
Selain Flappy Bird, saat ini Ha Dong juga disebutkan sedang berfokus mengembangkan game lainnya yaitu Super Ball Juggling dan Shuriken Block.
Untuk lebih lengkapnya, inilah rangkaian tips sukses bermain Flappy Bird versi Nguyen Ha Dong:
1. Usahakan dalam keadaan rileks
2. Yakinkan diri Anda sudah dalam keadaan rileks
3. Jangan ragu untuk beristirahat dan mencobanya lagi nanti
4. Tekan layar secara lembut, jangan terlalu keras
5. Temukan irama yang tepat
6. Gunakan perangkat berlayar lebar
7. Jangan pernah menyerah
Sumber : http://tekno.liputan6.com
Go to link Download
Monday, May 8, 2017
Tips dan Optimasi WP Robot
Tips dan Optimasi WP Robot
Auto blogging secara dasar dapat diartikan adalah aktifitas blogging (ngeblog) yang dilakukan secara auto atau otomatis. Apakah itu mungkin untuk dilakukan? Ya, sangat mungkin sekali. Dengan penggunaan engine yang tepat (Wordpress) plus script yang pas (WP Robot) maka anda dapat mempunyai sebuah blog yang otomatis atau auto blogging.
WP Robot sendiri memiliki beberapa versi, berikut versi-versi WP-Robot yang anda dapat temui di website resmi Wp Robot (http://wprobot.net) :
- WP Robot Full Elite ( $169)
Dalam WP Robot versi ini anda dapat mendapatkan modul Article, Amazon, Clickbank, Ebay, Yahoo Answer, Youtube, Translation, Flickr, Yahoo News dan RSS Module
Dalam plugin ini anda juga mendapatkan fasilitas Unlimited Keywords, Unlimited License, dan No Feature Link
- WP Robot Full Advanced ($160)
Modul yang anda dapatkan sama dengan WP Robot Full Elite, perbedaannya ada pada 50 Keywords, 40 Website License, dan tetap No Feature Link
- WP Robot Full Basic ($150)
Modul yang didaptkan juga sama dengan WP Robot Full Elite dan hanya berbeda dengan hanya 20 Keywords, 20 Website License, dan Feature Link Footer
- WP Robot Developer Version ($550)
Kelebihan WP Robot paling mahal ini adalah kita diperbolehkan untuk memberikan copy WP Robot tersebut dalam satu paket dengan blog yang akan dijual kepada customer atau klien.
Jadi kita boleh menjual WP Robot ini dengan syarat jika dipaketkan dengan Blog/Website. Harganya pun (paket WP Robot + blog tadi) minimal $140. Instalasi WP Robot sendiri cukup mudah dan sama dengan instalasi plugin wordpress lainnya. Tetapi sebelum menginstalasi, harap anda pastikan dulu bahwa Versi Wordpress anda minimal adalah versi Wordpress 2.7 keatas. Sedangkan PHP yang disupport (sesuai dengan keterangan di website resmi WP Robot) adalah PHP 5 with cURL.
Dengan estimasi bahwa anda telah memiliki blog yang terinstall engine Wordpress (self hosting) maka kita dapat dengan mudah menginstall plugin ini.
Yang pertama, login ke Dashboard wordpress anda
Lalu pilih Plugins,
Klik Add New
lalu pilih tab Upload
Lalu setelah itu pilih browse..
Pilih Plugin WP Robot anda,
dan klik Install Now
Jangan lupa klik Activate sebagai langkah akhir.
Selamat, anda baru saja berhasil menginstall WP Robot.
untuk lebih lengkapnya anda dapat mendownload tutorialnya disini
Go to link Download
Sunday, May 7, 2017
Create iTunes Backup iTunes Backup Password Recovery Tips
Create iTunes Backup iTunes Backup Password Recovery Tips
iTunes is used to backup the iOS device to a computer usually. So such backup is called iTunes backup. How important it is, we can know that when we want an encrypted iTunes backup to restore or factory reset iOS device. Especially, when you are locked out of idevices, iTunes backup is one of effective ways for you to access iOS device again without important data loss.
Therefore, how to create iTunes backup for iOS devices?
There is iTunes on iOS device and on computer. Which one should we choose to create iTunes backup? Now we take iTunes on computer to create one.
Create iTunes Backup in Computer manually and automatically
1. Connect iOS device to computer with USB cable.
2. Open iTunes and iOS device will appear in iTunes. (Take iPad as example)

3. Click iPad name in the top right side of iTunes screen.
4. Unfold iPad menu, choose Summary and click "Back Up Now".
If you have not tipped Encrypt local backup, iTunes will make a copy of everything on iPad device, including contacts, SMS, photos, calendar, music, call logs, configuration files, database files, keychain, network settings, offline web application cache, safari bookmarks, cookies and application data, etc.
Besides, if you donÕt want to make a iTunes backup manually every time, set device synced with iTunes. And then when you connect device to computer, iTunes will automatically create a backup of device. But if the automatic sync option is turned off, you will need to create a backup with above steps.
Tips: If you tip "Encrypt local backup" before back up iOS device in iTunes, you will be asked to set a password for the iTunes backup in pop-up dialog.
From then on, whenever you backup iOS device on computer, it will not be necessary to encrypt iTunes backup.
Related Articles:
Related Articles:
- How to Choose Backup Method | iTunes VS iCloud
Go to link Download
Saturday, March 4, 2017
How to Decrypt iTunes Backup with Tool iTunes Backup Password Recovery Tips
How to Decrypt iTunes Backup with Tool iTunes Backup Password Recovery Tips
Is your iTunes backup encrypted now? Getting tools to decrypt them is a good choice. Here will introduce two available tools to decrypt iTunes backup, iTunes Password Genius and Keychain.
1. iTunes Password Genius
During the encryption of iTunes backup, backup password is stored in Manifest.plist file. Once it is imported into iTunes Password Genius, this tool can recover backup password from this file with password attack method. Without damaging backup, backup password is found easily.
Steps to decrypt iTunes backup with iTunes Password Genius (Eg. iPad)
Step 1: Download, install and run iTunes Password Genius on your Windows computer.
Step 2: Import encrypted iTunes backup into this password recovery tool.
Click Open button and then select the iTunes backup in pop-up window. Then click OK button to add it into "Encrypted File" box.

Step 3: Make password recovery settings and recover iTunes backup password.
Choose one of password attack types from "Type of attack". And then make settings in following part. Later, click "Start" button to let backup password recovery program run.
Step 4: Decrypt iTunes backup with recovered password.
Copy the password you just recovered with iTunes Password Genius. And then use it to decrypt iTunes backup in iTunes.
2. Keychain
During the backup, iTunes can also store encrypted backup password on the iPhone Keychain. So if backup password is unknown and physical access to the device is available, the backup password can be retrieved by viewing the iPhone keychain items.
Steps to decrypt iTunes backup with Keychain (Eg. iPhone)
Step 1: Open Keychain Access utility from Application Ð Utilities.
Step 2: Search "iPhone" in the top-right search field. Look for keychain item named "iPhone Backup" of kind "application password".
Step 3: Double click "iPhone Backup" and click on "Show password" in new window.

Step 4: Type your computer password for locking Mac, and click Allow (once). Then iPhone backup password will appear in clear text.
Tips: If you are not a Mac user or you couldnÕt find "iPhone Backup" keychain item, this way will not work for you. And then you can choose iTunes Password Genius.
Related Articles:
- iTunes Backup Password Recovery Software: Why Can It Do?
- How to Create iTunes Backup Manually or Automatically
- How to Encrypt iTunes Backup
- How to Decrypt Password Protected iTunes iPhone Backup
Go to link Download
Friday, March 3, 2017
Encrypt iTunes Backup iTunes Backup Password Recovery Tips
Encrypt iTunes Backup iTunes Backup Password Recovery Tips
If you back up iOS device data to iCloud, Apple ID will be the key to backup. However, if you create backup in iTunes, what is the key to iTunes backup? Surely it is the iTunes backup password. But how to encrypt iTunes backup and protect it from accessing by other people?
Actually, the direct and easy way to encrypt iTunes backup has appeared in the process of creating iTunes backup, if "Encrypt local backup" box is checked. If not, follow these steps to learn how to encrypt iPhone/iPad/iPod touch backup in iTunes.
Step 1: Take your iPhone, iPad, or iPod Touch connected into computer with USB cable.
Step 2: Open iTunes.
If you have set "Open iTunes when iPhone/iPad/iPod connected" in iTunes before, now you will donÕt need to open iTunes. iTunes will run automatically once iOS device has been connected to computer successfully.
Step 3: Click device name in the top-right side of iTunes.

Step 4: Choose Summaryoption, and in the "Backups" part, you can see there is "Encrypt local backup" option.

Step 5: Tick "Encrypt local backup" and a dialog will pop up to ask for a backup password.
Step 6: Type and verify iTunes backup password, and then click "Set Password" button to confirm.

Besides, there is always another option under password box, "Remember this password in my keychain". If you select it, backup password will be saved in the keychain on your mac computer. One day, if you forgot password to unlock iTunes backup, you can get it in keychain. But to some degree, this defeats the purpose of setting a password in the backup password box. On the other hand, encrypt iTunes backup with powerful password not only increases the security of that data, but also prevents you from having to re-enter your email and Mobile Me passwords when you restore.
Therefore, we had better set a password to encrypt iTunes backup, but choose to save password in keychain or not depends on your own necessity. Save iTunes backup password in other safe place is worth to do. So that when you forgot or lost iTunes backup password one day, it can be found to unlock iTunes backup. Otherwise, you should need a tool, such as iTunes Password Genius, to recover iTunes backup password.
Go to link Download
Saturday, February 18, 2017
Tips help recovering deleted files from Windows hard drive
Tips help recovering deleted files from Windows hard drive
If youÕve accidentally deleted a file on PC and need to get it back, belows are 2 golden tips
1. You Should Stop Use the Hard Drive Immediately after Data Loss
The file deleted is recoverable. When you delete files the data itself isnt deleted, just the index entry that tells the system where the data for those files is located. The area containing the deleted data is also now marked as free space so it is available for any new files to be written there instead. If and when that happens, then it is too late to recover your deleted files. So it is very, very important to not save any new files or data to the device concerned.
2. Perform Deleted File Fecovery As Soon As Possible
As Windows continues to write files to your hard drive, the chances of it overwriting the deleted files increases. If you deleted a file on year ago, you may lost the chance to retrieve the deleted things. But if you just deleted files an hour ago, even you "shift+delete" the file, you still have high chance to get back them with Windows hard drive data recovery . If you want to be sure you can recover most of lost files, you should perform a recovery immediately.
How-to: Deleted file recoverying from a Crashed Hard Drive in 3 Steps
1. Connect the Drive to Another Computer
If the hard drive crash, you will need to remove it from the current machine and connect it to another machine as a secondary drive. You can connect the drive to another desktop computer internally as a secondary drive. If you do, make sure that the machine detects the drive in the BIOS or you wonÕt be able to access it.
Try to Copy the Data to Another Drive
Recovering deleted data via copying the data to another drive. The reason is you can copy data off that you would like to recover for there is a chance that only the operating system is corrupt and the user data is still fine. After you connect the hard drive to another computer either internally or with the USB adapter, you can check to make sure if you can browse the contents stored on the drive.
Download Deleted File Recovery Software
If you canÕt manually copy the user data off then you can try to recover it using data recovery software. Whatever you do, do not install the recovery software on to the drive that you are trying to recover data from. Doing so could actually overwrite files that you want to restore.
The best way for recovering deleted files from a hard drive is powering the computer down immediately after the file is deleted, inserting the hard drive into another computer, and using an operating system running on another hard drive to recover it. If you try to recover a file by installing a file-recovery program on the same hard drive, the installation process and normal use of the hard drive can overwrite the file.
view guide: How to recover deleted files from hard drive with full recovery
Vist more posts:
Recover data from Windows 8 Laptop HDD-rescue files from failed/dead hard drive
Recover Invisible Pictures From Seagate 500GB External Hard Drive
Quick or complete format recovery on Windows hard drive partition
100% Data Recovery to get Erased/deleted files from Windows 8.1 hard drive
Go to link Download
Sunday, February 12, 2017
How to Encrypt Archives in Computer and Some Tips
How to Encrypt Archives in Computer and Some Tips
In order to reduce the file storage space and ensure the safety of the file, we are more and more inclined to compressed and encrypted file. Compress file just need compression software, but how to encrypt archives in computer to protect them from damage?
Now this passage mainly talks about how to keep archives safe through encrypting and other related items. Please see the followings:
1. How to set permanent general compression password?
If you usually use the same password to encrypt archives, you can let WinRAR add password automatically. When you are creating archives, default password is added automatically and easily at the same time.
How to do it?
- Open WinRAR, choose Options - Settings command, and select Compression Option tag in the pop-up SettingsWindow.
- Click Create default settings button, a new window Set default compression option appears.
- Choose Advanced, and click Set Password button.
- At last, type password in Password Set and press OKto save settings.
2. Tips on editing file in archives
When you are editing file in archives, please donÕt close compression files window, otherwise, you couldnÕt save the files changes. In addition, if you open other RAR package at this time, WinRAR will close package you are editing automatically. So had better press Ctrl + S in WinRAR window, and cancel "Reuse Existing Window" under General option.
3. Hide File Name in Archives
Nearly all the compression software provides encryption function, in purpose of protecting secret and important data. But most of them ignore name encryption always. Once someone is interested in your data, data would become dangerous.
Therefore, we had better take name encryption as a part of archives encryption. Suppose someone doesnÕt know what kind of file the package includes, who will not pay attention to decrypting the file.
How to encrypt archive name?
- Click "Add" button on WinRAR main interface, and create a new package.
- Choose "File" on new window, and choose file you want to encrypt and decrypt. And then add them into compressed file.
- Turn to "Advanced" button, and click "Set Password" and type password is OK.
What you need to know?
Please choose "Encrypt File" option before clicking OK so that we can make file name encrypted.
4. Lock Archives for Safety
When you delete file in archives, WinRAR will automatically update it. WinRAR couldnÕt find back "deleted file" and it will update file automatically. Therefore, for some important archives or package, please choose this file and press Alt + I. In the information dialog of compression, click Option and then choose Forbidden editing compressed file. Press OK and you will see the archives are locked. Other files in the archives will be not changed or deleted.
Tips: The above operation only applies to RAR file. After you open "lock archives", archives will not be changed. This is so useful to back up important data.
The above introduces how to protect compressed file from damage by encryption etc.
More information about archives or file encryption and decryption:
More information about archives or file encryption and decryption:
- How to Encrypt a File or Folder with Easy Ways
- How to ZIP a File with a Password
- How to Find Out ZIP File Password When Locked Out of It
- How to Remove and Reset RAR Password Easily with Software
Go to link Download
Tuesday, December 6, 2016
6 Tips on How to Protect Your iPhone Data Safe
6 Tips on How to Protect Your iPhone Data Safe
The higher value and more popular the device is, the more dangerous it will be. To some extent, the popularity and high value of iPhone result in the possibility of iPhone stolen or lost. When iPhone is stolen or lost, data on iPhone will be used by others casually if they are not protected with any measures.
So is there any ways or tips to protect iPhone we can do by ourselves? Surely there is, please follow these tips below to keep iPhone data safe.
Tip 1: Create a Complicated Passcode
In iOS 4 and lower version, probably you can only create digital passcode. However, when you are using iOS 4 or supper version, more complicated passcode can be created. For example, alphanumeric password consists of numbers, alpha lower or upper case characters or other characters.
Go to Settings Ð General Ð Touch ID & Passcode, and turn off "Simple Passcode". Type in your iPhone existing passcode now and set a new password for iPhone access.

Tip 2: Use Touch ID If Possible

Touch ID is available in iPhone 6 Plus, 6, 5s and iPad Air 2, iPad Mini 3. It is a new and special way to access iPhone with only your fingerprint. If your iPhone is one of these versions, make full use of it. It can bring you more convenient access to iPhone, and get rid of other people using it. Now you just need to create a Touch ID account.
Tip 3: Turn Find My iPhone on
Find My iPhone is free service for iPhone users to locate lost iPhone and can delete all data and settings on this iPhone.
Therefore, before unfortunate things happen, turn on Find My iPhone is necessary in Settings Ð iCloud with Apple ID.

But this still cannot promise that you can successfully erase iPhone remotely when iPhone is in other peopleÕs hand. Because deleting iPhone data remotely asks for internet connection, and as long as Control Center appearing on lockscreen, another person can disable internet connection.
So when you turn Find My iPhone on, please prevent Control Center from appearing on the top of lockscreen.
Go to Settings Ð Control Center , Turn off Access on Lock Screen.
Tip 4: Encrypt Backup When Sync iPhone to Computer
Why we have to encrypt backup when sync iPhone to computer?
If we have set iPhone synced to computer, iPhone backup will be created automatically when it is connected to computer. However, if we do not encrypt iPhone backup, anyone can access this computer, and easily use this backup without any difficulties. As a result, your iPhone data can be seen clearly in other peopleÕs iPhone.
And if you dont want it happen, just check "Encrypt iPhone backup" or "Encrypt local backup" box in iTunes before you sync iPhone to computer.

And if you dont want it happen, just check "Encrypt iPhone backup" or "Encrypt local backup" box in iTunes before you sync iPhone to computer.
Tip 5: Disable Siri Access from Lockscreen
 Even though you have made alphanumeric password, Touch ID and Find My iPhone enable, made Control Center disable, people still can access iPhone lockscreen by Siri.
 So please disable Siri access from Lockscreen.
Go to Settings Ð General Ð Touch ID and Passcode, type your passcode and click Done. Toggle off Siri under the "Allow Access When Locked" section.
While youre at it, you can also toggle off Passbook access to make sure no one can get to your sensitive information without first unlocking your iPhone.
Tip 6: DonÕt Jailbreak your iPhone
Surely jailbreaking iPhone allows you to customize your iPhone in ways not approved by Apple and install apps that have been rejected in the official App Store. But if you want your iPhone to be secure as possible, stay far away from jailbreaking.
Actually, Apple has designed the secure operating system that runs on the iPhone. If there is no accident, no viruses, malware, or other software-based security threats iPhone like PCs and Android phones. The only viruses that have struck iPhones have targeted jailbroken devices. So, for the security of iPhone, donÕt jailbreaking.
Even though all these settings cannot protect iPhone from using when it is stolen or lost, they are enough for iPhone users to protect their iPhone.
Related Articles:
- Encrypt iTunes Backup | iTunes Backup Password Recovery Tips
- How to Factory Reset iPad with or without iTunes
- Three Ways to Hard Reset iPhone with or without Passcode
- Locked out of iOS 7/8 after Forgot iPhone Passcode
Go to link Download
Subscribe to:
Posts (Atom)