Showing posts with label create. Show all posts
Showing posts with label create. Show all posts
Sunday, May 14, 2017
Create A System Restore Point In XP
Create A System Restore Point In XP
Create A System Restore Point In XP
Introduction:
Windows backup and restore is a system that can save your machine to a specific time and load this backup to restore your computer in exactly the same state as when you saved it.
You can use a restore point when, for example, you have been infected by a destructive virus and can no longer serve you properly on your computer. The restore point, if you did, you will regain a healthy computer and working. Well, the theory generally just practice. The time has come for you to create a restore point (Windows XP).
You should know that Windows includes a restoration software that works perfectly well. It is this software that we will use in this tutorial
Create a restore point:
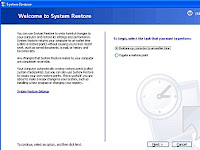
To begin, start Windows Restore: Button Start => All Programs => Accessories => System Tools => System Restore You should see a window offering you to restore your system or create a restore point. Select Create a restore point. and click nextyou must enter a description that will allow you to easily identify yours restore point.
Using a restore point:
Now that you have created you restore point, you need to know how to load.
If you clicked on the button Start, returned here on the main window of the assistant. Select Restore my computer to an earlier time. You now find yourself facing a schedule. This calendar is special; it lists all yours restore points. Thus, you should see youÕre in the right frame by clicking on the day you created.
Cancel restore:
Your system restores gone wrong? No problem, there is a simple and effective solution?
Start the Recovery Tool. You fall back on the main window (again!?). Select Undo my last restoration. Click Next. Once again, it summarizes the information you: what will change if you cancel the restoration, what restoration will be canceled ... Click Next to start the cancellation of a previous restoration. Click Cancel to cancel and exit the System Restore tool (theres still time to turn around!). Windows restarts and like magic your computer has resumed its old settings!
You May Like Also.......
(Offline) How To Install .Net Framework 3.5 On Windows 8/8.1/10
What Is The Difference Between FAT32, exFAT, and NTFS?
How To Show or Hide File Name Extensions in Windows 10/8.1/8/7/Xp
[Solved] Wifi Problem After Updating Windows 10, Limited Access or Not Connecting
Go to link Download

Sunday, May 7, 2017
Create iTunes Backup iTunes Backup Password Recovery Tips
Create iTunes Backup iTunes Backup Password Recovery Tips
iTunes is used to backup the iOS device to a computer usually. So such backup is called iTunes backup. How important it is, we can know that when we want an encrypted iTunes backup to restore or factory reset iOS device. Especially, when you are locked out of idevices, iTunes backup is one of effective ways for you to access iOS device again without important data loss.
Therefore, how to create iTunes backup for iOS devices?
There is iTunes on iOS device and on computer. Which one should we choose to create iTunes backup? Now we take iTunes on computer to create one.
Create iTunes Backup in Computer manually and automatically
1. Connect iOS device to computer with USB cable.
2. Open iTunes and iOS device will appear in iTunes. (Take iPad as example)
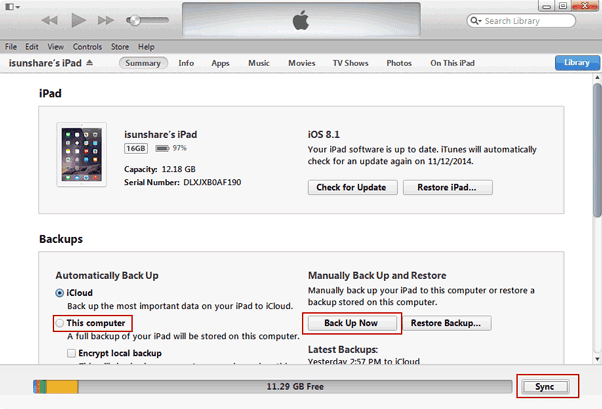
3. Click iPad name in the top right side of iTunes screen.
4. Unfold iPad menu, choose Summary and click "Back Up Now".
If you have not tipped Encrypt local backup, iTunes will make a copy of everything on iPad device, including contacts, SMS, photos, calendar, music, call logs, configuration files, database files, keychain, network settings, offline web application cache, safari bookmarks, cookies and application data, etc.
Besides, if you donÕt want to make a iTunes backup manually every time, set device synced with iTunes. And then when you connect device to computer, iTunes will automatically create a backup of device. But if the automatic sync option is turned off, you will need to create a backup with above steps.
Tips: If you tip "Encrypt local backup" before back up iOS device in iTunes, you will be asked to set a password for the iTunes backup in pop-up dialog.
From then on, whenever you backup iOS device on computer, it will not be necessary to encrypt iTunes backup.
Related Articles:
Related Articles:
- How to Choose Backup Method | iTunes VS iCloud
Go to link Download
Wednesday, April 12, 2017
Create apple iTunes store id without credit card
Create apple iTunes store id without credit card
Create apple iTunes store id without credit card

No doubt iTunes store is a wonderful place to get apps for your iPhone / iPod touch. However, not many people know that you donÕt need a credit card to create an Apple iTunes app store account. There is just a small trick to get this done. Follow this article to achieve this:
- Open Apple iTunes application
- Goto iTunes app store option from the left menu
- Now here is the tricky part. Many people click on the sign in button on the top to sign up directly. DO NOT click on that button. Instead, look at the Top Free apps list in the right column (itÕs below the top paid apps) Click on any app and click ÒfreeÓ in front of it. It will popup a signin box
- Click on Create new account on that popup box and follow the normal signup process until select payment option
- On the payment option selection option, select the option NONE and complete the rest of the process.
This will create your Apple itunes App store id without using credit card or without paying via any other method.
Go to link Download
Friday, March 3, 2017
How to Create and Use a Windows 7 Password Reset USB
How to Create and Use a Windows 7 Password Reset USB
Suppose if you forgot Windows 7 password, you would try to find solutions to recover or reset it through the internet. Soon you would find one solutionÑusing Windows 7 password reset USB disk, which is most mentioned by people. So here in this article, I will show you the exact ways to create a Windows 7 password reset disk.
Theoretically, a password reset disk Windows 7 can be made with a CD/DVD or USB flash drive. Since USB flash drive is more convenient to carry and safer to preserve, here I highly recommend creating a Windows 7 reset password with USB to prevent your computer from being locked. Below are guides on how to create a Win 7 password recovery USB.
Scenario 1: If you havenÕt forgotten your Windows 7 password yet.
At this situation, you can easily make such a password reset USB disc for free to prevent your computer from being locked. Now please follow the below steps:
Step1: Insert the prepared USB flash drive into your computer.
Step2: Type ÒresetÓ in the Windows search box and select ÒCreate a password reset diskÓ.
Step3: When the ÒForgotten Password WizardÓ appears, click ÒNextÓ.
Step4: Select your USB flash drive and click ÒNextÓ.
Step5: Once the wizard finishes creating the reset disk, click ÒNextÓ then ÒFinishÓ.
At this situation, you can easily make such a password reset USB disc for free to prevent your computer from being locked. Now please follow the below steps:
Step1: Insert the prepared USB flash drive into your computer.
Step2: Type ÒresetÓ in the Windows search box and select ÒCreate a password reset diskÓ.
Step3: When the ÒForgotten Password WizardÓ appears, click ÒNextÓ.
Step4: Select your USB flash drive and click ÒNextÓ.
Step5: Once the wizard finishes creating the reset disk, click ÒNextÓ then ÒFinishÓ.
Scenario 2: If you have already forgotten your Windows 7 password.
Many computer users actually didnÕt take any precautions against Windows 7 password forgotten problem before they find theyÕve lost or forgotten the password. So if you donÕt have such a password reset disk when you forget or lose your Windows 7 password, you need to seek for other ways to make one and then use that to reset Windows 7 password, say a professional Windows password recovery toolÑWindows Password Recovery Enhance.
HereÕs how to create a reset password Windows 7 USB with Windows Password Recovery Enhance.
Step1: Download, install and launch Windows Password Recovery Enhance on an accessible computer.
Step2: Insert the early prepared USB flash drive to the accessible PC.
Step3: Choose ÒUSB Flash DriveÓ button to select your USB, next click ÒBurnÓ button to initiate the burning process. (Burn the image file of Windows Password Recovery Enhance to USB.)
Step4: Soon you will receive a message box showing ÒBurning successfully completedÓ. Until now it means you have successfully created a Windows 7 password recovery USB. Next, just click ÒOkÓ to end to process and then take out the USB from PC.
Many computer users actually didnÕt take any precautions against Windows 7 password forgotten problem before they find theyÕve lost or forgotten the password. So if you donÕt have such a password reset disk when you forget or lose your Windows 7 password, you need to seek for other ways to make one and then use that to reset Windows 7 password, say a professional Windows password recovery toolÑWindows Password Recovery Enhance.
HereÕs how to create a reset password Windows 7 USB with Windows Password Recovery Enhance.
Step1: Download, install and launch Windows Password Recovery Enhance on an accessible computer.
Step2: Insert the early prepared USB flash drive to the accessible PC.
Step3: Choose ÒUSB Flash DriveÓ button to select your USB, next click ÒBurnÓ button to initiate the burning process. (Burn the image file of Windows Password Recovery Enhance to USB.)
Step4: Soon you will receive a message box showing ÒBurning successfully completedÓ. Until now it means you have successfully created a Windows 7 password recovery USB. Next, just click ÒOkÓ to end to process and then take out the USB from PC.
ThatÕs all about how to create password reset USB disk for Win 7. If you are interested in how to use a reset Windows 7 password USB for lost Win 7 password recovery, you then can refer to:
http://www.windowspasswordrecovery.net/support/enhanceuserguid.html
http://www.windowspasswordrecovery.net/support/enhanceuserguid.html
Source: http://www.windowspasswordrecovery.net/article/reset-win-7-password-with-usb.html
Go to link Download
Friday, November 11, 2016
How to Create a New PDF Document with Word Excel PowerPoint or Other Files
How to Create a New PDF Document with Word Excel PowerPoint or Other Files
As a popular document read mode, PDF format is used usually on computer, mobile phone and other digital devices. So many other files types are converted to PDF document for reading more conveniently. Now letÕs see how can we create a new PDF document from other files?
- Method 1: Create PDF Document by "Save As" Option.
- Method 2: Create PDF Document with Adobe Acrobat Menu.
- Method 3: Combine a PDF Document from Several Kinds of Files.
Method 1: Save Word/Excel/PowerPoint as PDF format document
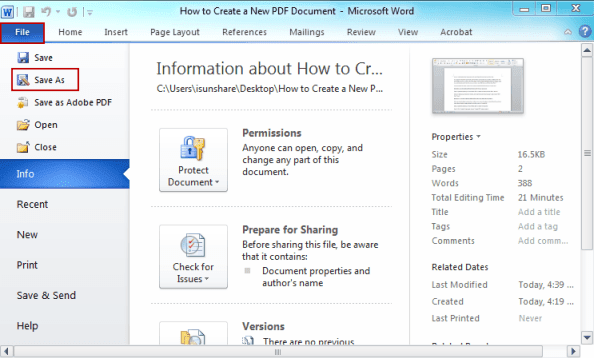
Step 1: Open Word, Excel, or PowerPoint 2007 or newer versions, and click File Ð Save As.
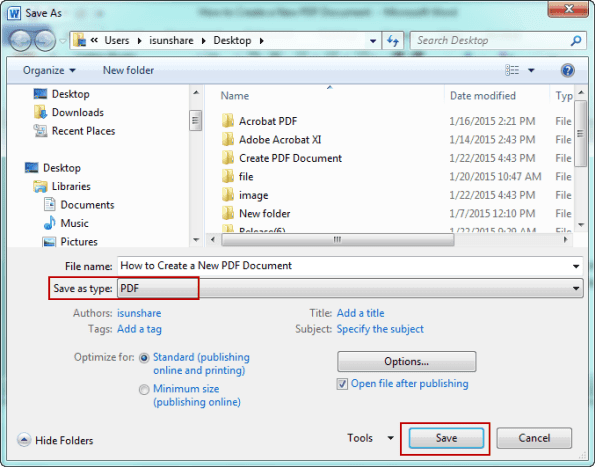
Step 2: In the pop-up Save As window, set a name. Browse Save as type, and choose PDF. Click Save.
Method 2: Create PDF with Word/Excel/PowerPoint by Adobe Acrobat Menu
After you install Adobe Acrobat, there will be a new menu "Acrobat" in Word/Excel/PowerPoint menu. Several options are provided in Acrobat, such as "Create PDF".
Step 1: Open Word, Excel, or PowerPoint 2007 or newer versions file.
Step 2: Click Acrobat menu and choose Create PDF option under it.

Method 3: Create PDF with any files by combining files in Acrobat
After you install Adobe Acrobat XI Pro, one new option "Combine files in Acrobat" is added to right-click menu. No matter which kind of file you want to create as a PDF file, just combine them and save it is OK. Then a new PDF file will be created, which includes all of the content of files you add.
Step 1: Right click one file you want to add to the new PDF. And choose ÒCombine files in AcrobatÓ in right-click menu.

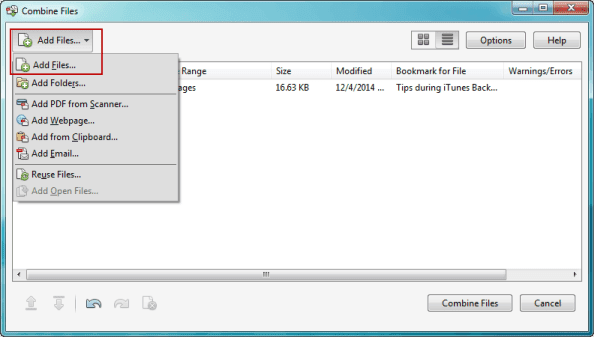
Step 2: In Combine Files window, you can see the file you just clicked. Now click Add Files Ð Add Files button.
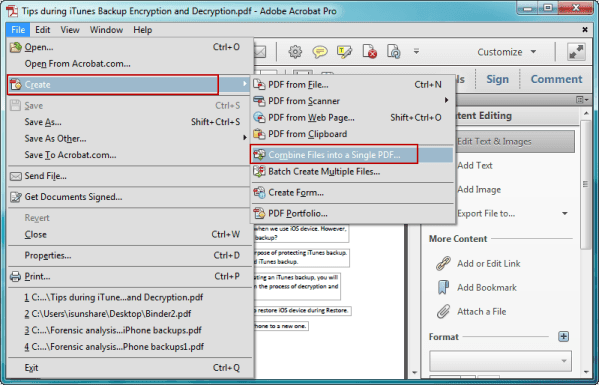
Or you can open a PDF file first, and then click File Ð Create Ð Combine Files into a Single PDF.
Then "Combine Files" window also appears.
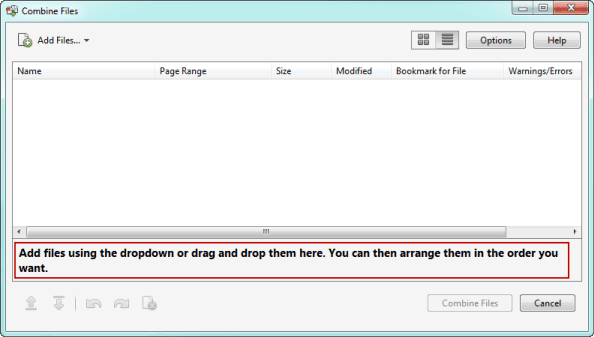
Then "Combine Files" window also appears.
Step 3: Select the files you want to add to the new PDF, and click Open.
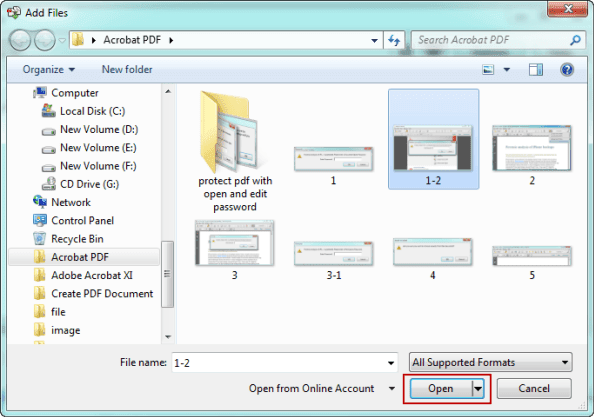
If there are still files you want to add, repeat above two steps.
Step 4: When all of files have been added, arrange the files and make them listed as you like.
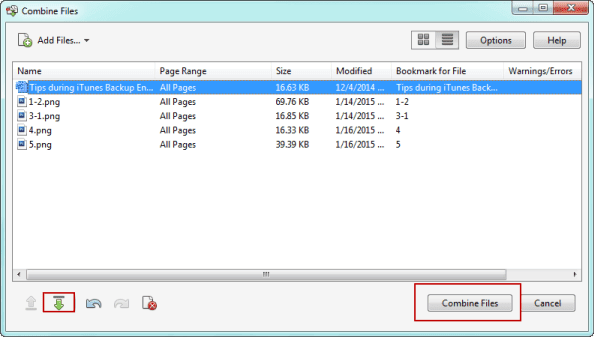
Step 5: Confirm and click Combine Files.
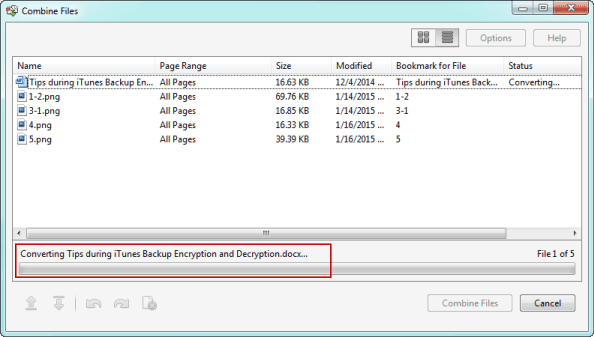
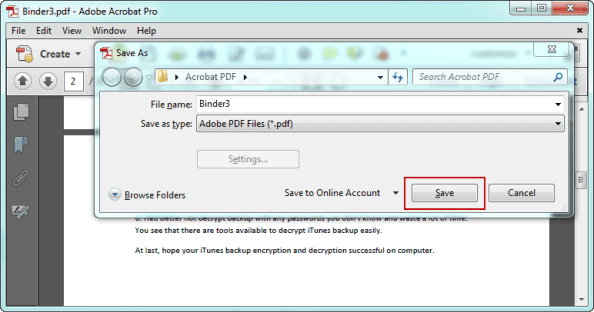
Step 6: After they are added into new PDF file and open, press Ctrl + S to save it.
Related Articles:
Related Articles:
- How to Secure and Edit a Secured PDF Document
Go to link Download
Monday, October 31, 2016
Create a Windows Vista Password Reset Disk
Create a Windows Vista Password Reset Disk
ÒEveryone help, please!!! Somehow I just forgot my Vista computer password after I had a vacation. IÕve searched for many resources on the Internet, and one way mostly mentioned is to use a Windows Vista password reset disk. But I just donÕt have such one, how can I create one to fix my problem?Ó
Asked by Mark from Yahoo
Asked by Mark from Yahoo
If you have been completely locked from your Vista password, yes, using a Windows Vista password reset disk is the best option to help you rescue the locked computer. Theoretically, one needs to previously create such a disk before he forgot his Vista login password. But for most computer users just like Mark, they actually donÕt have created such a disk until they realize their password has been already lost or forgotten. Then is it still possible to create Windows Vista password reset disk to crack or reset the forgotten Vista login password?
Of course, itÕs possible! First choose a professional Windows Vista password reset tool which allows you to burn a CD, DVD or USB flash drive into a bootable Vista password reset disk and next you can then use the disk to boot your computer and reset the forgotten password.
Well, speaking of this, I personally think Windows Password Recovery Enhance can be a nice option. Now, you can get this tool here:
http://www.windowspasswordrecovery.net/windowspasswordrecoveryenhance.html. Next quickly download and install it on your computer, then letÕs move on!
(Note: The computer should be accessible.)
http://www.windowspasswordrecovery.net/windowspasswordrecoveryenhance.html. Next quickly download and install it on your computer, then letÕs move on!
(Note: The computer should be accessible.)
Steps on creating a Windows Vista password reset disk with Windows Password Recovery Enhance.
Step1: After launching the program, please insert an empty and writable CD/DVD or USB flash drive to the accessible computer.
Step2: Now, you can see such an interface as below. Now follow the wizard on the interface to create disk step by step. First select your device CD/DVD or USB. Then click ÒCD/DVDÓ or ÒUSB Flash DriveÓ option. In the end, just click ÒBurnÓ to start creating Windows Vista password reset disk. Once the burning process finishes, just take out your device from the PC.

Step1: After launching the program, please insert an empty and writable CD/DVD or USB flash drive to the accessible computer.
Step2: Now, you can see such an interface as below. Now follow the wizard on the interface to create disk step by step. First select your device CD/DVD or USB. Then click ÒCD/DVDÓ or ÒUSB Flash DriveÓ option. In the end, just click ÒBurnÓ to start creating Windows Vista password reset disk. Once the burning process finishes, just take out your device from the PC.
Guides on using the created Windows Vista password reset disk to rescue locked computer.
1. Access your locked computer with the burned disk.
Now insert the burned disk into the locked computer and start it. When the system starts, continuously press some certain keys such as F12, Del, and F2 etc. to get into BIOS Device Menu. Next select 1st Boot Device to CD-ROM/USB, and then press F10 to save setting. For details on how to make such settings in BIOS, you can refer here:
http://www.windowspasswordrecovery.net/support/deluxe_bios_setting_for_cd.html
1. Access your locked computer with the burned disk.
Now insert the burned disk into the locked computer and start it. When the system starts, continuously press some certain keys such as F12, Del, and F2 etc. to get into BIOS Device Menu. Next select 1st Boot Device to CD-ROM/USB, and then press F10 to save setting. For details on how to make such settings in BIOS, you can refer here:
http://www.windowspasswordrecovery.net/support/deluxe_bios_setting_for_cd.html
2. Crack forgotten Vista password with the disk.
Now, when the PC reboots, a new interface will occur, just see as below. This means you are under the pre-installation system environment of Windows Password Recovery Enhance now. Next, you just follow the wizard to select Windows Installation first, then select the user account whose password youÕve forgotten, after that click ÒNextÓ to start cracking password.

Now, when the PC reboots, a new interface will occur, just see as below. This means you are under the pre-installation system environment of Windows Password Recovery Enhance now. Next, you just follow the wizard to select Windows Installation first, then select the user account whose password youÕve forgotten, after that click ÒNextÓ to start cracking password.
In less than 40 or 50 seconds, you will be reminded ÒYou have reset the password successfullyÓ. Next you just need to reboot your PC and then log in without password. ThatÕs for my sharing on how to create Windows Vista password reset disk and how to use this disk to crack forgotten Vista login password.
Source: http://www.blog.windowspasswordrecovery.net/create-windows-vista-password-reset-disk.html
Go to link Download
Monday, October 10, 2016
Create an Empty Name invisible Facebook Profile
Create an Empty Name invisible Facebook Profile

Note: IF you have changed your name last 60 days or changed the name manytimes and crossed the limit then you will be unable to create an invisible/empty Facebook account name.To Do this you should create a Facebook account
- 1st of all you have to download and install vpngate
- 2nd open vpn gate and select an Indonesian ip address
- 3rd verify that you have successfully changed you ip by going to www.whatismyipaddress.com
- 4th clean browser cookies & history and log in to facebook go to setting change your language to Bahasa Indonesia.
- 5th Click on edit name first remove your last name and then copy name below k???k
- Now remove both k letters from this
- Give your password save or hit enter button
- Again change your language to default (English us)
Watch Video Online In Urdu&Hindi
Go to link Download
Subscribe to:
Posts (Atom)