Showing posts with label data. Show all posts
Showing posts with label data. Show all posts
Thursday, May 11, 2017
EaseUS Data Recovery Wizard Technician 10 5 Keygen Full Latest Version
EaseUS Data Recovery Wizard Technician 10 5 Keygen Full Latest Version


Features:
Deleted, Formatted, Inaccessible, Partition Lost? Get All Your Lost Data Back Now!
EaseUS Data Recovery Wizard Professional, completely safe and effective hard drive data recovery software, provides reliable data recovery solution to save all kinds of data loss scenarios. It enables you to recover unlimited types of files from PC/laptop, hard drive, lost or raw partition, USB drive, memory card, digital camera, music player or other storage devices due to deleting, formatting, partition loss, partition inaccessibility, virus attack or other unknown reasons. Just need 3 simple steps to retrieve all your lost data.
Quickly and Easily Retrieve All Lost Files
After program starts, it will automatically perform Ôquick scanÕ to quickly scan your hard drive, lost hard drive or storage device to find the lost files in just 1 minute. You can conveniently preview and locate the files you need. If you donÕt find the lost files you need, you can opt to click Ôdeep scanÕ to check your hard drive or storage sector by sector and find all the lost or hidden files.
- Quick scan finds deleted files and lost files emptied from Recycle Bin.
- Deep scan finds formatted, inaccessible or lost data completely.
Apply to All Data Loss Situation and Devices
The reliable hard drive data recovery software allows you to not only recover lost data from PC, laptop or hard drive, bust also recover lost data from USB drive, SD card, digital device or other storage media.
- Recover whatever you lost, such as images, documents, videos, music, emails, archives etc.
- Any Data Loss Situation: recover data due to deleting, formatting, inaccessibility or raw, virus attacking, improper operation etc.
- Recover data from PC, Laptop, hard drive, USB drive, SD/Memory Card, Digital Cameras or other storage media.
- Support large hard disk.
Preview before Recovery
- Specify your recovery file types before scanning for precise searching results.
- Filter your search by file name, type, date to find files quickly and save time.
- Preview the files to check their details and quality before you decide to recover them.
Easy to Use and Safe
The 100% safe data recovery tool allows you to recover lost data within only 3 simple steps. Follow the clear and brief instructions on the interface, and no prior recovery experience required.
- An interactive and user friendly interface for recovery process. Just 3 simple steps to get all your lost data back.
- 100% safe, it will never cause any damage to your device or overwrite your data.

SETUP | KEYGEN
Go to link Download
Tuesday, May 2, 2017
Minitool Power Data Recovery 6 5 License Key
Minitool Power Data Recovery 6 5 License Key

MiniTool Power Data Recovery 6.5
Personal License:
45YUAKSXWPMVPXKA555Y3AP5WMMW5XPX55KY35WCVPFMA8WS3833V3YMXA5PKSPW
A5S4YPWSKUS85S85VKSW3F4CVASSY4PS
Commercial License:
WUYXK3WFFAF8Y5YYV4FWKX44FAF4CX5MWUS5WWSKAA5AKVPC35U35VPU8AU5V454
XU5M8KS58AS5WMYCK8PCUKFS5AA3WV5P
Enterprise License:
U3AMSVP34M5UCPMX38MCVMWA348VXFUWU3VVXX4MPVYPVMUK34WPAYWX34AXS3UV
F3CFCSPCYM8CKVA8VK43UVX5WCV4YAUW
Technician License:
YSKSY4MMKAMXM4FCX4KK83APCCWYA5PU5SUWK3M4PV8X8YYF8PPF5K58W4PSMSPY
YSV5AAKVY5FK84KUUF4F4VPU4CM8SXP5
PLEASE! RECOMMENDED US ON GOOGLE!
Go to link Download
Wednesday, April 26, 2017
Cara Backup Data Android Via Google Backup Aman
Cara Backup Data Android Via Google Backup Aman
Cara Backup Data Android Via Google Backup Aman. Untuk menjaga data file penting di Android tetap aman dan tidak hilang, jika suatu saat terjadi masalah pada ponsel Android, data masih bisa dikembalikan. Membuat backup data pada Android menjadi cara yang tepat dan wajib kita lakukan agar tidak kehilangan data penting kita.
Kita sebaiknya melakukan backup data secara berkala, setiap memiliki data baru maka perlu untuk kita lakukan backup kembali data baru anda. Cara Backup data Android melalui layanan Google, menjadi salah satu cara yang aman dan setiap saat bisa kita unduh kembali data tersebut.
Pada smartphone Android anda, juga bisa secara langsung melakukan Backup Data Bagaimana caranya, gampang sekali, masuk ke Settings > Backup and Reset > Backup My Data kemudian silakan pilih Automatic Restore. Langkah selanjutnya anda perlu, melakukan sinkronisasi agar data di handphone bisa tersimpan, seperti data kontak, email dan lain-lain.
Melalui layanan dari Google
Anda bisa mengupload file kesayangan ke server google, misalnya ingin menyimpan file musik/video, bisa menggunakan fasilitas dari google yang ada. Namun butuh koneksi yang bagus dan juga waktu, karena jika koneksi jelek bisa memakan waktu cukup lama.
Jika anda memiliki computer maka cara ini tentu lebih mudah dan praktis yang bisa kita lakukan. Tinggal copy paste ke computer maka data penting akan tersimpan disana secara aman. Pingin lebih aman lagi, bisa disimpan pada folder dengan menggunakan password.
Jika ingin mem-backup menggunakan Android cara lain anda bisa gunakan My Backup Pro. Ini adalah sebuah aplikasi Android bernama My Backup Pro yang bisa diunduh / beli yang berasal dari Rerware. My Backup Pro memiliki kelebihan dan kemudahan dalam penggunaannya. Dengan My Backup Pro secara mudah Anda bisa secara langsung mem-backup data seperti foto, data aplikasi, bookmark browser, kalender, MMS, SMS dan lain-lain.
Bagi pengguna Samsung bisa menggunakan Samsung Kies yang telah disediakan oleh pihak smartphone aplikasi Kies Air. Aplikasi Kies Air bisa digunakan untuk pengguna Samsung Android dengan menghubungkan ke komputer untuk terhubung dengan perangkat lainnya dalam jaringan yang sama. Melalui computer bisa mengeksplor ataupun mengcopy data. Untuk menggunakan aplikasi ini akan diberi alamat IP yang harus dimasukkan ke dalam browser yang disertai dengan PIN.
Bagi pengguna Samsung Kies, pada aplikasi ini dilengkapi dengan Desktop. Anda bisa menggunakan desktop untuk mem-backup data smartphone dengan menghubungkan smartphone Android Samsung dengan computer. Itulah sedikit info tentang Cara Backup data Android Via Google Backup Aman
Untuk data-data seperti file gambar, audio, video bisa saja disimpan di internal storage (kartu MicroSD, dll), namun untuk data seperti kontak, sms, memo, email, perlu cara tertentu untuk bisa backup/menyimpannya, bisa dengan cara online dan offline.
Cara Backup Data pada Android Secara Online:
Menggunakan fitur Google Back Up,cara mengaktifkan sbb
1. Menuju ke menu Setting (pengaturan), pilih menu personal, pilih Back Up dan reset.
2. Beri ceklist pada pilihan Back Up dan Restore otomatis.
3. Kembali lagi ke menu pengaturan lalu pilih menu personal.
4. Pilih Account dan sync.
5. Selanjutnya silakan pilih akun Google utama yang Anda gunakan untuk disinkronisasi (ke Google Back Up)
6. Setelah itu akan muncul list data yang akan disinkronisasikan, dan Anda memerlukan aplikasi tambahan, bisa diperoleh di Google Playstore seperti SMS Backup atau My Phone Explorer.
Backup Data pada Android Secara Offline
Anda harus menggunakan aplikasi tambahan untuk metode/cara ini. Aplikasi tambahan yang dapat Anda gunakan, seperti My Back Up, Mobile Backup II, App Backup and reinstall, JS Backup ataupun My Phone Explorer dan semua bisa di download gratis di Google Playstore. Buat file backup data melalui salah satu dari aplikasi tersebut, kemudian pindahkan file backup anda ke komputer. Semoga bermanfaat.
Go to link Download
Wednesday, April 19, 2017
How to Import External Data into Access 2013 App or Desktop Database
How to Import External Data into Access 2013 App or Desktop Database
While you want Access database referring to your important excel file, the introduction about importing external data into Access 2013 App or desktop database in this passage would tell you how to do. So whether you have such a problem, go on to read.
- S1: Import external file into an Access 2013 app
- S2: Import external data into Access 2013 desktop database
S1: Import external file into an Access 2013 app
Available external file type: Excel workbooks, ODBC data sources, text/CSV files, SharePoint lists, and other Access databases.
Preparation: Access 2013 has been installed and opened on your computer and imported files have been prepared on computer or connected storage devices.
Step 1: On the Add Tables page, you can import data from Excel workbooks, ODBC data resources, text/CSV files, SharePoint lists, and other Access databases.
Tips: You can see Add Tables page when creating a new custom app. But if you have already started an app, open it in Access, then click Home - Table.
Step 2: Near the bottom of the Add Tables page, click the type of data source you want to import, and follow the instructions in the Get External Data wizard.
Tips: Imported data is always added to new table with default List and Datasheet views.
S2: Import external data into Access 2013 desktop database
Imported data can be added to existing table. And sometimes, when you couldnÕt import data directly into an app, you might be able to import it into a desktop database first, and then import desktop database table into the app.
For example: import external excel file into Access 2013 desktop database
For example: import external excel file into Access 2013 desktop database
Step 1: Open Access 2013. On the External Data tab, in the Import & Link group, click the file type you want to import.

Step 2: Follow the instructions in the Get External Data Wizard. For example, click "Browse" button next to "File name" box, to specify the source of the definition of the objects. Now we choose to import Excel file.

Step 3: Follow "Import Spreadsheet Wizard" to do.
 |
| 3-1 Choose Show Worksheet you like and click Next |
 |
| 3-2 Check "First Row Contains Column Headings" and click Next |
 |
| 3-3 Set "Field Name" and "Data Type" |
 |
| 3-4 Set datasheet primary key |
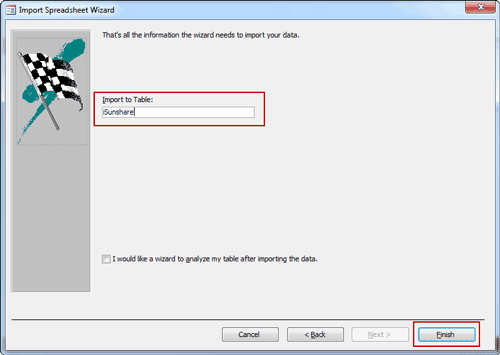 |
| 3-5 Set a name for imported Excel file in Access and click Finish |
 |
| 3-6 Exit "Import Spreadsheet Wizard" |
 |
| or Save Excel import steps |
Step 4: External Excel file has been successfully imported into Access 2013.

Summary:
The beginning of importing different external data into Access is the same. But it would be different after you choose the file type you want to import. For example, if you want to import SQL database into Access database, it would be more complex than importing Excel or access database file into Access.
Related Articles:
Related Articles:
- 3 Ways to Create Access 2007-2013 Database
- How to Encrypt and Decrypt Access Database
- How to Access Locked Access 2013 Database
- Access Database Password Reset
- What Errors Lead to Access DataImport from Excel or Export Failure
Go to link Download
Thursday, April 13, 2017
Recover Data from a Damaged Seagate External Hard Drive
Recover Data from a Damaged Seagate External Hard Drive
I just found that data has been lost after transferring data from Seagate external hard drive to computer. And now Seagate external hard drive seems to be damaged. It has become inaccessible.
If you are in such situation and in search to find how to recover data from damaged Seagate external hard drive, it is important to clarify why data lost after transaction.
Technical Errors: Sometimes, lots of data always lose after we accidently delete or copy, but not paste them at right location.
Hard Disk Errors: Seagate external hard drive has been used for a long time. And now it becomes broken, so data lost.
Software Errors: When transferring data from external hard drive to computer, Seagate external hard drive is attacked by virus software on computer.
No matter which reason, Seagate external hard drive damaged is inevitable now. But donÕt panic. There is still chance to recover Seagate external hard drive data, as long as the external hard drive has not been written with new data.
How to recover Seagate external hard drive lost data?
Data Genius is a powerful and free Seagate hard drive data recovery tool, no matter hard drive is formatted, virus-attacked, partition or any other reasons.

Steps for data recovery from Seagate damaged external hard drive:
- Connect damaged Seagate external hard drive to accessible computer.
- Download and install iSunshare Data Genius on this computer.
- Run data recovery tool and choose data recovery option. If you are not sure, choose Deleted Recovery. Click Next.
- Choose external hard drive and click Scan button.
- When hard drive scan process completes, lost data or files can be seen in the left pane of Data Genius new window.
You can select the files and preview them in the right pane to see whether they are the lost data you want to recover from damaged Seagate external hard drive. - Check files you are sure to recover and click Recover button.
- At the following pop-up window, choose a location on computer to save recovered data.
- Until "Recovery is finished" message appears, lost data is recovered successfully from Seagate external hard drive. Click OK and you will turn to the recovered data.
- How to Find Lost File in Windows 7 Laptop
- How to Retrieve Important Data after Deleted or Lost Accidently
- How to Retrieve Music/Movies/Photos Deleted from Mobile SD Card
- Western Digital External Hard Drive Lost Data Recovery
Go to link Download
Wednesday, April 12, 2017
How to Exit Recovery Mode Easily without Data Loss from iPhone iPad iPod
How to Exit Recovery Mode Easily without Data Loss from iPhone iPad iPod
"I clicked Restore button in iTunes carelessly, and my iOS device has been in recovery mode now. But thatÕs not what I want. Apps, connections, or data saved on device will be lost or deleted. How can I do?"
If you have just created a backup before operation error, you can restore device from previous backup after exiting recovery mode. There will not be so much data lost. However, if there is no backup, or the backup has been created a long time ago, how should you do?
Can device exit recovery mode instantly without any data lost when iPhone/iPad/iPad just enters recovery mode? If there is one effective way or tool, that would be perfect.
And now I would tell you such a tool, which can easily get iOS device out of recovery mode instantly. iOSBoot Genius will be introduced in following passage about how to exit recovery mode.
Step 1: Download and install iOSBoot Genius in your computer.
Step 2: Connect device to computer or make sure device connected to computer.
Step 3: Run iOSBoot Genius, and it prompt you that device has been connected, and "Exit Recovery Mode" button is bright.

Step 4: Click "Exit Recovery Mode" button.
You will see USB cable and iTunes logo appearing in device screen. And iOS device will be out of recovery mode soon. During the process of recovery mode existence, you donÕt need to worry about data loss or damage. So if you want device to be out of recovery mode safely without any loss, just need to install and run iOSBoot Genius on computer to help put iPhone/iPad/iPod out of recovery mode.
Tips: It is worth to mention that iOSBoot Genius also can help iPhone/iPad/iPod enter recovery mode. So if there is another reason that leads to failed access recovery mode with device menu or iTunes, iOSBoot Genius can do that successfully.
Related Articles:
- How to Change iTunes Forgotten Backup Password without Data Loss
- How to Factory Reset iPad with or without iTunes
- How to Unlock Locked iPad/iPhone/iPod after Passcode Forgot
- How to Unlock iOS Device If Forgot Passcode
Go to link Download
Tuesday, April 4, 2017
Find Back Deleted File on Windows Partition with H Data Windows File Recovery
Find Back Deleted File on Windows Partition with H Data Windows File Recovery
How to Find deleted lost files on Partition with Windows File Recovery
The most effective way to do this is using a professional Windows File Recovery Software software. Note: the software is fully compatible with Windows XP, Windows Vista, Windows 7 & latest Windows 8 and Windows 8.1 and will update to available for Windows 10. The H-Data can locate and find deleted files on hard drive. You can even keep the original name after recovering(for win8.1/8/7/Vista). So that you will recover original folders with file with original file names. But for Windows XP, the file name may be changed after recovering.
Lost files can usually be recoveredÑif you find deleted files as early as possible. You can often successfully recover a deleted files from a PC. You accidentally deleted important files such as your favorite family pictures, the report youÕve been working on for months or critical business documents. How to find deleted files completely and successfully.
When you empty the Recycle Bin, the folders and files are not really gone but are "hidden" in some place. You know, Disk Management and the File System work together. When you delete big file folders or files emptying Recycle Bin, Shift + Delete, DOS command delete or other methods to get rid of the files, the file system (usually NTFS) only marks the spaces where those files occupy as ÒdeletedÓ sign telling Disk Management that those spaces are free now to be overwritten. If Disk Management has not yet written new data to the area which was freed for reuse, that "deleted" folders and filrs are still sitting there. So you still have chance to find and recover deleted files on PC.
4-step to find and retrieve accidentally deleted files from your PC hard drive
Step1: Free download and install the program on your computer.

Step 2. Launch the file recovery program and select "Emptied the Recycle Bin" or "accidetanlly deleted file"to recover lost data.

Step 3. Select the disk where you lost your data and click "Scan" button, the software will quickly scan the selected disk to find all your target files. If you lost your partition, select "partition formatted/disapper" to continue the recovery process.

Step 4. After scan, you can preview all the listed recoverable files one by one and select out those you want. Then, click "Recover" button to get them back once. Here you should save all the recovered files on another disk to avoid data overwriting.

Now you have lerarned how to find deleted files on PC. With H-Data Windows File Recovery, you can also restore files emptied from the Recycle bin as well as images and other files that have been deleted by user error from USB drive, digital camera memory cards or MP3 players. It will even bring back files that have been deleted by bugs, crashes and viruses!
View more posts
Restore shift deleted files and folders from Windows 8, Windows 7 and Windows XP
100% Data Recovery to get Erased/deleted files from Windows 8.1 hard drive
Detect and Recover deleted files, Photos, Video on Windows PC
Go to link Download
Saturday, April 1, 2017
How to Recover Data File Password in Outlook E mail
How to Recover Data File Password in Outlook E mail
Microsoft Office Outlook password forgot? CouldnÕt open Outlook PST/OST data file? CouldnÕt access E-mail accounts in Outlook?
Have you encountered these problems? Actually, all of these problems could be solved by one way, recovering Outlook data file password. All of the e-mail accounts added to Outlook and information about e-mails, task and schedule etc are saved in Outlook data file on your local computer, or saved in E-mail server. So just recovering data file password, you would be able to access e-mail in outlook.
Through the search and comparison of different kinds of outlook password recovery tools, Outlook Password Genius is effective one for Outlook data file password recovery. Because it directly imports data file into software, and then recover data file password by password attack.
Only three steps and two minutes at most needed. With so high efficiency, letÕs see how to recover Outlook data file password in details?
Step 1: Install Outlook Password Genius on your computer. And click ÒOpenÓ button to import encrypted outlook data file, PST or OST file.
Get it here: http://www.isunshare.com/outlook-password-recovery.html

Step 2: Select password attack type and make settings.
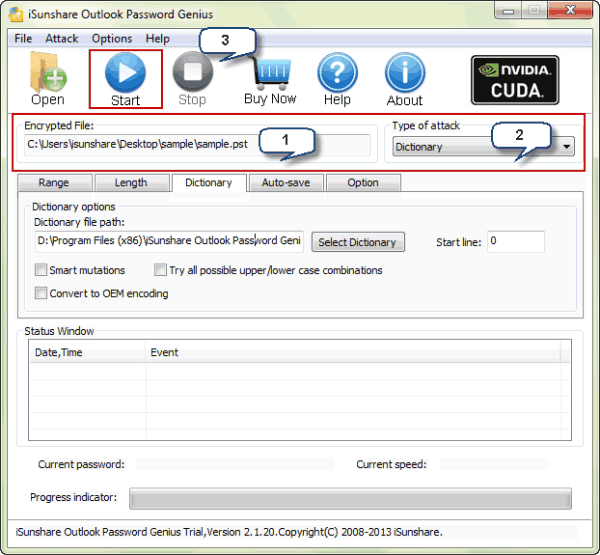
Step 3: Click ÒStartÓ button to recover imported data file password.
In new pop-up window, there is Outlook password recovered. You can copy it to access E-mail in Outlook or save it in safe place.

If you forget not only Outlook data file password, but also other Office password files, such as Word document, Excel sheet, Access database or PowerPoint file, select Office Password Genius to help you. Related Articles:
- How to Recover Different Kinds of Deleted or Damaged Data
- Principles of Hard Disk Data/File Storage and Format
- How to Setup and Delete E-mail Account in Outlook 2010
Go to link Download
Friday, March 31, 2017
How to Recover Different Kinds of Deleted or Damaged Data
How to Recover Different Kinds of Deleted or Damaged Data
There are different kinds of data stored on computer or other devices. Because of incorrect or careless operation on computer, or device damage, or floppy disk and optical disk unable to read and write, these data probably would lose or be damaged or deleted. How to recover deleted or damaged data on computer and different kinds of devices?
Situation 1: Recover damaged system partition table
Sometimes MBR in hard disk or partition table would be destroyed because of virus or wrong computer operation. System partition table damage leads to that Windows couldnÕt boot from hard disk, even couldnÕt access hard disk after computer boot from floppy disk.
The way to solve this partition table damage problem is so many, now suggest you how to rebuilt system partition table with KV3000.
Boot computer from floppy disk with KV3000 and check whether hard disk partition is normal.
And then do following prompting messages after it checks out problems.
Situation 2: Recover file or data deleted accidently
As soon as we find we have deleted file or data on computer accidently, and we deleted them with ÒDeleteÓ button, we still could restore them to original location from recycle bin.
If we have deleted them with ÒShift + DeleteÓ button, or we find file deleted after recycle bin is cleared, only program or software could help us to recover them.
Why software could recover deleted file?
This is because Windows system just only makes a mark for deleted files but not deletes them actually. So they are still saved in hard disk until they are covered with new files.
- If the file is ever on hard disk, take EasyRecovery Pro to recover file or data.
- If the deleted file is on portable storage device, run Digital Image Recovery to retrieve file.
Situation 3: Recover file or data formatted carelessly
Format is usually used in computer operation. But sometimes because choose wrong drive letter, and format other disk partition, but actually data on computer hard disk has not been cleared, only FAT table rewritten. Most of file data are not destroyed, so lots of hard disk data still could be recovered.
The easiest method is to turn your computer to run in DOS, and type in Òunformat x:Ó. This command would recover formatted disk partition.
But even though this command could recover all of files, the hierarchical structure of the directory would lose. And not all of computer users are familiar with the command. So now suggest you using EasyRecovery Pro to recover data for formatted disk partition.
But even though this command could recover all of files, the hierarchical structure of the directory would lose. And not all of computer users are familiar with the command. So now suggest you using EasyRecovery Pro to recover data for formatted disk partition.
Situation 4: Retrieve data after cloning reduction system accidently
Generally, we would save the image file with Ghost for disk partition where system is installed, in order to restore system to previous status when system is destroyed. But sometimes we probably would cover system section not system region when we restore Windows system. For example, Windows is installed in C:, but we restore image file into D:. Or some hard disk is set to restore to all of hard disk default. So after we restore Windows system, only one disk C: is available.
At this time, how to recover deleted data or file in our computer?
- If you are confused with the first situation, take EasyRecovery Pro to use, which will help you recover data in Windows computer.
- If you meet the second situation, it is a little difficult, now use Final Data to retrieve computer data and file.
Note: When we restore Windows system, we have to pay attention to that not only choosing the right drive letter, but also whether all the disk partitions are recognized as one disk partition default when restore optical drive. If this happens, donÕt use optical drive. Besides, donÕt save important data in disk partition where Windows system is installed, in purpose of not preventing them from being covered.
Situation 5: Recover data on disk that cant read and write
1. Recover data on floppy disk
If the data in floppy disk are only deleted, we could use the methods introduced in Situation 2. If there are other reasons leading to floppy disk unable to read and write, follow methods below.
1-1 Recover floppy disk data when software track is damaged.
We know that when partition table, file allocation table or track is damaged, we still could access disk, but read and write data on disk couldnÕt be finished.Now use NDD to check and recover floppy disk.
1-2 Data recovery when floppy disk shows it is not unformatted
1-2 Data recovery when floppy disk shows it is not unformatted
This always happens because of track zero damaged. But only HD-COPYcan be used, the problem will be solved.
2. Recover data on optical disk in capable of read/write
Maybe most of us have such experience. When computer is reading an optical disk with information, CD-ROM is working all the time. But after long time, a prompting window pops up told us that optical disk couldnÕt be read. Even though this happens and it makes you angry, look for BadCopy Proto help you please.
BadCopy Pro not only could read and recover damaged data on hard disk, optical disk and floppy disk, but also could retrieve file and pictures on ZIP drive and Flash/CF/Smart Media. And it is easy-to-use, so just follow operation wizard to do.
BadCopy Pro not only could read and recover damaged data on hard disk, optical disk and floppy disk, but also could retrieve file and pictures on ZIP drive and Flash/CF/Smart Media. And it is easy-to-use, so just follow operation wizard to do.