Showing posts with label without. Show all posts
Showing posts with label without. Show all posts
Monday, May 15, 2017
How to Reset Windows Vista Password without CD or Reset Disk
How to Reset Windows Vista Password without CD or Reset Disk
When you forgot Windows Vista password and no installation CD image and password reset disk are available, how should you do to reset forgotten Windows password?
From the beginning of Windows password recovery, password reset disk and convenient installation CD are computer usersÕ favorite tools to recover forgotten or lost Windows login or admin password. But now, you donÕt have them longer. As soon as you are complaining about this, you have to thank for this chance, which makes you find another more effective ways to reset Windows Vista password Ð Windows password recovery tool.
Now, in this passage, we mainly talk about two tools for Windows Vista password recovery.
1. Offline NT Password Registry Editor - Old and Freeware Program
2. Windows Password Genius - Easy and Effective Program
1. Offline NT Password Registry Editor - Old and Freeware Program
2. Windows Password Genius - Easy and Effective Program
1. Offline NT Password and Registry Editor Ð Old and Freeware Program
Offline NT Password and Registry is a utility to reset password of any user that has a valid local account on Windows system from NT3.5 to Win7, including Windows Vista. You do not need to know the old password to set a new one. It works offline, that is, you have to shut down your computer and boot off a CD or USB disk to do the password reset.
Step 1: Get Offline NT Password and Registry Editor.
Just get password reset CD/USB boot disk Ð Offline Windows Password and Registry Editor
Step 2: Insert the CD and convince your BIOS that should boot from it.
Step 2: Insert the CD and convince your BIOS that should boot from it.
You will see Windows Vista computer boots and outputs a lot of kernel messages about your hardware and such.
Tip: How to set computer boot from CD/DVD ROM
Step 3: Select disk where the Windows installation is.
Here we only have one partition, so we just press Enter to select it.

Step 4: Select PATH and registry files.

The registry is usually system32/config under WINDOWS or WINNT directory, depending on the windows version (and it may be changed during installation).
If the correct partition has been selected, the default prompt will be adjusted to match if it can find one of the usual variants.
And the select which part of registry to load, use predefined choices or list the files with space as delimiter.

Choice 1 is for password edit, most used. So now just press Enter to select it.
Step 5: Password or registry edit.
After we choose password reset, chntpw runs and its main interactive menu appears.

Just select 1 to edit user data and passwords. But you can also do other things.
And then that will list user info and passwords. Choose user you want to reset its password and go on.
About details on how Chntpw disk reset Windows password, please turn to:
How to Reset Your Windows password without an install CD
2. Windows Password Genius Ð Easy and Effective Program
Does the first program help you? If not, go to see how this easy and effective program works. Compared to Offline NT Password and Registry, Windows Password Genius with user-friendly interface, becomes easier for Windows Vista user to use, and whose concise function design makes operation effective.
Step 1: Get Windows Password Genius to install on your available computer.
There are four versions of Windows Password Genius for you to choose. Except raid version, other three versions apply to Windows Vista computer. Now download Windows Password Genius Professional.
Step 2: Burn a Windows Password Reset Disk.
Step 2: Burn a Windows Password Reset Disk.
When it runs normally, insert bootable USB drive into available computer. And then choose media type Ð USB. At last, click ÒBegin burningÓ to create password reset disk. Few seconds later, a message ÒSuccessfully burningÓ will tell you password reset disk has been created.
Step 3: Set Windows Vista Computer Boot from USB.
Plug USB reset disk into Vista computer first. How to boot from USB various from computer make to computer make. Some BIOS shows a boot device select menu if you press ESC, F8, F11 or F12 or something like that during the self-test. Some even tell you on the screen what to press.
How to set computer boot from USB
Step 4: Reset Windows Vista Forgotten Password.
If it boots from USB reset disk, you should see this:

Select Windows Vista and user you have forgotten password. Click ÒReset PasswordÓ and ÒYesÓ to make sure remove its password.

The last step is to reboot locked Windows Vista computer, and exit USB drive during start-up. Now you will see you donÕt need to type any password to login Windows Vista.
Which one can help you in short time? Which one could reset Windows password even you have no knowledge about computer? Make a try, and you will know.
Which one can help you in short time? Which one could reset Windows password even you have no knowledge about computer? Make a try, and you will know.
Go to link Download

Thursday, May 11, 2017
How to Activate Office 2013 without Product Key
How to Activate Office 2013 without Product Key
 No matter this is your first time or second time to install Microsoft Office 2013, without product key, how to activate Office 2013?
As we all know, Microsoft 2013 has two editions, VOL and Retail. The VOL edition is also called batch authorized version. The other is Retail edition, which is provided in computer shop with Office installation CD. And there are several benefits if you get Office 2013 VOL edition. For example, one key of VOL edition could activate a lot of computers through KMS server, while one key of Retail only activates a computer installed with Office 2013 by calling Microsoft service during installation. You would find Office 2013 VOL is convenient than Retail edition to activate.
So when we get ready to activate Office Professional 2013, we have to know which edition our computer is installed with.
Maybe you know that when we want to see the product version, we just need to open ÒFileÓ Ð ÒAccountsÓ, and you will find product information showing product version. But this does not applies to Office 2013. No matter how many times you try, you could only see Microsoft Office Professional Plus 2013. So how to look for what Office 2013 Edition is on your computer?
Step 1: Confirm Office 2013 Edition on Computer
After you access Windows 8 computer, run CMD with administrator or account with admin privileges. Turn to installation directory of Office, and type command: cscript ospp.vbs /dstatus
If what you see is ÒLICENSE DESCRIPTION: Office 15, RETAIL(Grace) channel, it means your computer is installed with Retail edition, otherwise, it will show ÒLICENSE DESCRIPTION: Office 15, VOLUME_KMSCLIENT channel to let you know this is Office 2013 VOL edition.
If what you see is ÒLICENSE DESCRIPTION: Office 15, RETAIL(Grace) channel, it means your computer is installed with Retail edition, otherwise, it will show ÒLICENSE DESCRIPTION: Office 15, VOLUME_KMSCLIENT channel to let you know this is Office 2013 VOL edition.
When you have understood which edition your computer Office is, activation will become easy. But you have to make sure Windows 8 has been activated before you active Office 2013. Because Office 2013 Retail is activated by call, so now I mainly introduce how to activate Office 2013 VOL with KMS.

However, if now the KMS server couldnÕt work, take Microsoft Toolkit to activate Microsoft Office 2013.
However, if now the KMS server couldnÕt work, take Microsoft Toolkit to activate Microsoft Office 2013.
Step 2: Activate Office 2013 VOL with Toolkit
- Get Microsoft Toolkit first.
Download here: http://goo.gl/bfl56m - After Microsoft Office 2013 installation, run Microsoft Toolkit.

ERROR CODE: 0x4004F00C
ERROR DESCRIPTION: The Software Licensing Service reported that the application is running within the valid grace period.
Even though they are error message prompting you, actually Office 2013 is activated successfully. Now you can try to run Office 2013 and experience function on it.

The above activation method is used when you first install Microsoft Office really without product key. When you want to install it on another computer, it is an available way too.
But besides this, there is another effective and guaranteed tool for you to find out product key after you forget or lost Office product key. And then activate Office with forgotten product key. It is called Product Key Finder. You dont need to know anything about command or complex programs. Just get product key finder and click one button to find product key.
Related Articles:
- Office 2013 Product Key Finder
- Find Lost Windows/Office Product Key easily with one click
- How to Find Windows 8.1 Activation Key
Go to link Download
Friday, May 5, 2017
How to Reinstall Office without Disk or Product Key
How to Reinstall Office without Disk or Product Key
After we buy a new computer, besides Windows installation, there are still other programs having to be installed on new computer, such as common Microsoft Office. Almost all of computer users use it to work or write something, or do with data. But unfortunately, we always encounter some problems when we prepare to install full version of Microsoft Office. How to reinstall Office successfully becomes a new problem for us after we get new computer and Windows system.
We can discuss this problem on three occasions:
- How to reinstall Office without disk
- How to reinstall Office without product key
- How to reinstall Office without disk and product key
1. How to reinstall Office on new computer without disk
Maybe you have purchased Microsoft Office at a store or from the web, or it has come with your PC. You are given a 25-digit Microsoft Office product key. It is very important to keep the product key in safe place or write it down.
But now you lost or misplaced your Microsoft Office Disc even though you have product key. So you are unable to reinstall Office on your new computer.
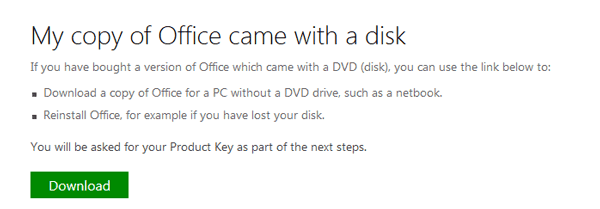
Actually, at this time, you just need a personal computer and an internet connection, and you can go to Microsoft Office download page to choose the right version of Microsoft Office for you.
Step 1: Click on the green Download button under the main heading "My copy of Office came with a disk".
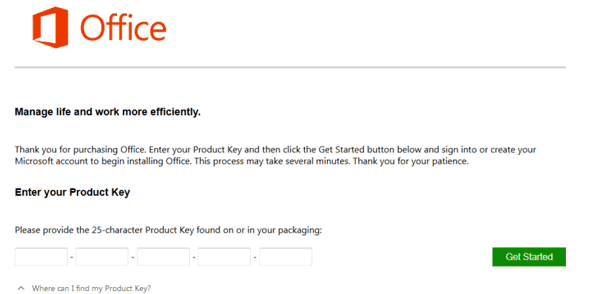
Step 2: Type in product key in the product key box.
2. How to reinstall Office without product key
When you have purchased Microsoft Office, there would be Office product key for you. But now Office product key has been lost and only Microsoft Office disc is saved in computer. How to reinstall Office on another new computer?
At this moment, the main step is to find out Office product key. According to the previous installation of Office in your old computer, you could find its product key with software, iSunshare Product Key Finder.
Step 1: Run Product Key Finder on your old computer. And click ÒStart RecoveryÓ to recover product keys for programs installing on computer now.
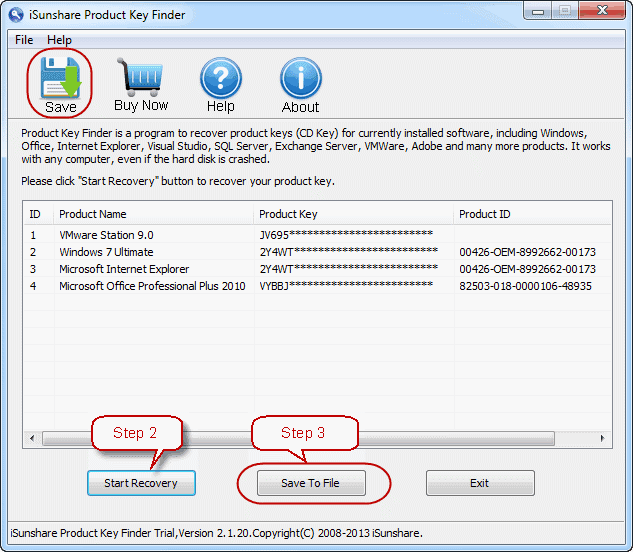
Save Office product key to a text file after all the product keys appear in software window.
Save Office product key to a text file after all the product keys appear in software window.
Step 2: Install Microsoft Office on new computer and type in product key just found to complete Office reinstallation.
Tips: How to Reinstall Microsoft Office without Product Key
Tips: How to Reinstall Microsoft Office without Product Key
3. How to reinstall Office without disc and product key
From the above introductions on two different situations, we can know if you donÕt have Office disk, you can download it from:
http://office.microsoft.com/en-gb/products/download-backup-restore-microsoft-office-products-FX103427465.aspx
If you have lost Office product key, Product Key Finder could help you find it out on your old computer.
After all Office disk and product key has been prepared, begin to reinstall Office on your new computer.Related articles:
- How to activate Office 2013 without product key
- What matters needed attention if reinstall Windows 7 after forgot password
- Find Lost Windows/Office Product Key easily with one click
- How to Find Windows 8.1 Activation Key
Go to link Download
Monday, May 1, 2017
How to Activate Windows 8 Pro without Product Key
How to Activate Windows 8 Pro without Product Key
When Windows 8 releases, I got Windows 8 to have a try on VMware Workstation. And I activated it with KMS. But now Windows 8 has become not activated because time is up.
You could see the details in PC info.
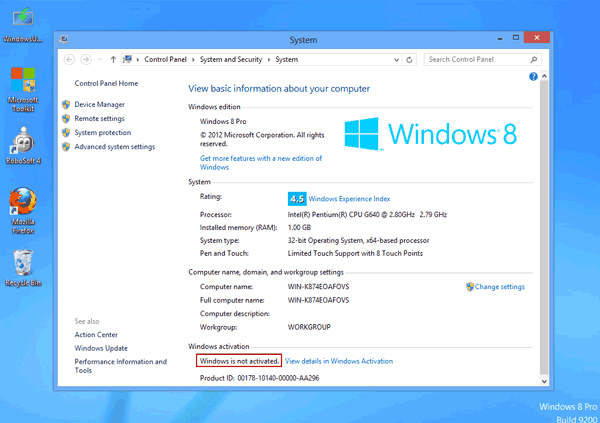
At this time, we could choose to activate Windows 8 with key directly. Or if we donÕt have key, letÕs learn to activate Windows 8 with Microsoft Toolkit like the following introductions.
1. Find and download appropriate Microsoft Toolkit.
Here we get Microsoft Toolkit 2.4.8, which is available for Windows 8.1/8/7/Vista and Windows server 2008/2012 (R2).
2. Run Microsoft Toolkit as administrator in Windows 8 virtual machine.
Microsoft Toolkit could activate Windows and Office without product key. Now we choose Windows system to activate.
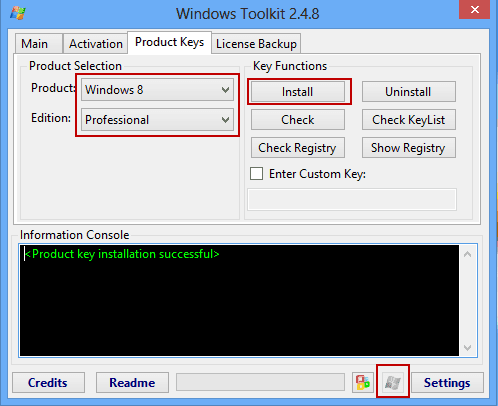
3. In "Product Keys" option, select Windows system type and version in "Product" and "Edition". And then click "Install" button.
4. When product key has been installed successfully, click "Activate" button to make Windows 8 pro activated.
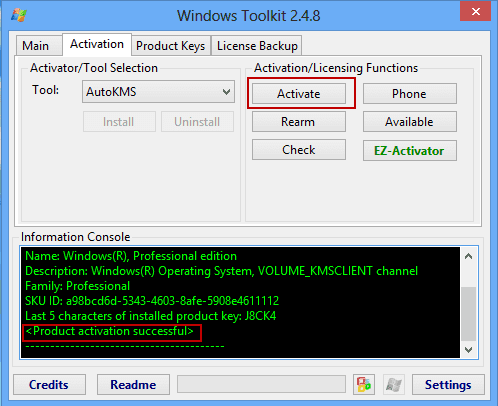
Few seconds later, message "Product activation successful" would appear in Information Console box at the bottom side of Microsoft Toolkit program window. Windows 8 has been activated at this time.
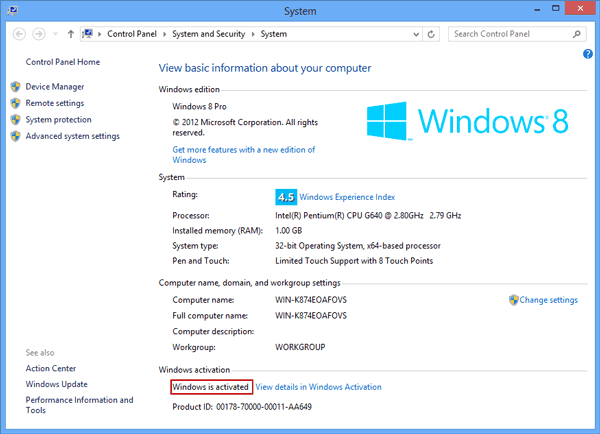
Now, if you open PC info, you could see Windows has been activated.
Related Passages:
Related Passages:
- How to Activate Office 2013 without Product Key
- How to Find Windows 8.1 Activation Key
- How to Factory Reset Windows 8 without Password
- Windows Server 2012 R2 Activation Key Finder
- Four Ways to Create Windows 8 Logon Password and How to Use
Go to link Download
Friday, April 21, 2017
How to Unlock iPhone without iTunes or Passcode
How to Unlock iPhone without iTunes or Passcode
When you forgot passcode or couldnÕt connect iPhone to computer with iTunes, how to unlock iPhone when it is locked out?
If you want to find effective ways for this problem, I think it has to be discussed in following two parts.
- Part 1: How to Unlock iPhone without iTunes
- Part 2: How to Unlock iPhone without Passcode
So now the passage below will describe the details to unlock locked iPhone without iTunes or passcode.
Part 1: How to Unlock iPhone without iTunes
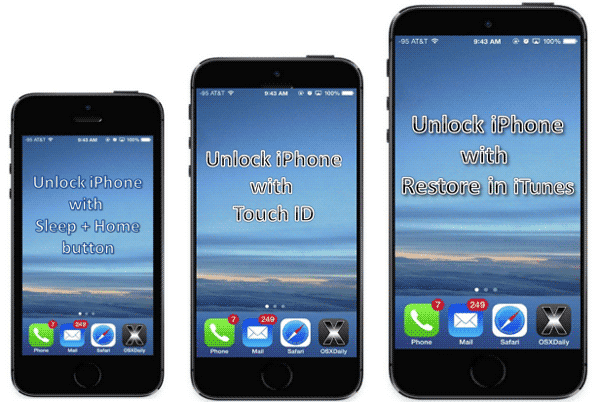
If you couldnÕt useRestore feature in iTunes, iPhone buttons can restore iPhone to factory settings. And then iPhone can be restored from iCloud backup after factory reset.
When iPhone is locked, hold Sleep button and Home button at the same time, iPhone will enter recovery mode. And then you just follow tips to do.
Part 2: How to Unlock iPhone without Passcode
Method 1: Access Locked iPhone with Touch ID
Use Touch ID instead of passcode to access locked iPhone, if it is iPhone 6, 6 plus, 5s or 5c. Touch ID is another way to protect iPhone, which has been created before you want to use it to enter locked iPhone. It is a fingerprint of iPhone user. And it can be used to unlock iPhone when your iPhone is locked because of passcode forgot.
Method 2: Unlock iPhone with iTunes
If iTunes is not available for iPhone, follow part 1.
If iPhone can be connected to computer, and just couldnÕt be checked by iTunes, iOSBoot Genius is another choice for your iPhone. It can easily enter iPhone recovery mode, so you can restore iPhone to factory default to unlock iPhone.
Step 1: Connect iPhone to computer.
Step 2: Install and run iOSBoot Genius.
Step 3: Click "Enter Recovery Mode" in iOSBoot Genius.
When "Exit Recovery Mode" becomes available, iPhone can instantly restore to factory settings with recovery mode.
Every method above has its advantages and disadvantages. We canÕt say which one is better than another one. What we can do is to choose available conditions.
Related Articles:
- How to Unlock iOS Backup after Password Forgot
- How Do I Unlock My iPad Air 2 without iTunes
- How to Unlock iPod Touch Backup If Password Lost
- Locked out of iTunes Backup Ð How to Reset iTunes Backup Password
- How to Exit Recovery Mode Easily without Data Loss from iPhone/iPad/iPod
Go to link Download
Wednesday, April 19, 2017
How to Reset Windows 7 Password with or without USB Disk
How to Reset Windows 7 Password with or without USB Disk
USB flash drive is usually used to create password reset disk, burn Windows installation disc, Windows recovery drive, which could reset Windows 7 password. So USB disk usually appears in Windows password reset. In this passage, we will talk about Windows 7 password reset with or without USB disk.
- Reset Windows 7 Password with USB Disk
- Reset Windows 7 Password without USB Disk
Part 1: How to Reset Windows 7 Password with USB Disk
- When you have USB disk with password reset disk, how to reset Windows 7 password?
- When you have USB disk with installation disc, how to remove Windows 7 password?
Option 1: Reset Windows 7 Password with USB Password Reset Disk
Password reset disk is common boot disk for Windows password reset, applying to Windows 8.1/8/7/Vista/XP and Windows server 2012/2008/2003/2000. And it is created in Control Panel or with Windows password recovery tool, such as Windows Password Genius.
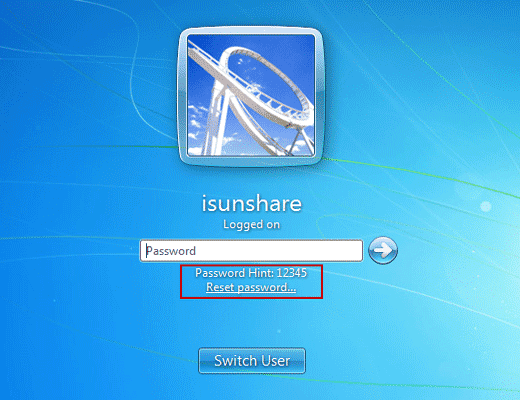
If it is created in Control Panel, just insert USB disk into your locked computer after you login Windows 7 failed. Click ÒReset PasswordÓ on Windows 7 logon screen, and Windows forgotten password reset wizard appears. Follow it and go on to set a new password for current user account.
If it is created with Windows password recovery tool, such as Windows Password Genius, you have to insert USB disk into locked Windows 7 computer. And set computer boot from USB disk. When Windows Password Genius program runs in WinPE environment, select Windows 7 system and user account to ÒReset PasswordÓ. This password recovery tool would remove forgotten Windows 7 user password.
If it is created with Windows password recovery tool, such as Windows Password Genius, you have to insert USB disk into locked Windows 7 computer. And set computer boot from USB disk. When Windows Password Genius program runs in WinPE environment, select Windows 7 system and user account to ÒReset PasswordÓ. This password recovery tool would remove forgotten Windows 7 user password.
Option 2: Reset Windows 7 Password with USB installation disk
Installation disc is used to reinstall Windows 7 or repair Windows 7, in order to remove forgotten Windows 7 password. So make sure important data has been back up previously.

- Boot from Windows 7 DVD or USB Device.
Insert Windows 7 USB installation disk into computer. And hold on pressing Del key. - Wait for Windows 7 Installation Files to Load
- Wait for Windows 7 Setup to Finish Loading
- Choose Language and Other Preferences
- Click the Install Now Button.
- Wait for Windows 7 Setup to Begin
- Accept the Windows 7 License Terms
- Choose the Type of Windows 7 Installation to Complete
- Show the Windows 7 Advanced Drive Options
- Delete the Partition Windows is installed on
- Confirm the Partition Deletion
- Delete Other Operating System Related Partitions
- Confirm Additional Partition Deletions
- Choose a Physical Location to Install Windows 7 On
After it completes successfully, you will get Windows 7 clean install. Previous Windows 7 password has been removed. Now there has been no password for Windows 7 default administrator. So now you could login into Windows 7 computer without password.
Part 2: How to Reset Windows 7 Password without USB Disk
When you donÕt have USB disk, CD disk is also available for Windows 7 password reset. Or create password reset disk with new bootable USB drive to reset Windows 7 password.
Option 1: Reset Windows 7 Password with system repair disc
- Plug the system repair disc in the CD/DVD drive of your locked Windows 7 computer. Restart the computer.
- A few seconds later, the screen displays Press any key to boot from CD or DVD. Press any key to boot the disc. If your PC still boots from the hard drive, you need to change the boot order in BIOS.
- Choose the Use recovery tools that can help fix problems starting Windows option. Click Next.
- On the next screen, youll see various system recovery tools that can used to repair your computer. Click on Command Prompt.
- In the Command Prompt window, type these commands one by one in order to replace the sethc.exe (Sticky Keys application) with the Command Prompt (cmd.exe).
c:
cd windows
cd system32
ren sethc.exe sethc.exe.bak
copy cmd.exe sethc.exe - Close the Command Prompt. Remove the system repair disc and restart your PC.
- Once you get to the Windows 7 login screen, hit the Shift key 5 times and it will open the Command Prompt window instead of the Sticky Keys application.
- Now to reset the password - just type the following command, replacing the username and password with the combination you want:
reset user isunshare 123456 - Close the Command Prompt and you should be able to log into your PC using the new password.
- After getting into Windows 7, remember to rename the sethc.exe.bak back to sethc.exe.
- Thats it Ð you have successfully reset your forgotten Windows 7 password.
Option 2: Create password reset disk with new bootable USB drive
When there is no USB disk to reset Windows password, Windows Password Genius provides you another chance to create password reset disk, which could recover Windows 7 forgotten password and add new user account in locked Windows 7 computer.
- Prepare devices what are needed to create password reset disk with USB drive.
Windows Password Genius, bootable USB flash drive, available computer. - Install Windows Password Genius on available computer and insert bootable USB drive into computer.

- Choose inserted USB drive and click ÒBegin burningÓ to burn password reset disk into USB drive. Exit it after successfully password reset disk creation.
- Plug USB password reset disk into your locked Win 7 computer, and boot computer from USB disk, you could remove Windows 7 password on Windows Password Genius program interface. After that, exit USB drive and reboot Win 7 computer.
Related Articles:
- How to reset Windows 7 password without reset disk
- How to create recovery disc for Windows forgotten admin password reset
- How to reset admin password on PC Windows 7
- How to bypass password for Acer laptop Windows 7 | forgot Windows 7 password
- How to crack administrator password in Windows 7 without CD
Go to link Download
Wednesday, April 12, 2017
Create apple iTunes store id without credit card
Create apple iTunes store id without credit card
Create apple iTunes store id without credit card

No doubt iTunes store is a wonderful place to get apps for your iPhone / iPod touch. However, not many people know that you donÕt need a credit card to create an Apple iTunes app store account. There is just a small trick to get this done. Follow this article to achieve this:
- Open Apple iTunes application
- Goto iTunes app store option from the left menu
- Now here is the tricky part. Many people click on the sign in button on the top to sign up directly. DO NOT click on that button. Instead, look at the Top Free apps list in the right column (itÕs below the top paid apps) Click on any app and click ÒfreeÓ in front of it. It will popup a signin box
- Click on Create new account on that popup box and follow the normal signup process until select payment option
- On the payment option selection option, select the option NONE and complete the rest of the process.
This will create your Apple itunes App store id without using credit card or without paying via any other method.
Go to link Download
How to Exit Recovery Mode Easily without Data Loss from iPhone iPad iPod
How to Exit Recovery Mode Easily without Data Loss from iPhone iPad iPod
"I clicked Restore button in iTunes carelessly, and my iOS device has been in recovery mode now. But thatÕs not what I want. Apps, connections, or data saved on device will be lost or deleted. How can I do?"
If you have just created a backup before operation error, you can restore device from previous backup after exiting recovery mode. There will not be so much data lost. However, if there is no backup, or the backup has been created a long time ago, how should you do?
Can device exit recovery mode instantly without any data lost when iPhone/iPad/iPad just enters recovery mode? If there is one effective way or tool, that would be perfect.
And now I would tell you such a tool, which can easily get iOS device out of recovery mode instantly. iOSBoot Genius will be introduced in following passage about how to exit recovery mode.
Step 1: Download and install iOSBoot Genius in your computer.
Step 2: Connect device to computer or make sure device connected to computer.
Step 3: Run iOSBoot Genius, and it prompt you that device has been connected, and "Exit Recovery Mode" button is bright.

Step 4: Click "Exit Recovery Mode" button.
You will see USB cable and iTunes logo appearing in device screen. And iOS device will be out of recovery mode soon. During the process of recovery mode existence, you donÕt need to worry about data loss or damage. So if you want device to be out of recovery mode safely without any loss, just need to install and run iOSBoot Genius on computer to help put iPhone/iPad/iPod out of recovery mode.
Tips: It is worth to mention that iOSBoot Genius also can help iPhone/iPad/iPod enter recovery mode. So if there is another reason that leads to failed access recovery mode with device menu or iTunes, iOSBoot Genius can do that successfully.
Related Articles:
- How to Change iTunes Forgotten Backup Password without Data Loss
- How to Factory Reset iPad with or without iTunes
- How to Unlock Locked iPad/iPhone/iPod after Passcode Forgot
- How to Unlock iOS Device If Forgot Passcode
Go to link Download
Thursday, March 30, 2017
How to Open Password Protected Excel Worksheets without Password
How to Open Password Protected Excel Worksheets without Password
"My Excel Worksheets are encrypted with strong password. But now the password used to open Excel Worksheets has been forgotten or lost."
How can I open the password protected Excel worksheets when no password available?
Should I get a password recovery tool to recover lost or forgotten excel worksheets password?
Now we make an example in following passage, introducing the steps for Excel password recovery in two parts. After the detailed introductions, believe you could find the appropriate way to open your protected Excel worksheets.
How can I open the password protected Excel worksheets when no password available?
Should I get a password recovery tool to recover lost or forgotten excel worksheets password?
Now we make an example in following passage, introducing the steps for Excel password recovery in two parts. After the detailed introductions, believe you could find the appropriate way to open your protected Excel worksheets.
- Part 1: Prepare Excel Password Genius and make settings for recovering Excel password.
- Part 2: Recover Excel password and open password protected excel worksheets.
Part 1: Prepare Excel Password Genius and make settings for recovering Excel password.
1. Get Excel Password Genius and install it on your computer.
There are two versions, trial version and full version for selection. The Excel Password Genius trial version only could recover password less than 3 characters. While full version could recover all kinds of excel password no matter how complex forgotten excel password is.
2. Run password recovery tool and import password protected excel worksheets.


2. Run password recovery tool and import password protected excel worksheets.
Double-click Excel Password Genius to run it on your computer. And then click "Open" button to browse encrypted excel worksheets on your computer. Select password protected worksheet and open it. It would appear in "Encrypted File" box then.
3. Make password attack settings.
3. Make password attack settings.
In drop-down box of "Type of attack", select the most appropriate password attack type for imported excel worksheets. And then make detailed settings for password attack type, Brute-force, Mask, Dictionary and Smart.
- Brute-force: set password range and length.
- Mask: mainly set "Mask" parameter.
- Dictionary: set dictionary path or confirm default dictionary path.
Part 2: Recover Excel password and open password protected excel worksheets.
1. After all necessary settings have been made, click "Start" button to recover imported Excel worksheet password.

Copy recovered excel password, and open encrypted Excel worksheets with it. And then choose to save excel worksheets password on safe place or change Excel password for easy-to-remember, or remove Excel worksheets password protection. No matter which kind of password is set for excel, it should be back up.
Related video for reference:
Remove Excel Forgotten or Lost Password Effectively and Easily
Related Articles:
- How to Open Password Protected Access Database without Password
- Could I Open Encrypted Outlook Data File without Password
- Can I Decrypt Encrypted PowerPoint File in Your Computer
- How to Open Password Protected Word Document
Go to link Download
Monday, March 13, 2017
How to Reset SQL Server Password without Access
How to Reset SQL Server Password without Access
Two authentication modes are available to access SQL Server, Windows Authentication mode and SQL Server Authentication mode. When you forgot or lost SQL Server SA password, if you have Windows Built-in Administrator privileges for SQL Server, you can access SQL Server using Windows Authentication mode first. And then reset SQL password.
But if you always couldnÕt login into SQL Server with Windows Authentication mode successfully, how do you reset forgotten SA password for SQL Server?
Now, we have to make use of third-party software and Command Prompt.
But if you always couldnÕt login into SQL Server with Windows Authentication mode successfully, how do you reset forgotten SA password for SQL Server?
Now, we have to make use of third-party software and Command Prompt.
- Reset SQL Password with SQL Password Genius
- Reset Forgotten SQL Password with Command
Way 1: Reset SQL Password with SQL Password Genius
SQL Password Genius full version could help to reset all user passwords set for SQL database file, master file. Just with master.mdf file and SQL Password Genius, SQL password could be reset or changed.
1. Get SQL Password Genius and install it on your computer.
Tips: Please remember to stop SQL Server Service before SQL Password Genius resets SA password.
2. Run it and open SQL Server master file in it.
2. Run it and open SQL Server master file in it.
Click ÒOpen FileÓ button on password software, to browse master file on your computer. Open it and it would appear in this software. At the same time, all the users for master file are listed.
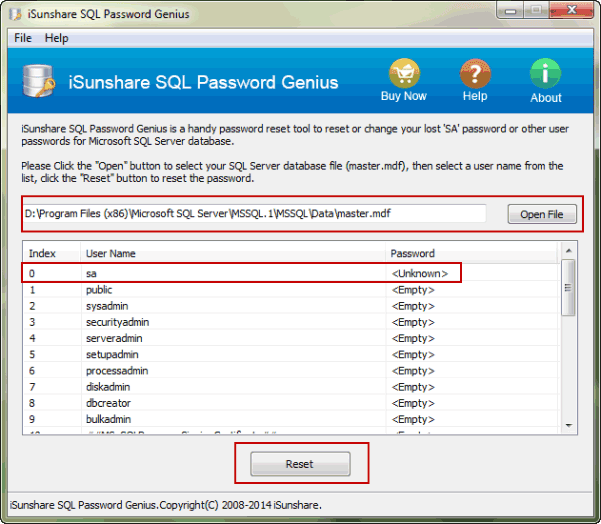
3. Reset SQL SA Password.
3. Reset SQL SA Password.
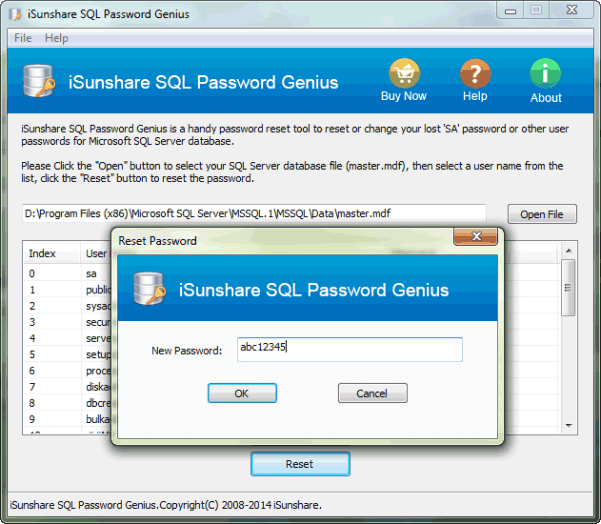
Select the user you want to reset password and whose password is unknown. Now, we select ÒsaÓ account and click ÒResetÓ button. Instantly, a window pops up with a box. Type a new password in box and click ÒOKÓ.
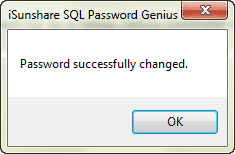
Message ÒPassword successfully changedÓ would tell you SA password has been reset. And then you can see it in user list.
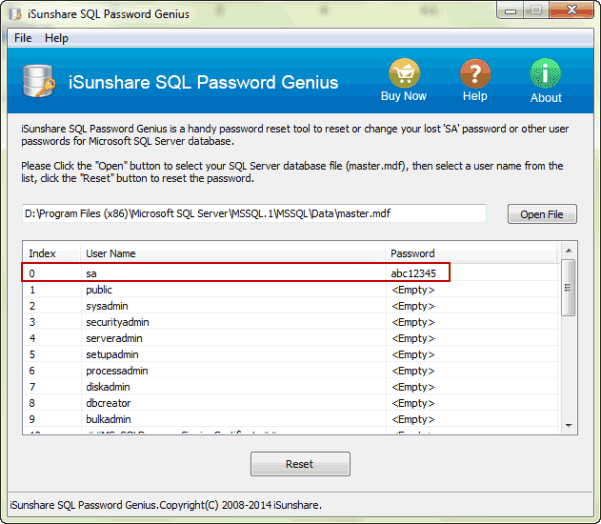
After SA password is reset, exit SQL Password Genius and start SQL Server Service. And then turn to open SQL Server Management Studio to login with SA account and new password.
Message ÒPassword successfully changedÓ would tell you SA password has been reset. And then you can see it in user list.
After SA password is reset, exit SQL Password Genius and start SQL Server Service. And then turn to open SQL Server Management Studio to login with SA account and new password.
Way 2: Reset Forgotten SQL Password with Command
1. Click Start Ð Run, and then type ÒcmdÓ in Run box. Press Enter to run Command Prompt.
2. Type following commands, and press Enter after each command line.
Osql CS yourservername CE
1> EXEC sp_password NULL, yourpassword, sa
2> GO
Above commands could help you to reset SA password in SQL Server. But if you donÕt have Windows administrator privileges, you couldnÕt reset SQL password with commands.
2> GO
Above commands could help you to reset SA password in SQL Server. But if you donÕt have Windows administrator privileges, you couldnÕt reset SQL password with commands.
Go to link Download
Sunday, February 26, 2017
How to Upgrade to iOS 8 without Losing Data
How to Upgrade to iOS 8 without Losing Data
Under normal circumstances, after upgrading iPhone/iPad/iPod Touch to iOS new version, such as iOS 8, data on iOS device would be lost. This is not what we want really.
So which measures can we take to prevent data loss after iOS upgrade?
- Measure 1: Create a iTunes backup for iOS device
- Measure 2: Make a iCloud backup for iOS device
Measure 1: Create a iTunes backup for iOS device
Once you connect your iOS device to computer installed with iTunes, before iOS upgrade, you will have two choices to back up data on iOS data.
Choice 1: Back up iOS data manually with iTunes
- Open iTunes, and your iOS device (e.g. iPhone) is shown on the right bottom side of iTunes interface.
- Click it and go to its main interface.
- Under Summaryoption, click Back Up Now in Backups part.
Then back up message and progress can be seen at the top of iTunes window. The iTunes backup file is usually saved in these folders. You can go to check them.
- Windows 7: C:UsersisunshareAppDataRoamingApple ComputerMobileSyncBackup
- Windows 8/8.1: Users>USERNAME>AppData>Roaming>Apple Computer>MobileSync>Backup
- Windows XP: C:Documents and SettingsuserApplication DataApple ComputerMobileSyncBackup
Choice 2: Sync your iOS device to iTunes automatically once connected
If you would like to back up iOS device like this, you should set your iOS device automatically synced to iTunes when iOS device is connected to computer.
The iTunes backup also saved in the same location as manually back up iOS device with iTunes.
Measure 2: Make a iCloud backup for iOS device
Before you back up your iOS device data to iCloud, please make sure iCloud Backup is turned on , and Wi-Fi and Apple ID are available. Your iOS device is not locked because of passcode forgot.
Navigate to Settings - iCloud - Restore & Backup - Back Up Now, while you have signed to iCloud with Apple ID. If not, sign in to iCloud when you are prompted.
Navigate to Settings - iCloud - Restore & Backup - Back Up Now, while you have signed to iCloud with Apple ID. If not, sign in to iCloud when you are prompted.
With backup in hand after iOS upgrade, if we want the previous data on iOS device are still on it now, we have to restore iOS device data from backup.
However, how can we restore iOS device data after iOS upgrade from backup?
- Restore iOS from iTunes backup or iCloud backup is OK.
- But are there any other more effective ways to recover iOS data?
Surely there are. For example, iOS Data Genius gives users privileges to scan iTunes backup file first to see what are saved in it, so users can choose what they want to recover, or recover all the data from iTunes backup file. This way prevents iOS device from restoring from wrong iTunes backup file and saves time.
- How to Restore iOS Device Data from iCloud and iTunes
- Why and How to Make a Data Backup for iPhone/iPad/iPod
- How to Recover iOS Data from iTunes Backup with iOS Data Genius
- Locked out of iTunes Backup Ð How to Reset iTunes Backup Password
- How to Recover iPad Deleted Files | iPad File Recovery
Go to link Download
Tuesday, February 21, 2017
Upgrade to Which Windows System after without Windows XP
Upgrade to Which Windows System after without Windows XP
With the Microsoft announcement about stopping support Windows XP since April 8 in 2014, Windows XP users have to make hard decisions. Go on running Windows XP, turn to use Linux or upgrade to Windows new operational system? According to the survey, there are still many people choose to use Windows XP in later few years. The problems Windows XP users need to mention have introduced in where to go if without support for Windows XP.
For computer users who have been accustomed to using Windows XP in previous few years, suddenly turn to run Linux instead of Windows XP is hard to adapt. Believe more and more people would choose to upgrade Windows XP to new operational system, such as Windows 7 and Windows 8, except those persons who are obsessed with Windows XP.

Now, all PC computers and laptops can be upgraded to Windows 7/8. So now letÕs discuss the problems necessary to be thought about during choosing which Windows system instead of Windows XP.
First, consider computer hardware configurations.
Does Windows XP computer hardware configuration satisfy the conditions to upgrade to Windows 7 or Windows 8?
ThatÕs no doubt that Windows 7 and newer Windows systems need more advanced hardware configuration compared to Windows XP. If you want to upgrade Windows operational system to Windows 7, computer hardware configuration has to be mainstream configuration gotten after 2006.
Detailed configurations:
Detailed configurations:
- CPU: 1GHz or above; double kernel CPU;
- Memory: 1G or above (2G and above better)
- Disk: 16 G and above, suggest leave 100G and above and disk utilization had better not be higher than 75%.
- Graphic Card: WDDM driver available for DirectX 9
- Driver: Many OEM have not prepared drivers for new operational system in old device. Old device would affect use and stability of new Windows operating systems.
Windows 8/8.1 is not designed to run in Windows XP old computer. So if you prepare to upgrade to Windows 8, suggest run Windows 8 Upgrade Assistant to check whether old computer has achieve the lowest demand.
Second, consider choosing Windows system according to ease-of-use
After making sure computer hardware configuration, we should consider to select which operational system according to its ease-of-use. On similarity, Windows 7 is more similar to Windows XP on interface. It would be easy to know Windows 7 well more quickly than Windows 8. But it would take more time and disk to install nearly about 100 patches.

And Windows 8/8.1, there have been so many changes on interface. Computer users have to spend more time to be familiar with it. Compared with Windows 7, Windows 8 doesnÕt need to install many patches and Windows system boots more quickly.
Third, choose 32-bit or 64-bit Windows operating system
Now 64-bit operational system has become the trend, because most of 32-bit programs could run successfully in 64-bit operating systems, but 64-bit programs are hardly to run in 32-bit Windows systems. At the same time, 64-bit Windows system would occupy more memory and disk. So according to computer memory and disk, choose appropriate Windows operational system. Try hard to choose 64-bit operating system.
At last letÕs see how new Windows operational system would influence our computers after Windows 7 or Windows 8 installation.
Whether operating system would influence the programs running in previous Windows system?
This is the problem we always worry about after Windows system upgrade. CD-ROM or USB flash drive is needed to fully install Windows 7/8/8.1 in Windows XP old computer. Therefore, all the usersÕ files and programs previously installed on this computer could not be moved automatically. Computer users have to reinstall all programs new version manually applying to Windows 7/8, and copy user files to new operational system.
Tips: How to move files from old operational system to new one
Tips: How to move files from old operational system to new one
Related articles:
- Three Major Differences between Windows 8 and Windows 7 Ð Security/Design/Version
- Operational System Differences Ð Linux/Windows/Chrome/Mac OS X
- 10 New Features in Windows 8.1
- Configure Windows 7 Security Settings and Deployment