
Showing posts with label install. Show all posts

Saturday, April 29, 2017

Which Version of Windows 8 Could I Choose to Install

Which Version of Windows 8 Could I Choose to Install


Compared to Windows 7, there are only four versions for Windows 8 to choose, Windows 8 Standard, Windows 8 Professional, Windows 8 Enterprise and Windows RT. And these four versions satisfy the demand of common consumer, professional computer user, and enterprise user, which makes computer usersÕ choice easy.

Now see the simple introductions about Windows 8 versions.

Windows 8 Standard:

Generally, Windows 8 Standard is called Windows 8. For common computer user, Windows 8 is the best choice. Windows 8 provides bran-new Windows Store, Windows Resource Management, Task Management and other services only provided in previous Windows Ultimate and Enterprise. And you can choose appropriate language version according to your requirements.

Windows 8 Professional:

Also called Windows 8 Pro, a series of Windows 8 powerful technology are provided for technophiles and business/technical personnel, including encryption, virtualization, PC management and domain name connection etc. Compared with Windows 8 Standard, this version provides more functions, but they are not necessary for most general users.

Windows 8 Enterprise:

Besides the functions included in Windows 8 Pro, Windows 8 Enterprise also provides PC management and deployment, advanced safety and virtualization etc.

The special function in Windows 8 Enterprise introduced in details below:

  • Windows To Go: Enterprise user could get "Bring Your Own PC" experience, and user could run Windows 8 anytime with USB device, making Windows operational system, application and data gone with computer user.
  • DirectAccess:  Enterprise user could login enterprise Intranet without VPN. It helps manager maintain computer and update software.
  • BranchCache: It allows user to cache file, web page and other content, avoiding frequently repeated downloads.
  • AppLocker: Limit running file and application allowed by user groups to solve problem.
  • VDI enhanced edition: Bring enhancement in Microsoft Remote FX and Windows Server 2012, and rich experience for user because of 3D graphic display and touching device.
  •  New Windows 8 Application Deployment: Windows 8 Enterprise user could get the auto deployment of Windows 8 Metro application.

Windows RT:

This is new Windows system version. It would not be on sale individually, released only by pre-installation. There is optimized Microsoft Word, Excel, PowerPoint and OneNote, but unfortunately not allowed other desktop software installation. Users have to create Metro application through WinRT development environment.

So according to the introduction above, now make a summarization to see which Windows system version applies to which kind of computer user.

Windows 8 version

Users Position

Standard

Common computer user

Professional

Professional computer user, technophiles

Enterprise

Enterprise user


After the installation of Windows 8, the next step is to activate Windows 8. 


Related Articles:
  • Windows 8 Security Knowledge
  • 10 New Features in Windows 8.1
  • How to Find Windows 8.1 Activation Key
  • 8 Effective Ways for Windows 8 Password Reset
  • 10 General Secure Settings Options for Windows 8


Go to link Download

Read more »

Monday, April 10, 2017

How To Install All Software in One Click

How To Install All Software in One Click


How To Install All Software in One Click


Watch Video and Share With Your Friends.

How To Install All Software in One Click by MastiComputer

Go to link Download

Read more »

Tuesday, March 7, 2017

How to Use or Install USB Flash Drive as Ram in Computer Windows

How to Use or Install USB Flash Drive as Ram in Computer Windows


How to Use or Install USB Flash Drive as Ram in Computer Windows

How to Use USB Flash Drive as Ram in all computer windows.This is a good computer tipsNtricks post.In thistopic video we can practically describe it.I hope when you watch the tutorial you can use it for fun.Ram is a random access memory which stores data of software which you run.But some times we have use low GB Ram as a software run slow. Zubair Find the Solution to solve the Problem and say we can replace ram through Usb .Its Friends interest in this topic and Make a tutorial which is as follow.


How to Use USB Flash Drive as Ram in Windows... by vidhippo

Go to link Download

Read more »

Sunday, February 19, 2017

Install Android sdk emulator on linux ubuntu

Install Android sdk emulator on linux ubuntu


How to install android sdk emulator on ubuntu linux as well as how to install android sdk on windows operating system , there may be a slight difference, both android sdk in ubuntu linux as well as windows.

Android SDK emulator as an alternate, the other is to install BlueStacks Android emulator than if if it turns out the specifications we have a computer or laptop vga less than 512 HD or not to install the BlueStacks will find some problems like error 25000 which means that the driver vga or vga / graphic should be updated to the latest version .

I think this emulator using android sdk android emulator better than others because every time I install the application then the application can run properly. But while the other is virtually impossible according to different opinions depending on what they see and used.

Android sdk is android that can be used on a PC or laptop and it is an interesting thing, so we do not need to buy Android phone if we already have another phone but as long as we have a laptop or PC then it can be done on a PC / laptop and it is an excess of PC / laptop, which almost could install all kinds of operating systems.

In addition we can use android on ubuntu together we can also install applications such as WeChat , whatsapp and computer line so we can run android applications .

How to install android SDK emulator on ubuntu :


1. Download and install opn jdk di ubuntu dengan cara.

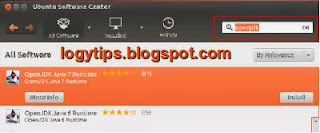
Her way is to install open jdk available in ubuntu software center or synaptic package manager. open ubuntu software center and then on the right there is a small box and write open JDK, and you will see open jdk 7 and open jdk 6 or you can see here OpnJDK 7
install open jdk ubuntu
In the terminal :
sudo apt-get install openjdk-6-jre

2. Download android sdk for linux here.
3. After downloaded extract on everywhere you like for example on Documents folder
4. Open terminal on ubuntu CTRL + Alt + T and type command :
  • sudo gedit ~ /. Bashrc
  • copy and paste this text at the very top
    #AndroidDev PATH export PATH=${PATH}:/home/???/Documents/android-sdk-linux/tools export PATH=${PATH}:/home/???/Documents/android-sdk-linux/platform-tools
    save and close note :the red texts is the name android sdk folder that i store on my ubuntu, adjust to your android sdk folder that you store and saved.
  • And type command text below :
  • sudo gedit /etc/udev/rules.d/51-android.rules
copy and paste this text :

SUBSYSTEM=="usb", ATTRS{idVendor}=="0bb4", MODE="0666"
SUBSYSTEM=="usb", ATTRS{idVendor}=="0502", MODE="0666"
SUBSYSTEM=="usb", ATTRS{idVendor}=="12d1", MODE="0666"
SUBSYSTEM=="usb", ATTRS{idVendor}=="1004", MODE="0666"
SUBSYSTEM=="usb", ATTRS{idVendor}=="22b8", MODE="0666"
SUBSYSTEM=="usb", ATTRS{idVendor}=="04e8", MODE="0666"
SUBSYSTEM=="usb", ATTRS{idVendor}=="0fce", MODE="0666"
SUBSYSTEM=="usb", ATTRS{idVendor}=="0489", MODE="0666"
SUBSYSTEM=="usb", ATTRS{idVendor}=="18d1", SYMLINK+="android_adb", MODE="0666"
SUBSYSTEM=="usb", ATTRS{idVendor}=="04e8", MODE="0666", GROUP="plugdev"
Source that text is from  Ubntu community.
after the text above saved reboot or restart your laptop or computer

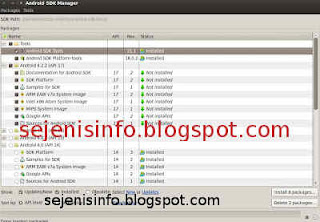
5. Open terminal CTRL + Alt + T and type "android"  without quotes to open android sdk emulator
android sdk on ubuntu

you can chooce android version that you will install
6. Click the install packages button on the right and accept license, wait after the downloaded done.
7. After all finish click tool tab is located at the top left.
8. A new windows will appear and click the manage avds button and click the new button to begin create android emulator on the right.
9. A new window will appear when the button is clicked and Insert your android name, select your choice according to size preference. If you want to change the size of the internal memory replace 200 to 512 and sd card to 1024 = 1GB and click OK.
10. Click start to open android will appear according to your choice.


To install Android sdk emulator on windows OS see here.

Go to link Download

Read more »

Sunday, February 12, 2017

How To Re install YOSEMITE If Necessary

How To Re install YOSEMITE If Necessary


How To Re-install YOSEMITE If Necessary?
How to re-install YOSEMITE if necessary?


YOSEMITE runs like clockwork on your Mac, but no one is immune from a major glitch. I cannot recommend that you perform backups to avoid losing all your data, on the day your hard drive or Mac come to give up the ghost. One is never too careful in this area (see page "Backup and cloneÓ).

If you are ever faced with the need to reinstall YOSEMITE or because you do not have a choice, either because the system seems increasingly fails, then the relocation of course depends on your configuration and the type of backup (s) you have made.


How to perform a clean installation of YOSEMITE?


Case 1: You have a clone (and possibly a USB bootable installation YOSEMITE)

This is probably the best possible configuration to reinstall YOSEMITE. Youll very quickly find all your work environment. Three options are available:


a) Start on this clone (by selecting it as the boot volume in the "Start" module in "System Preferences"). You will now simply launch your cloning software since this clone to delete your main OS X volume and clone (clone so) back to the main volume. Then select your new volume "OS X" in the main "Start" module, and presto! Voila! Everything is as before!


b) If you prefer a "clean install" (clean install), then no problem, start on clone your main OS X boot volume with "Disk Utility", start the OS X installer YOSEMITE located in the folder "Applications" your clone (if you followed my advice when installing YOSEMITE, he must find it - See page "Install" ) and install it on YOSEMITE main volume stark naked. "Migration Wizard" will start automatically and then you can simply transfer your data and settings from the clone.

Just think then to launch the menu "Software Update" from the Apple menu to make, if necessary, to the various proposed updates, including those regarding YOSEMITE OS X system.


c) If you have a bootable USB drive installation YOSEMITE crafted by your own care (See page "Install" ), then you can start on this USB stick to make a "clean install" of YOSEMITE, according to the same procedure as described above (b). But again, if you have a clone, it really is not essential to have a bootable USB drive ... The clone is much more convenient.


Case 2: You do not have a clone, but you have a bootable USB installation of YOSEMITE

If you have crafted yourself installation bootable USB key (see page "Install" ) after downloading YOSEMITE Mac App Store, then you will be able to proceed with a new installation of YOSEMITE, starting on this key, deleting your main volume under OS X, by performing a "clean install" of YOSEMITE this blank volume .... But then (because in that case you do not have 2 clone)?


a) If you have a volume Time Machine, or possibly another Mac, you can use "Migration Wizard" to retrieve your data and settings, and then quickly find your environment work.


b) If you do not have Time Machine volume or another Mac, then I hope you are still crafted backups of your personal files (data, music, photos etc. ...). You will need to manually reinstall however (or even re-upload) all the applications you need, and then manually transfer your backups from all your personal data. A job that can take hours!


Case 3: You did not clone or bootable USB key installation YOSEMITE

Here things get tough again. Fortunately, APPLE has scheduled a "spare tire" in this case. It is possible to use the partition "Recovery HD" to get you out of pap. This is, in my opinion, far from being the best solution compared to clone and possibly a bootable USB drive, but it can really help when you are not providing enough. Again three possible configurations:


A) Once you have started on this "Recovery HD", you will be able to restore your backup Time Machine ... if you heard a Time Machine backup (this will be a lesser evil).


b) If you do not have Time Machine backup, then the only solution is to reinstall YOSEMITE. But unlike a bootable USB drive, this partition "Recovery HD" contains no installation file YOSEMITE. You will therefore be necessary to re-download the installer YOSEMITE. That is, if you need to reinstall YOSEMITE in this configuration, it is necessary to have an Internet connection to re-download some 5 Giga installer. Not necessarily very practical, you will agree. NB: You can pre-boot your OS X volume by using "Disk Utility" also located on this partition "Recovery HD".


c) By default this partition "Recovery HD" is installed on the same hard drive where you installed YOSEMITE. But what happens there if unfortunately your hard drive were to let go? Without clone bootable USB drive without installation YOSEMITE, it will NOT POSSIBLE not boot from this partition "Recovery HDÓ!!! So what?

Apple offers to download a "recovery disk wizard." This wizard letÕs just clone the partition "Recovery HD" to another hard disk (external drive) or even a USB drive. But be careful, in this case, this key will IN NO EVENT USB key OS X bootable installation, but it will just be a clone of the partition "Recovery HD" you already have on your hard drive. You can use this partition clone "Recovery HD" if you cannot use the partition "Recovery HD" located on your disk.

Its a little spare tire of the spare wheel.

NB: It is necessary to make the partition clone "Recovery HD" before the partition "Recovery HD" is no longer operational, of course.


For complete information and to download the "Disk Recovery Wizard" is HERE.


Case 4: You did not clone or bootable USB key installation YOSEMITE, you do not clone your partition "Recovery HD" and lose your hard drive (only Macs sold before Release LION 10.7)

There is the extreme case. What to do in that case?

1. Change your hard drive.

2. If you have a bootable installation of LION, MOUNTAIN LION or MAVERICKS then use there to re-install initially the earlier version of OS X on the blank hard drive and then download it again YOSEMITE Mac App Store and then install from YOSEMITE.

If you have an installation DVD of Snow Leopard, you can install Snow Leopard on your Mac, and then download it again YOSEMITE Mac App Store and then install from YOSEMITE. Note: if your machine is still accepting SNOW LEOPARD of course.


If you have no bootable USB drive or DVD installation of Snow Leopard, then you are not out of the woods. The only solution is that a friend lends you a key USB bootable OS installation X (10.7, 10.8 or 10.9) or an installation DVD SNOW LEOPARD.


If your Mac is new (purchased after the release of LION 10.7 and 10.7 with a minimum LION installed on your hard drive originally) then do not worry, you do not enter in this case 4. You still have a spare wheel and are in the case 5 (below).


Case 5: On Macs sold since the release of Lion (Mac with at least OS X Lion installed on the hard drive)

This is a special case.

If you have no bootable USB key or clone or downloaded installer on the Mac App Store and saved, so it is essential you reinstall YOSEMITE starting on partition "Recovery HD" by selecting the "Reinstall OS X" menu (after booting your volume with "Disk Utility" also located on this partition "Recovery HD").


Macs sold since the release of LION and therefore come with LION MOUNTAIN LION, MAVERICKS or YOSEMITE now installed on the machine, also have a function "OS X Internet Recovery" that allows you, in case of failure your hard drive and / or hard disk change, start your Mac directly from APPLE servers to process resettlement OS X. This feature is not available for Macs before the release of LION and therefore which had been purchased with a previous version of the system (Snow Leopard and earlier).


"OS X Internet Recovery" checks your machine, including its serial number (to verify that your Mac is allowed), and then automatically downloads and launches an image of the hard drive recovery.

To do this, you must have an Internet connection because you will have to download more than 5 GB of data necessary for the relocation YOSEMITE!!


More on "Internet Recovery OS X" HERE .


Why make it simple when you can make it complicated? Some will no doubt think that this system is practical and modern because it avoids having to annoy to reinstall OS X, but I honestly think that APPLE would be much better to continue to offer the sale of bootable USB keys OS X and especially to slide one in all cartons sold Mac OS X, rather than forcing new buyers to go through this function "OS X Internet Recovery" really not practical. Everyone does not necessarily have a high speed Internet connection, and how to reinstall OS X and its MacBook Air or MacBook Pro when you are in a place without an Internet connection?


Indeed, the new Mac buyers have no choice but to go through Apples servers to reinstall OS X if something goes wrong with their hard drive, they have neither USB Bootable of installation or installer (downloaded from the Mac App Store) they could use from a clone.


In short, after reading the above, it is better to take all possible precautions to deal with any difficult situation. I do know strongly advise you to urgently provided a clone of your YOSEMITE installer and / or you make a bootable USB installation YOSEMITE key.


Chart Updates

To help you find your way in the updates for YOSEMITE, here is the summary, in order of their release, all day-to-Stakes for the official arrival of the new version of OS X in October 2014, and the numbers of builds.

Just click on a particular update to access the APPLE website offering its download page.


10.10.0: 14A389

10.10.1: 14B25


10.10.2: 14C109


Go to link Download

Read more »

Tuesday, December 27, 2016

Cara Mengatasi Access is Denied ketika Install Aplikasi

Cara Mengatasi Access is Denied ketika Install Aplikasi


Cara mengatasi Access is Denied ketika menginstall aplikasi atau program pada windows 7. Bisa disebabkan karena kurangnya hak administrasi. Anda harus login sebagai Administrator Lokal (Local administrator) dan pada komputer jaringan (domain) Anda perlu login sebagai administrator lokal (bukan administrator Domain).


Cara Mengatasi Access is Denied ketika Install Aplikasi. Silakan anda aktifkan akun Administrator di windows 7. Kesalahan pada User Account Control, kadang UAC juga akan membatasi anda dalam mengakses lokasi file/registri tertentu. Sebaiknya saat anda akan menginstal aplikasi gunakan ÒRun as AdministratorÓ untuk bisa menggunakan hak akses admin secara penuh.

Dalam kasus tertentu, perlu menonaktifkan sementara UAC, yaitu dengan cara:

- Klik start menu, pada kolom  ÒSearchÓ  ketik UAC
- Klik ÒChange User Account Control settingsÓ
- Geser slider ke ÒNever NotifyÓ lalu OK.
- Restart komputer dan anda bisa coba instal lagi aplikasi yang tadi gagal.
- Kembalikan ke pengaturan UAC semula, jika sudah berhasil.

Apakah masih gagal dengan cara diatas? kita coba cara berikutnya yaitu menonaktifkan "security software" seperti antivirus, windows defender, windows firewall, Mc security dan security software sejenis lainnya. Setelah berhasil kembalikan(aktifkan) lagi perangkat keamanan Anda. Lokasi umum yang ditolak perizinannya (denied permissions) ada pada folder Temp dan Installer pada Windows anda.

Anda bisa baca Cara mengambil izin kepemilikan (take ownership) file atau folder di windows. Perlu ketelitian dalam mengatasi masalah Access is Denied ketika Install Aplikasi atau program. Semoga bermanfaat dan sukses untuk anda.

Go to link Download

Read more »

Thursday, December 22, 2016

Cara Install IDM Full Atasi Fake Serial Number Solusi Total

Cara Install IDM Full Atasi Fake Serial Number Solusi Total


Cara instal dan mengatasi fake serial number pada IDM, cara menghilangkan perintah update IDM, cara menghilangkan Notifikasi Reinstall IDM dan bagaimana cara instal IDM agar bisa full bekerja dan bisa digunakan untuk download, berikut solusinya.
Pertama jika anda punya IDM lama, perlu di uninstal dulu secara Full (centang pilihan full) pada saat masuk ke proses uninstal. lalu download IDM yang baru.

Download IDM disini

Download Pacth

Cara download tunggu hingga muncul lingkaran merah menjadi penuh, lalu klik download lalu klik save file, OK.

Atau bisa juga Download Pacth disini.

Instal hingga selesai, lalu tutup dulu IDM anda (exit dari tray icon IDM di kanan bawah layar) atau jika terlanjur Exit dulu dari Task Manager, tekan [CTRL+ALT+DEL] lalu cari Internet Download Manager > klik kanan + pilih End Task.

Jalankan Patch-nya, (terdapat 4 patch didalam file rar) pilih salah satu dulu, jika gagal ganti yang lainnya. Cara pakainya adalah klik kanan patch > Run as Administrator > YES

Lalu klik Patch, (beri centang pada Save Oringinal)

Masukkan Nama depan anda (bebas) lalu Enter.

Masukkan kembali Nama belakang anda (bebas) lalu Enter.

Dan setelah itu akan muncul tulisan Patching Done. Selesai.

Silakan anda cek apakah IDM sudah full dengan membuka IDM-nya. Klik Tab Registration, dan jika pada Registration-nya sudah tidak aktif (tidak bisa di klik)  artinnya IDM full sukses dibuat.


Cara memperbaiki IDM Fake serial number:

Keluar/exit dari  IDM, ( tutup IDM Tray Icon di kanan bawah).
Buka directory IDM di programnya, ini bisa berbeda-beda tergantung windowsnya, yang penting cari bagian tulisan merah berikut ini. Misalnya (untuk win 7  64 bit) ada di (C:Program Files(x86)Internet Download Manager) lalu cari File  IDMGrHlp.exe lalu rubah nama dan ekstensinya menjadi idmhelp_old.exe Enter/OK setelah selesai merename File dan klik continue jika muncul notifikasi. Selanjutnya anda cari idmBroker.exe lalu rename menjadi IDMGrHlp.exe lalu enter > continue.

Cara ini akan menghilangkan semua notifikasi yang sering muncul di IDM. Adapun cara merename adalah klik kanan file lalu pilih rename. Jika nama file diatas belum terlihat lakukan cara berikut.

- Buka windows explorer > Organize > folder and search options.
- Pilih tab view > buang centang di hide extentions for known file types > OK


Sekarang trik agar pesan Update IDM tidak muncul di windows anda.

Masuk registry caranya tekan tombol (Windows+R), lalu ketik regedit lalu OK.

Buka/klik HKEY_CURRENT_USER > Klik Software

Klik kanan DownloadManager  > new > DWORD (32/64 bit) value, Pilih sesuai system yang anda pakai.

Ketik nama AutoUpdate (dan biarkan setingan default 0)

Kemudian pada sebelah kanan cari dan klik kanan di ExceptionServers Klik > modify, tambahkan  *.tonec.com  pada baris terakhir (beri spasi)  > OK

Exit registry dan Restart Komputer anda.

Sekian cara instal IDM cara atasi fake serial number pada IDM, cara menghilangkan perintah update IDM, cara menghilangkan Notifikasi Reinstall IDM dan bagaimana cara instal IDM agar bisa full bekerja.

Go to link Download

Read more »

Monday, November 21, 2016

How to Install SQL Server 2012 on Windows Server 2012 R2

How to Install SQL Server 2012 on Windows Server 2012 R2


Now I have gotten SQL Server 2012 Enterprise version, but how can I install it on computer or server?

First, letÕs see which Windows system SQL Server 2012 installation requires. And install SQL Server 2012 on that Windows system. Besides, we have to pay attention to the preparation needed for SQL Server 2012 installation.

1. Windows system requirement


From the description of Microsoft support, we know that SQL Server 2012 Enterprise, not only 32-bit, but also 64-bit, has to be installed on Windows Server 2012 Essentials 64-bit.

And now I have to install Windows Server 2012 Essentials 64-bit on VMware. LetÕs take a try with following introductions.

2. Steps to install SQL Server 2012 on Windows Server 2012 R2


Because what we get is SQL Server 2012 ISO file, so we have to add it to virtual disk on Virtual Machine first. And then open SQL Server 2012 ISO file in virtual disk, so we could run SQL Server setup program.

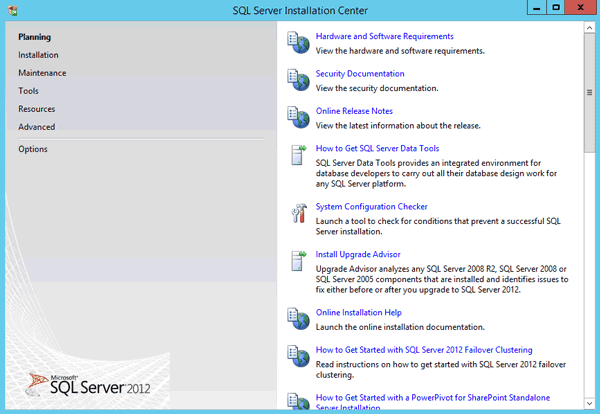
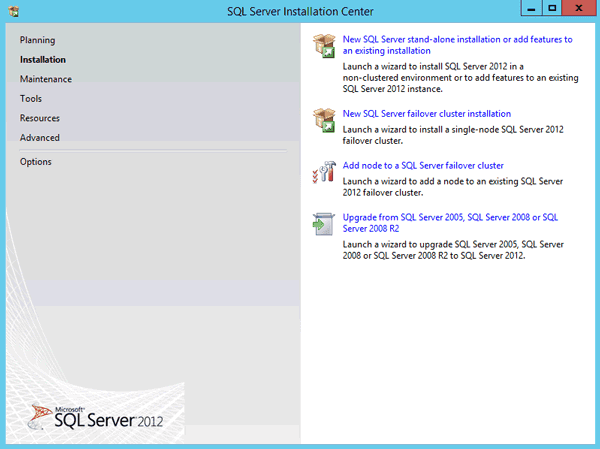
Step 1: SQL Server Installation Center runs.
enter SQL Server installation center

Step 2: Select ÒInstallationÓ option and click ÒNew SQL Server- stand-alone installation or add features to an existing installationÓ.

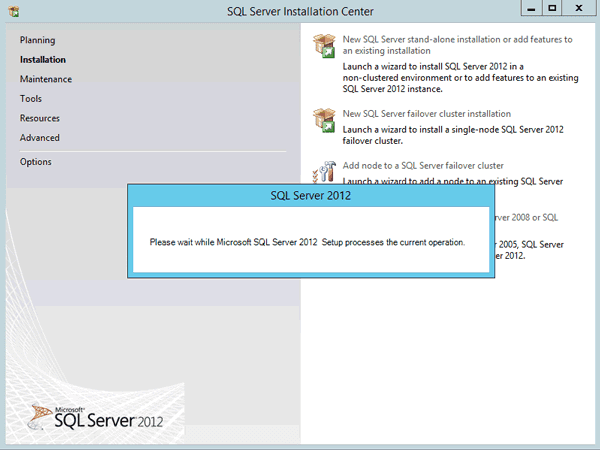
Step 3: Wait a minute when Microsoft SQL Server 2012 Setup processes the current operation.
wait for SQL Server 2012 setup process

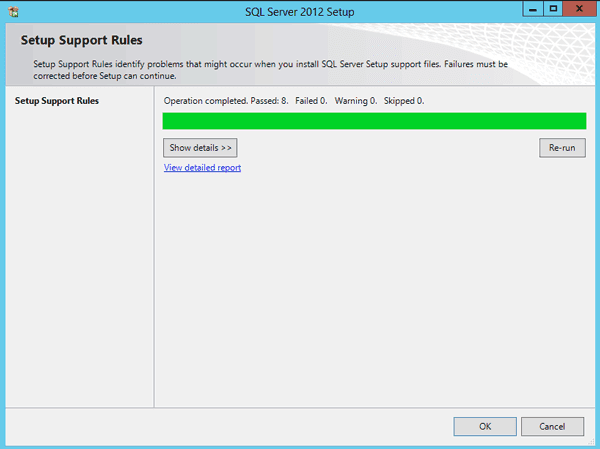
Step 4: SQL Server 2012 Setup Support Rules identity problems that might occur when you install SQL Server Setup support files. Failures must be corrected before Setup can continue. Click ÒOKÓ.
SQL Server 2012 setup support files

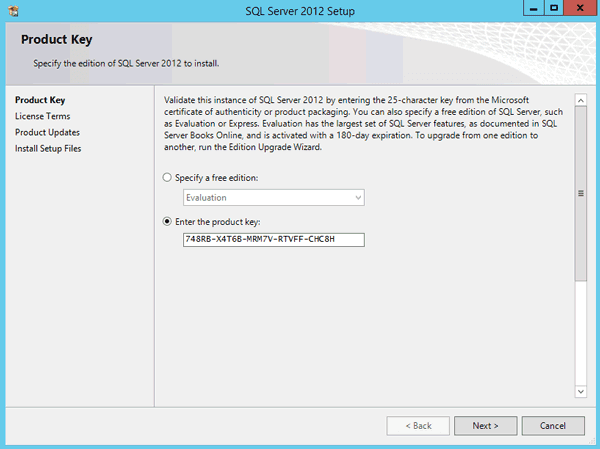
Step 5: Specify a free edition or ÒEnter the product keyÓ for SQL Server 2012.
enter SQL Server 2012 product key

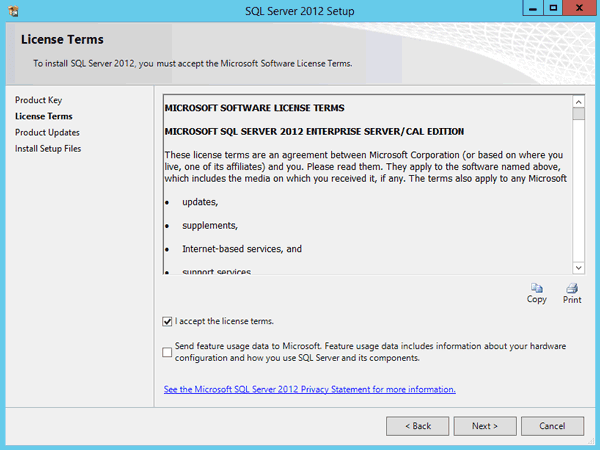
Step 6: Accept the license terms and click ÒNextÓ.
accept SQL Server 2012 license terms

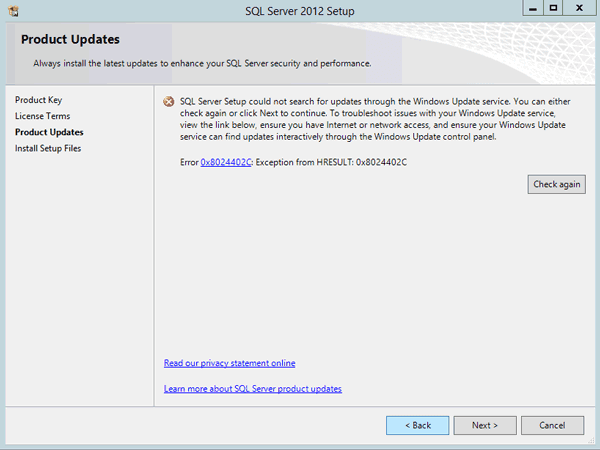
Step 7: Click Next after Product Updates.
SQL Server 2012 product updates

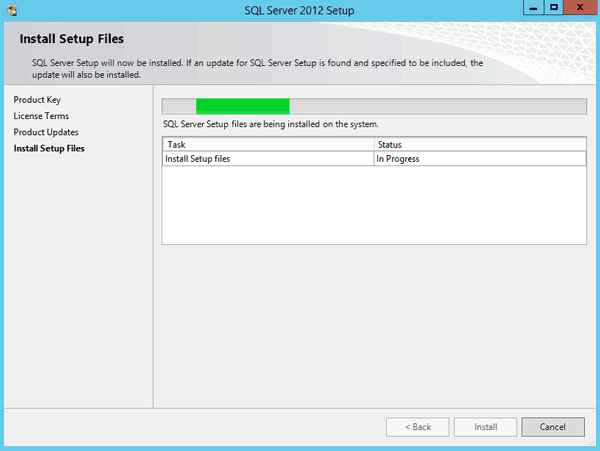
Step 8: Install Setup Files.
install SQL Server setup files

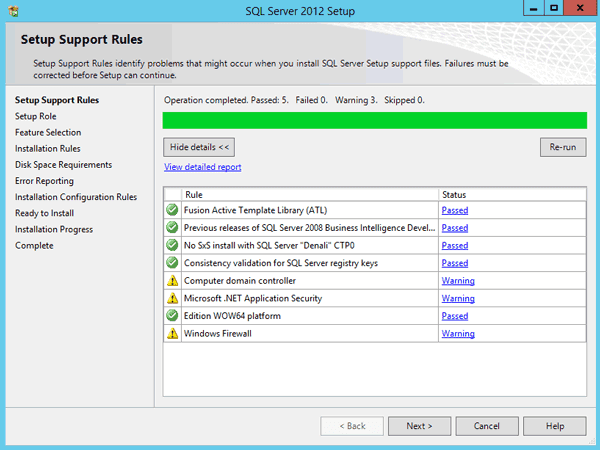
Step 9: Setup Support Rules again and their status is listed.
SQL Server setup support files identify problems

Tips: If the warning is not so important to influence SQL Server 2012 installation, we can ignore it and click ÒNextÓ. If it would make SQL Server installation failure on feature you need to install, solve the problem first and then begin to install SQL Server 2012.

For example, .Net Framework 3.5 would make SQL Server manage tools installation failed, so we have to make sure it has been installed successfully in Windows system or turned on. But unfortunately, .Net Framework 3.5 could not been turned on like other Windows features in Windows Server 2012 (R2) or Windows 8/8.1. So if you have any question on .Net Framework 3.5 installation, please turn to Microsoft support: http://support.microsoft.com/kb/2734782


Or get details here to install it when you have Windows Server 2012 R2 installation disc:

How to install .Net Framework 3.5 in Windows Server 2012 R2

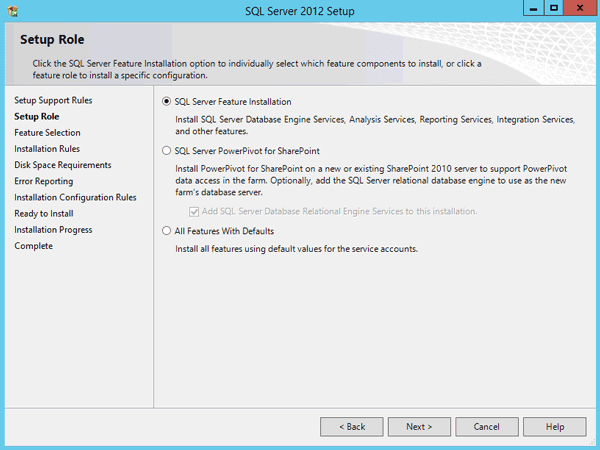
Step 10: Select ÒSQL Server Feature InstallationÓ in ÒSetup RoleÓ and click ÒNextÓ.
choose SQL Server feature installation

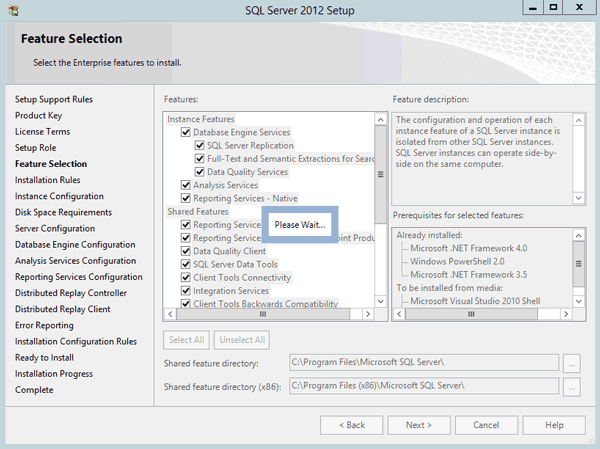
Step 11: Select the SQL Server Enterprise features to install.
select SQL Server features to install

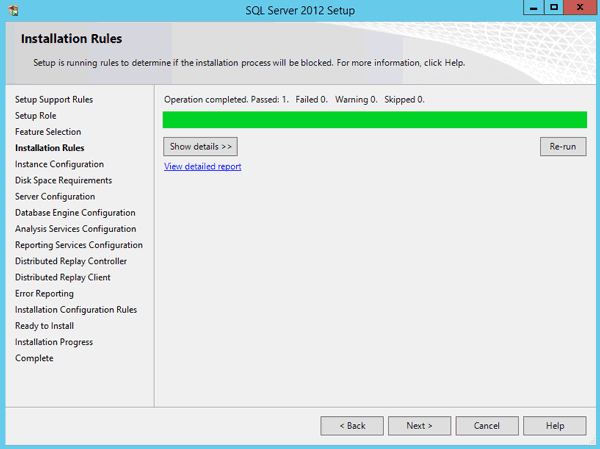
Step 12: Run rules to determine if the installation process will be blocked. Click Next.
SQL Server Setup runs rules

Step 13: Specify the name and instance ID of the instance of SQL Server.

Instance ID becomes the part of the installation path.

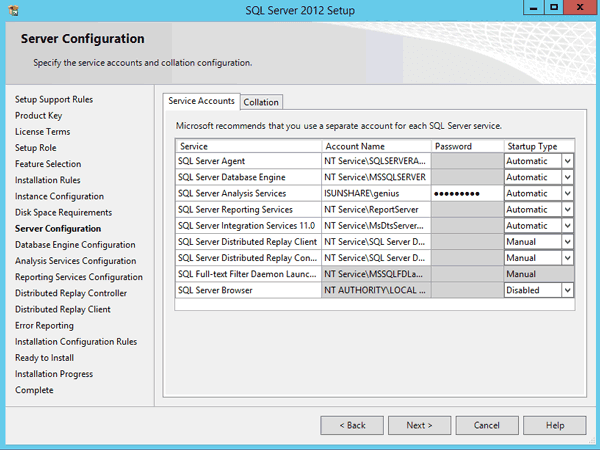
Step 14: Server Configuration. Specify the service accounts and collation configuration. Click ÒNextÓ.
specify server and SQL Server services account

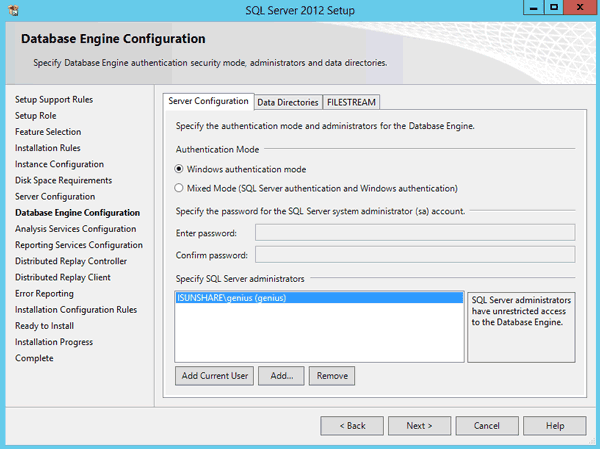
Step 15: Specify Database Engine authentication security mode, administrators and data directories. Click Next.
configure SQL Server Database Engine

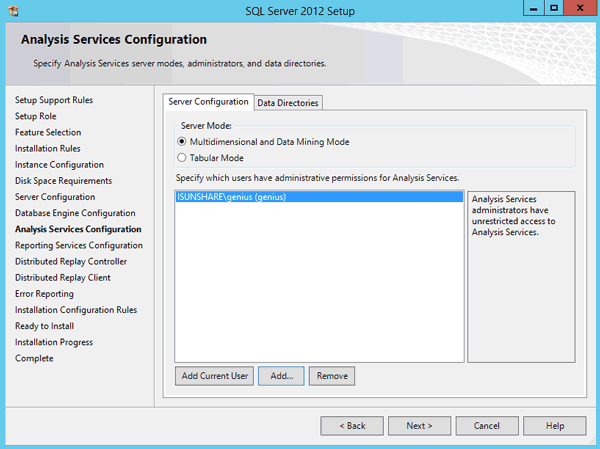
Step 16: Specify Analysis Services server modes, administrators, and data directories. Click Next.
configure SQL Server analysis services

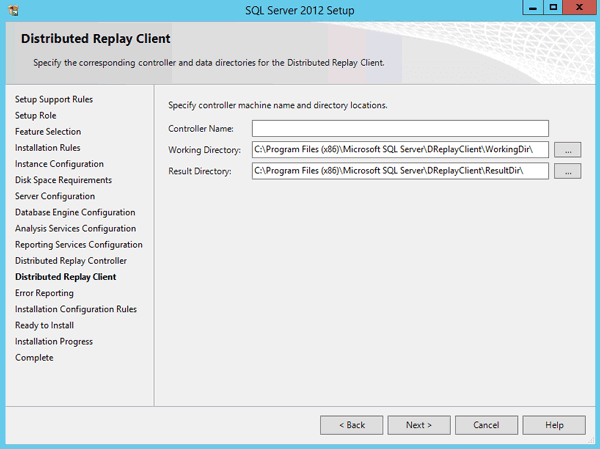
Step 17: Specify the corresponding controller and data directories for Distributed Replay Client, including Working Directory and Result Directory. Click Next.
configure SQL Server directory locations

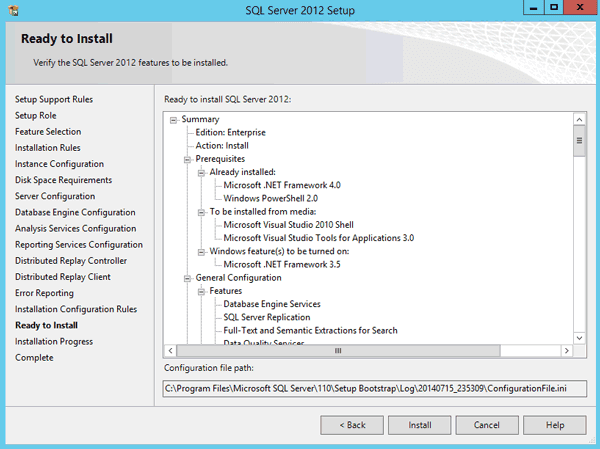
Step 18: Verify the SQL Server 2012 features and click ÒInstallÓ to install them on Windows Server 2012 R2.
verify and install SQL Server features

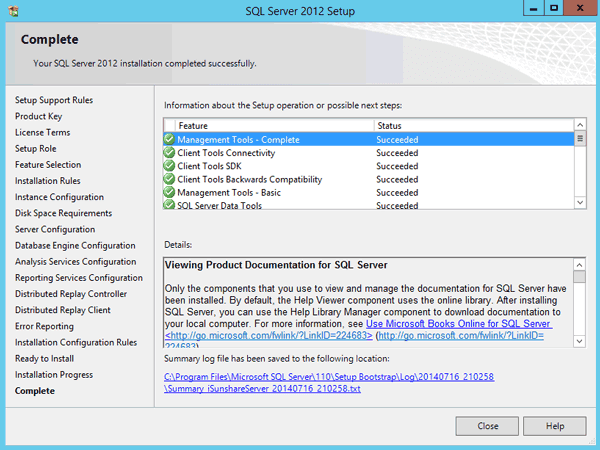
Step 19: And then you would get a message which SQL Server features you selected has been installed successfully. Click ÒCloseÓ and then run SQL Server 2012 on Windows Server 2012 R2.
complete SQL Server 2012 installation

3. Something in installation we should pay attention:


.Net Framework 3.5 is needed in SQL Server 2012 installation, but it could not be added into Windows system just by turning on such Windows features. The easiest way is to specify source file when you try to install it in Windows system. 


Related Articles:

  • How to Install Windows Server 2012 R2 on VMW
  • How to Create Virtual Drive in Windows Server 2012 
  • SQL Server 2012 SA Password Reset

Go to link Download

Read more »

Saturday, November 12, 2016

How To Install A Display Language On Windows 8 1

How To Install A Display Language On Windows 8 1


How To Install A Display Language On Windows 8.1
Hello friend! How are you? Hope you are very well. Today I am going to show you how to install a language on windows 8.1.

At first you need to download a language pack which language you want to install. Download from hereÉ . Open ÒRunÓ(For Run press Windows+R key). Write in the Run Òlpksetup.exeÓ then press ÒEnterÓ. Now will open a new window which name is ÒInstall or uninstall display languageÓ.Click on ÒInstall display languageÓ. Click on ÒBrowsÓ and brows your downloaded file where you saved (language Pack). Select the language pack then click OK--> Click Next--> Accept the terms and conditions--> Next. Now it takes sometimes. Please wait until it finished. After finishing this processes go to ÒControl PanelÓ--> Under the Clock, Language and Regionclick Add a Language click again Add a language. Now select your preferred language and click ÒAddÓ. Look your language already added. Click on your preferred language. Now click Move up. After doing this restart your computer.


After restarting your windows, you will see your computer display language changed. I mean your job is done.


Thanks to all of my friends.


Md. Manjurul Islam (Rubel)


Video of this tips


Go to link Download

Read more »

Monday, October 3, 2016

Offline How To Install Net Framework 3 5 On Windows 8 8 1 10

Offline How To Install Net Framework 3 5 On Windows 8 8 1 10


(Offline) How To Install .Net Framework 3.5 On Windows 8/8.1/10
Hello friend!

How are you? Hope you are very well. Long time latter I am here and writing a new tips. Today I am working with a brand new HP laptop, which one need to install windows 10 and already I have been installed windows 10 on that laptop.


But when I am trying to install Kaspersky antivirus, I have gotten an error massage. That massage for Microsoft .NET Framework 3.5. When I am going to install .NET Framework 3.5 over internet, but my network has some problem.


So that I was searched a new way to install the Microsoft .NET Frameworkand few minutes latter I got a solution. Yes, my friend today I am going to show you how to install .NET Framework 3.5 without internet connection. If you want to know how to do this, please follow my working procedures.


At first you need to download a batch file from hereÉ.

Now insert the installation disk into the laptop (DVD/USB drive)

Right click on that batch file.

Click on ÒRun As AdministratorÓ

Now automatically start installation process

Wait until the process is finished. After finishing that process your job is done. So my friend enjoy yourself.


Thanks

Md. Manjurul Islam (Rubel)


Video Of This Tips


[Note: This tricks also work on windows 8 and 8.1]

You May Like Also...
What Is The Difference Between FAT32, exFAT, and NTFS?
How To Show or Hide File Name Extensions in Windows 10/8.1/8/7/Xp
[Solved] Wifi Problem After Updating Windows 10, Limited Access or Not Connecting
How To Create A Video From Your MS PowerPoint

Go to link Download

Read more »

Tuesday, September 27, 2016

Install Windows 8 Developer Preview In VirtualBox Virtual Machine On Mac Windows 7 How To Tutorial

Install Windows 8 Developer Preview In VirtualBox Virtual Machine On Mac Windows 7 How To Tutorial


Microsoft took the veil off Windows 8 officially this 

Tuesday along also seeded the first Developer 

Preview to public and gained massive attraction. 

While many have installed them on their spare 

computers, what if you donÕt have one? Today weÕre 

showing you how to run Windows 8 and mostly all its 

features from within your current operating system.


In order to be up and running, all youÕll need is a free 

tool known as VirtualBox, which allows many 

operating systems to be installed as guests from 

within your main (host) system. YouÕll also need the 

Windows 8 Developer Preview. Once youÕre ready, 

just follow the steps below.


Step 1: Launch VirtualBox and click on the "New" 

button to create a new virtual machine. YouÕll be 

asked to enter your new virtual machineÕs name; just 

give it any name you wish. As for the operating 

system, you should select "Windows 7", as shown 

below.

Create-New-Virtual-Machine

Step 2: YouÕll now be asked to choose how much

physical RAM youÕd like to attribute to Windows 8. 

Typically, 1 GB is the ideal amount. You can go over 

it if you have the resources, just make sure you 

select nothing below 1 GB.

Create-New-Virtual-Machine-1

Step 3: YouÕll now have to create a virtual hard 

drive: this is a file where the operating system will 

be installed. Just follow the on-screen instructions, 

but remember to choose a size equal toor above 20 

GB, as shown below:

Create-New-Virtual-Disk
Step 4: Your virtual machine should have now been 

created, now youÕre all set to run it. The first time the 

virtual machine is started, a first-run wizard will 

appear: simply select your Windows 8 image file 

when asked, click "Continue" and wait for the 

installation to begin.


First-Run-Wizard

Step 5: Once the installer has fully booted up, simply 

select your language settings and follow the standard 

installation process. Since it is similar to that of 

Windows 7, we wonÕt go over into much detail here.

Windows-8-Running

Step 6: Once the installation is finished and your 

virtual machine reboots, you should be faced with 

Windows 8?s first run wizard. Just select your 

settings as you see fit, until you see Windows 8?s 

Start screen.
Windows-8-Running
Windows-8-Running1

Keep in mind that although the screenshots above

depict Windows 8 running on a Mac, the process is

the same for all operating systems, as long as 

VirtualBox supports them.

Enjoy Windows 8!

Go to link Download

Read more »